Official Mobile User Manual & Standard Operating Procedures
Mobile Field Operations Guide
A comprehensive operational manual covering Storekeeper central warehouse workflows, Supervisor personal Virtual Stores, peer-to-peer asset transfers, GPS-tagged installations, and offline site synchronization.
Document IDTS-MUG-2026-V1
Publication DateSeptember 2026
Total Modules15 Core Modules
Table of Contents
Structured guide to system operational procedures
Section 01: Getting Started
01.Overview & ArchitectureModule 1
• Introduction to TrackSmart
• The Asset Tracking Lifecycle
• User Roles & Responsibilities
02.Mobile AuthenticationModule 2
• Signing In
• Automated Role Dispatch
Section 02: Web Administration
03.Projects & Stores SetupModule 3
• Creating & Managing Projects
• Creating & Managing Stores
04.Items & Catalog ConfigurationModule 4
• Items & Hierarchy Groups
• Item Hierarchy Values
• Shared Item Properties
• Unique (Per-QR) Properties
• Measurement Units
05.Users & Access ManagementModule 5
• Creating Users
• Managing the User Register
06.Order Registration & DispatchModule 6
• Placing an Order
• Reviewing Dispatched Orders
07.Tracking, Map & ReportsModule 7
• Project-Wise Installation Map
• QR History & Chain of Custody
• Viewing Reports
08.QS VerificationModule 8
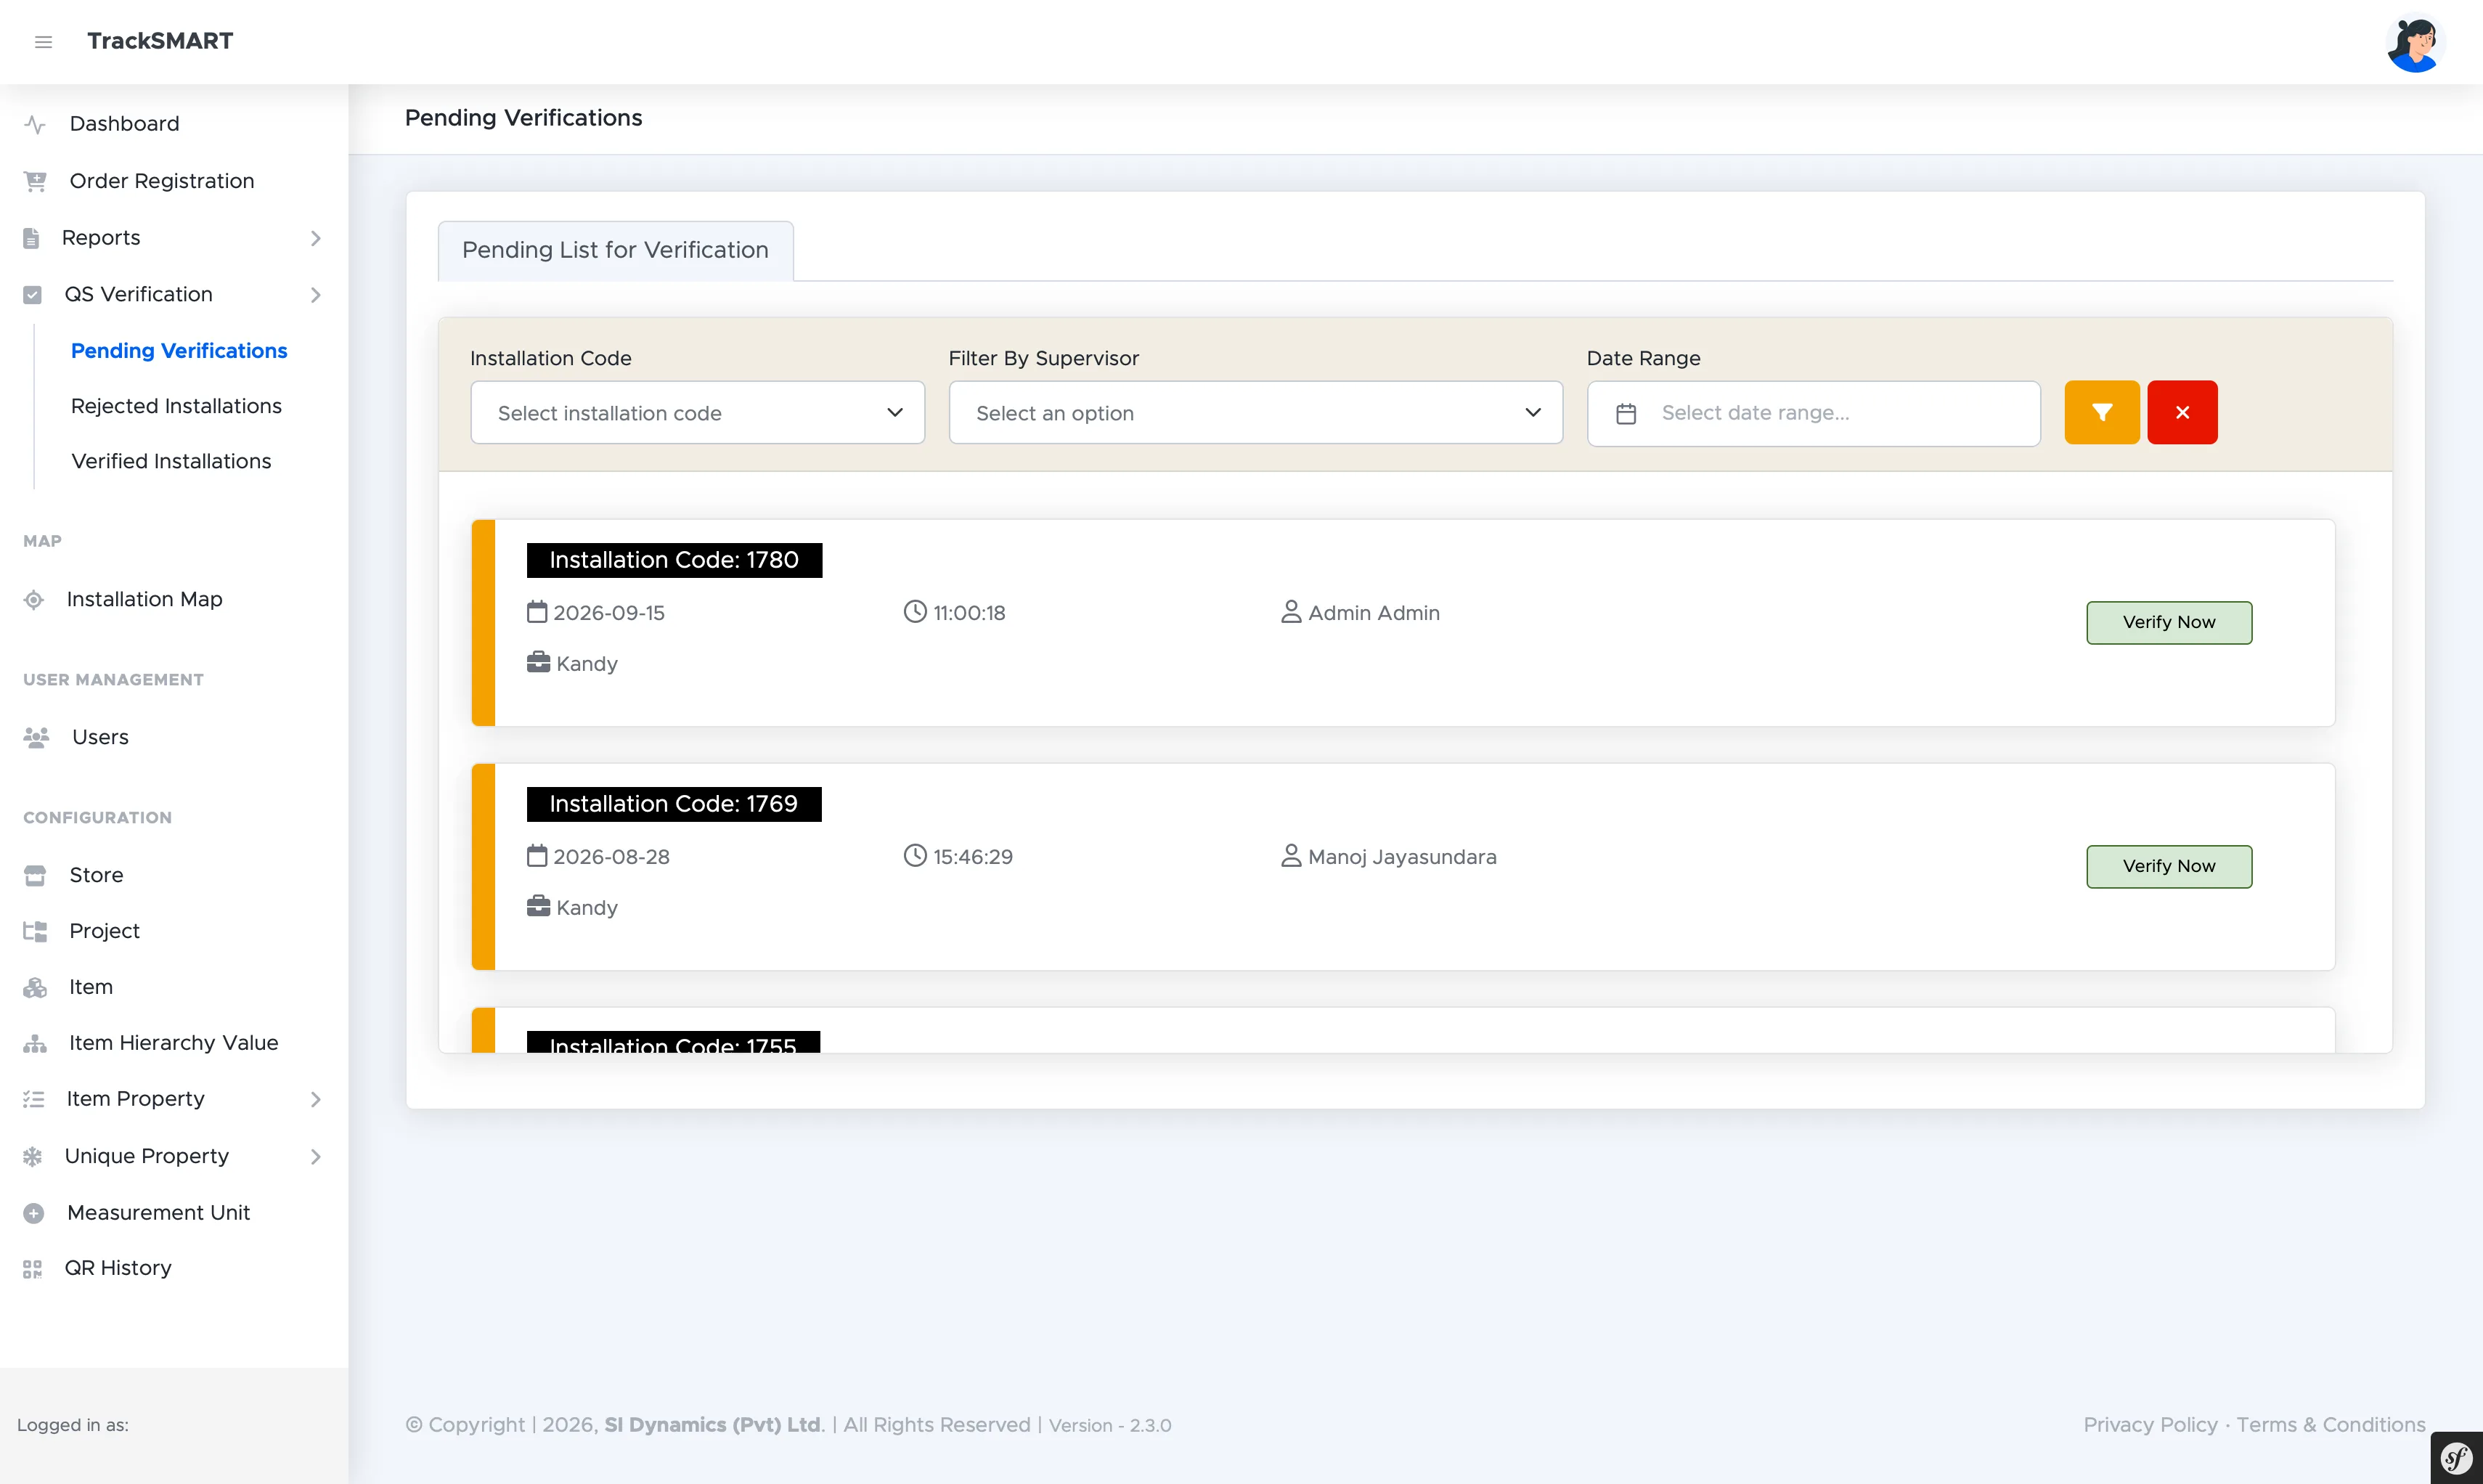
• Pending Verifications
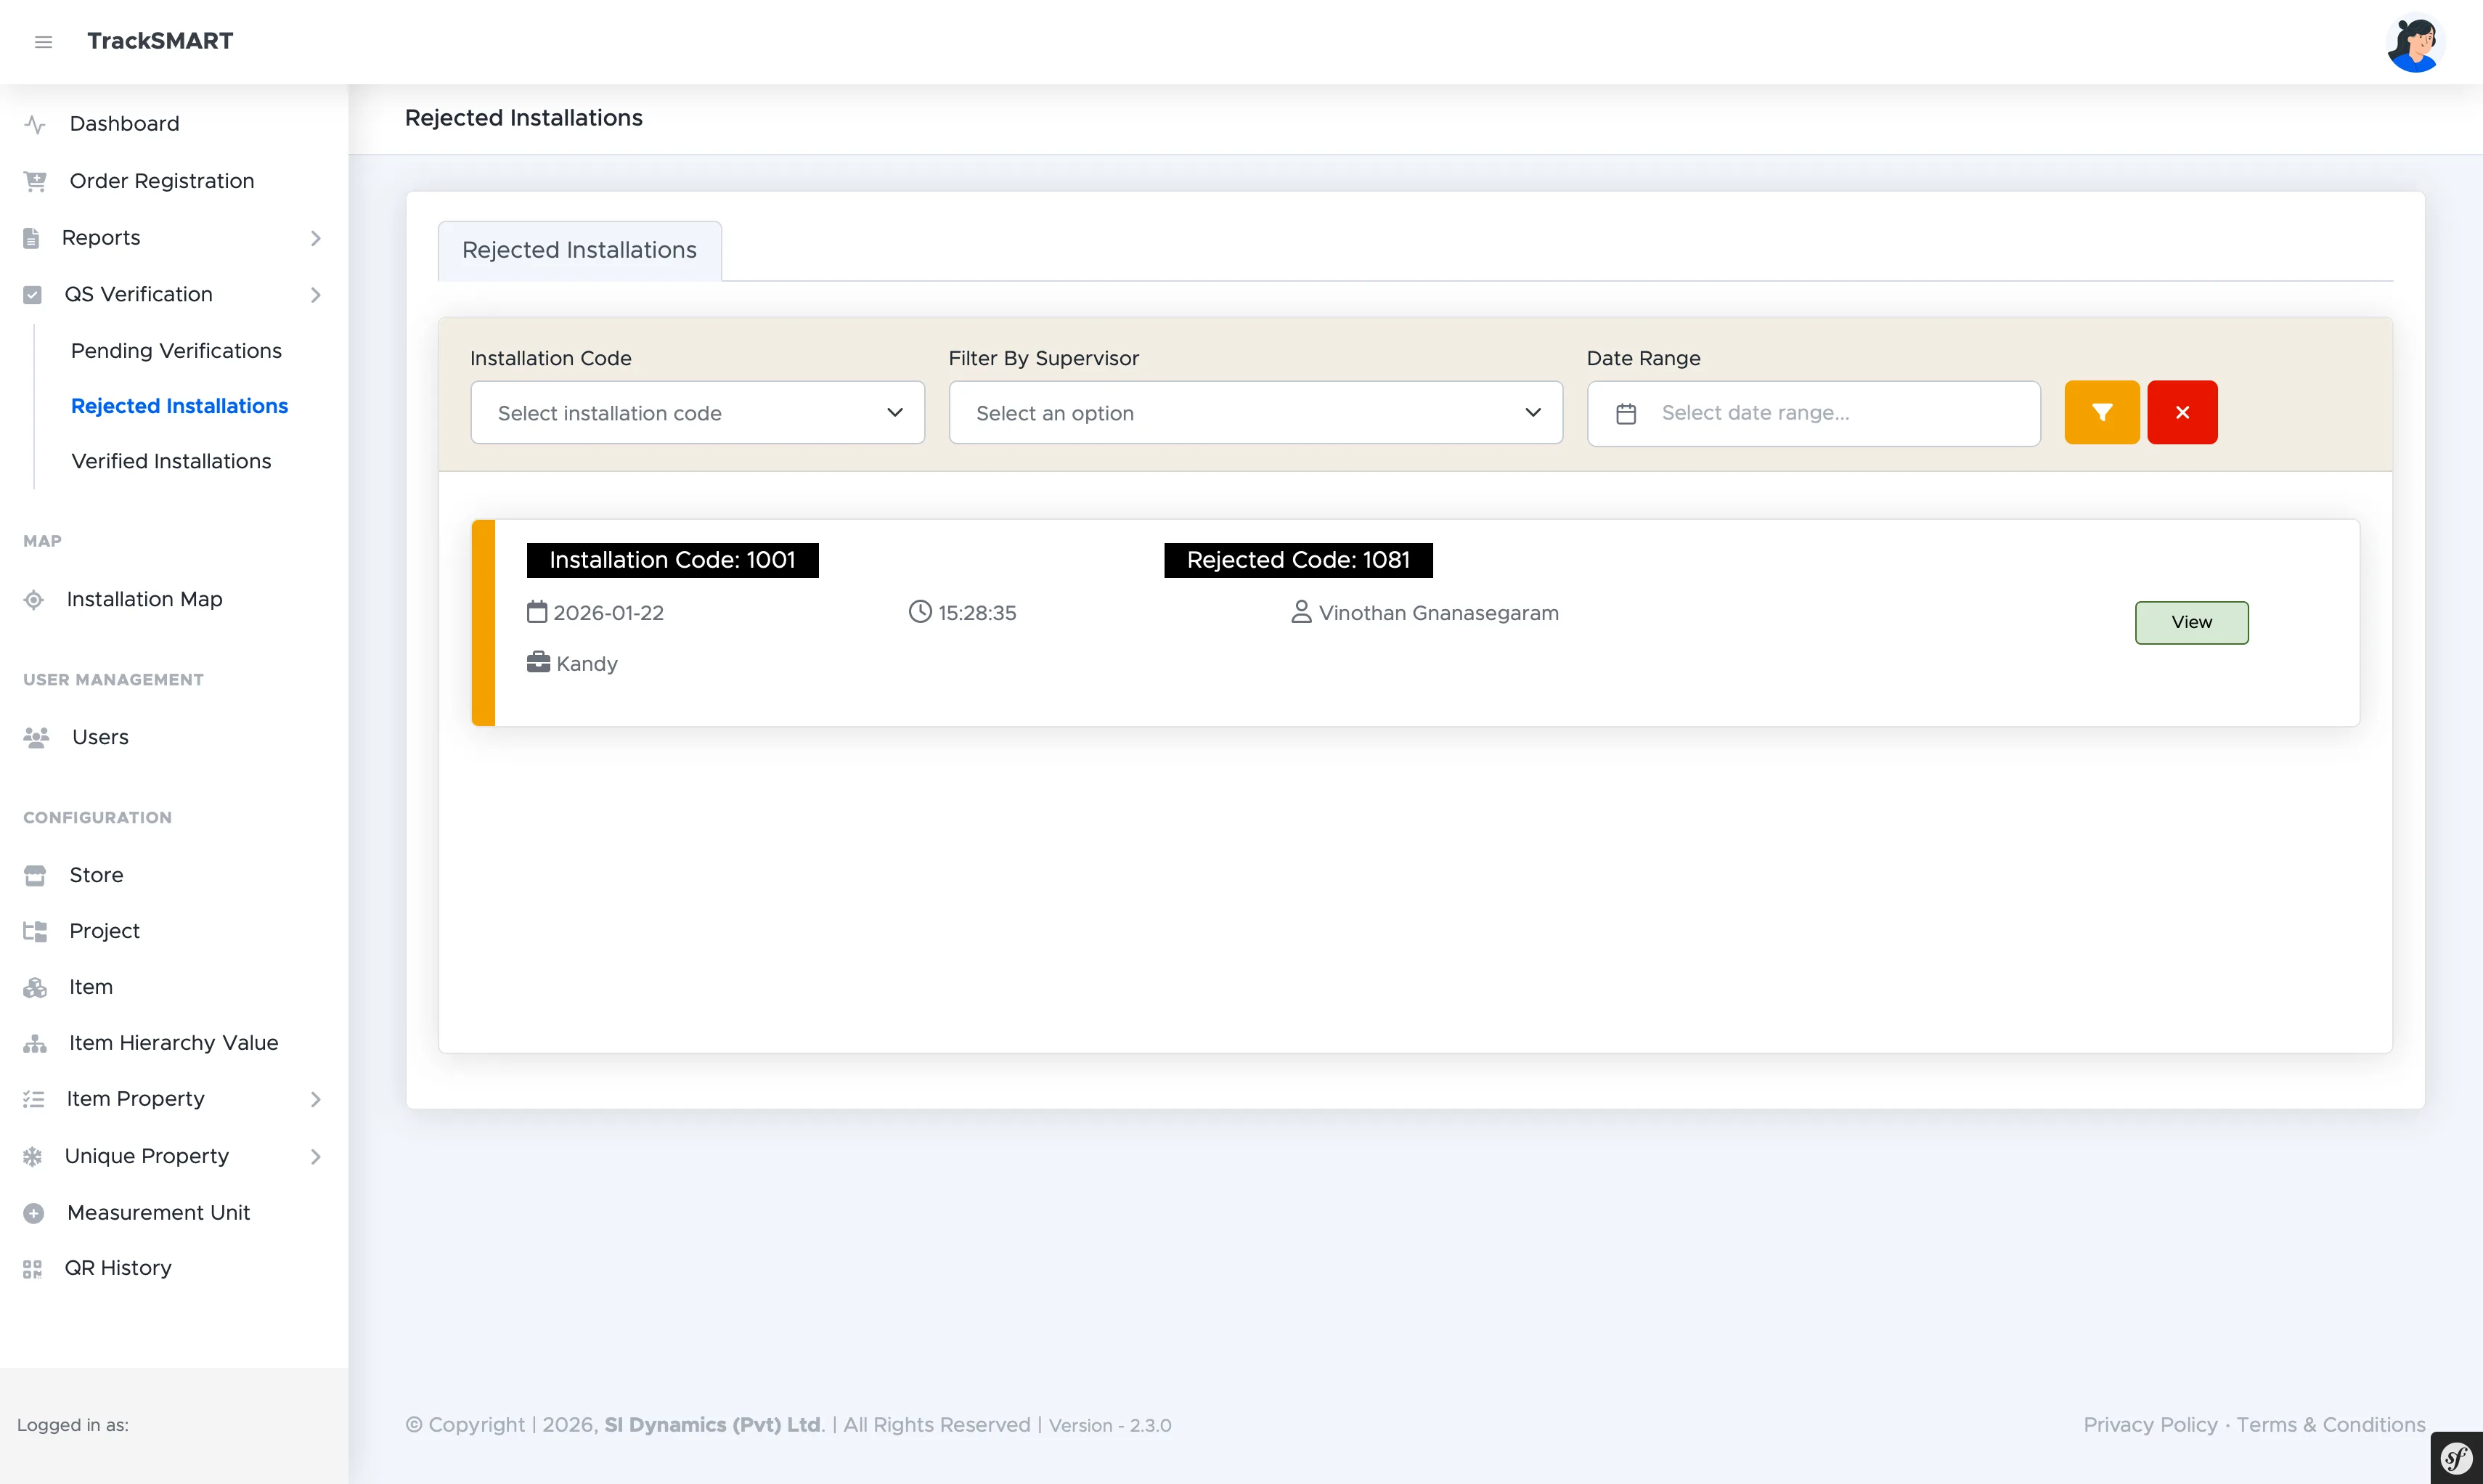
• Rejected Installations
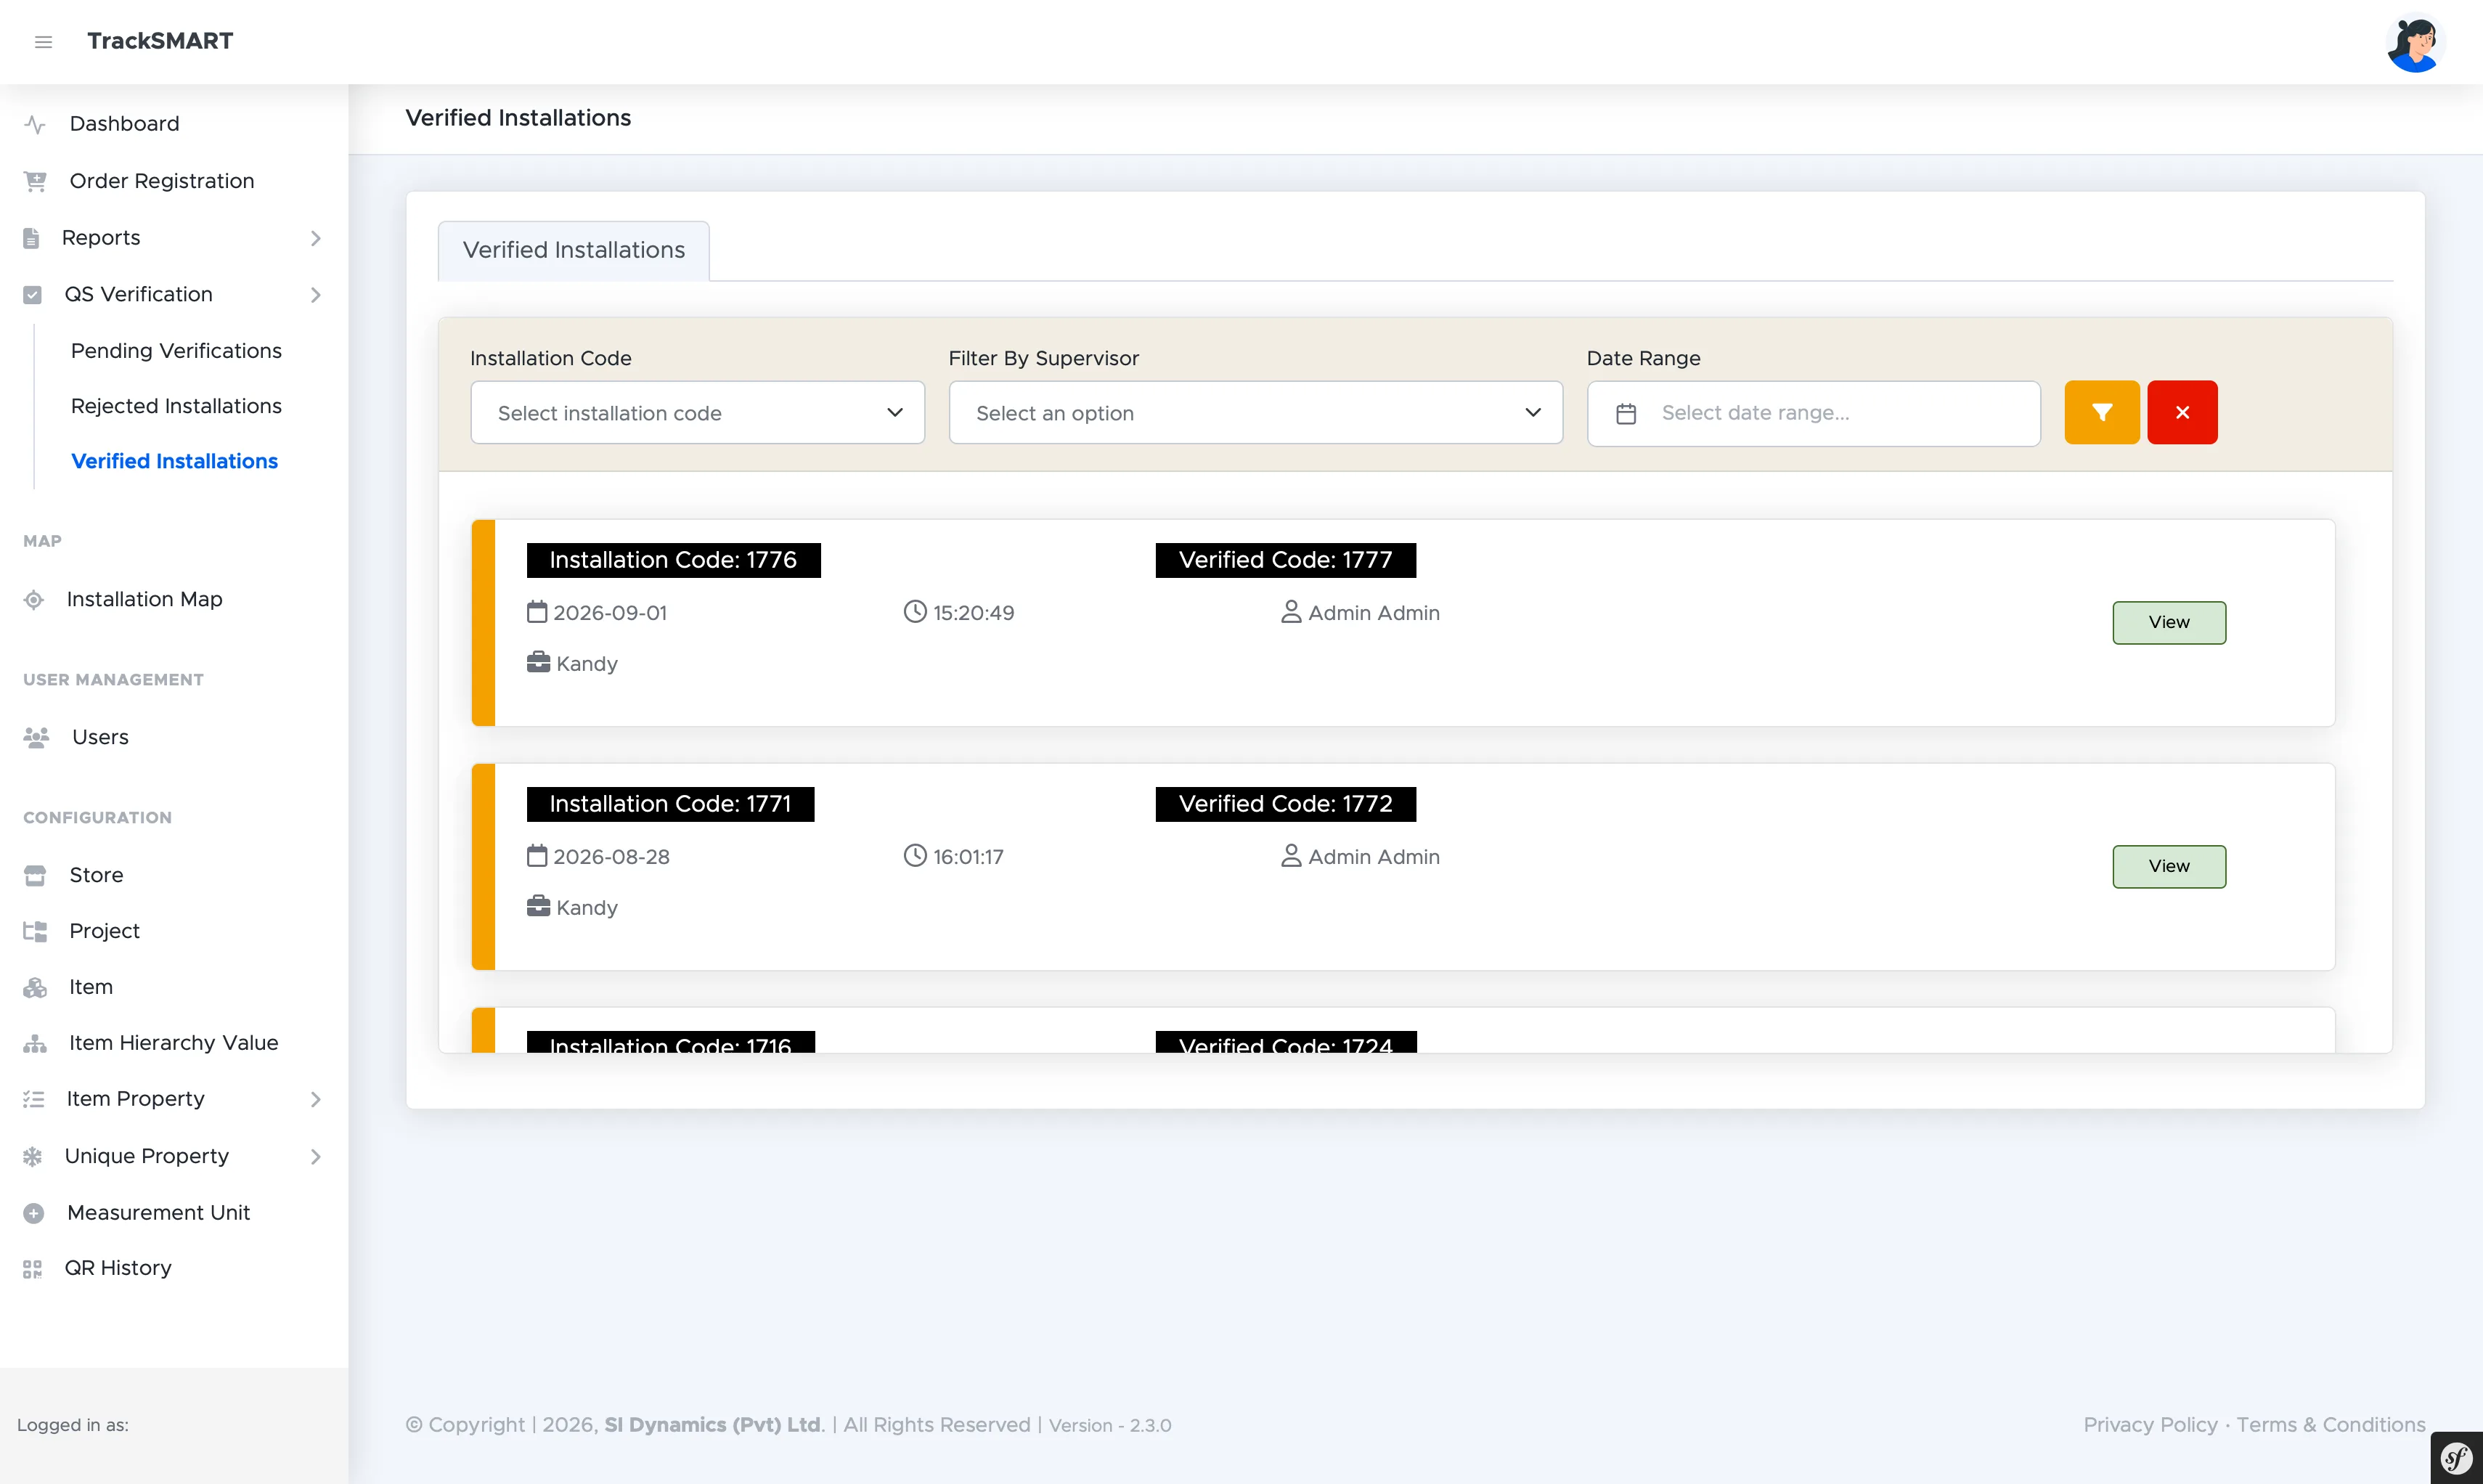
• Verified Installations
Section 03: Storekeeper Operations
09.Stock In: Deliveries & ReturnsModule 9
• Stock In Overview
• Receiving Project Shipments (Receive Order)
• Receiving Returns from Supervisors
• Stock In Transaction Audit Records
10.Stock Out: Issuing AssetsModule 10
• Stock Out Overview
• Issuing Materials & Equipment
• Stock Out Audit Records
11.Damaged Stock ManagementModule 11
• Damaged Stock Protocol
• Logging Damaged Assets
Section 04: Supervisor Operations
12.Virtual Store & DashboardModule 12
• The Virtual Store Concept
• Supervisor Dashboard Modules
13.Stock In: Receiving AssetsModule 13
• Receiving Issued Stock
• Scanning & Acknowledging Assets
• Stock In Receipt History
14.Stock Out: Returns & TransfersModule 14
• Stock Out Options: Transfer vs Return
• Peer-to-Peer Supervisor Transfer
• Returning Assets to the Storekeeper
15.Field Installation & SyncModule 15
• Field Installation Workflow
• GPS Geo-Tagging & New Installation
• Offline-First Caching: Local vs Synced
Module 01 : Getting StartedTS-REF #101
Overview & Architecture
TrackSmart is a QR-first asset and material tracking solution engineered for construction projects, providing complete accountability from supplier delivery to on-site installation.
Introduction to TrackSmart
The purpose-built material tracking ecosystem for modern construction jobsites.
TrackSmart solves one of the most critical challenges in construction site management: unaccounted material shrinkage, misplaced equipment, and unverified installations. By establishing a strict digital chain of custody driven by unique QR codes, every physical component, from high-value equipment like rotary drills to bulk infrastructure materials like pipes and valves, is accounted for in real time.
TrackSmart Mobile App: The field interface for Storekeepers and Supervisors.
Zero Anonymous Movement: No asset enters, moves within, or exits the jobsite without being scanned and assigned to an authenticated user.
Dual-Role Field Architecture: Distinct, streamlined interfaces for Storekeepers managing physical site stores and Supervisors executing field installations.
Virtual Store Accountability: Each supervisor operates a personal 'Virtual Store' ledger of checked-out assets, maintaining 100% individual custody tracking.
Offline-First Resilience: Full mobile functionality in signal-deprived basements, tunnels, and remote zones with automatic cloud sync upon reconnection.
The Asset Tracking Lifecycle
How assets travel through the TrackSmart ecosystem from dispatch to QS handover.
The physical journey of every asset on a TrackSmart-enabled project follows a closed-loop verification pipeline:
1Central Web Dispatch: An Administrator on the TrackSmart Web Platform assigns materials or purchase orders to a specific project store.
2Storekeeper Stock In: When physical delivery reaches the jobsite, the Storekeeper scans item QR codes via the mobile app, verifying the manifest and registering items into physical store inventory.
3Storekeeper Stock Out (Issuance): A Supervisor requests materials or tools. The Storekeeper issues them by scanning the items and assigning them to the supervisor's unique account.
4Supervisor Virtual Store Stock In: The Supervisor acknowledges receipt by scanning the items, immediately transferring custody into their personal Virtual Store.
5On-Site Installation or Return: Consumable materials (e.g. pipe joints) are scanned and geo-tagged upon installation. Reusable tools (e.g. power drills) are returned to the storekeeper or transferred to a peer supervisor.
6Verification Handover: Installed assets automatically flow into the web portal for Quantity Surveyor (QS) sign-off and billing verification.
Storekeeper Dashboard: Focused on central inventory control, receipts, and issuing.Supervisor Dashboard: Centered on Virtual Store custody, peer transfers, and installations.
User Roles & Responsibilities
Understanding the operational boundary between Storekeepers and Supervisors.
The TrackSmart mobile app automatically configures its interface based on the logged-in user's assigned role:
Storekeeper: Manages the physical warehouse/laydown yard on site. Responsible for accepting bulk supplier shipments ('Receive Order'), checking in returned items from supervisors ('Receive Returned'), issuing stock to supervisors, marking damaged stock, and maintaining warehouse audit logs.
Supervisor: Manages field installation crews and temporary tooling. Maintains a personal Virtual Store of assets in their custody, accepts issued materials, executes peer-to-peer transfers or warehouse returns, and records verified installations with GPS geo-tagging.
TrackSmart Mobile Operations ManualModule 1 of 15
Module 02 : Getting StartedTS-REF #102
Mobile Authentication
Signing in to the TrackSmart Mobile Application, credential management, role recognition, and project store selection.
Signing In
Step-by-step guide to accessing the TrackSmart mobile application.
Access to TrackSmart Mobile is granted by your organization's Web Administrator. Field personnel can authenticate using either their registered organization email address or their National Identity Card (NIC) number, paired with their secure password.
Sign in using your organization email or National Identity Card (NIC) number and secure password.
1Launch the TrackSmart app on your Android device.
2Enter your registered Organization Email Address or National Identity Card (NIC) number.
3Enter your secure password.
4Tap Login to authenticate with the central TrackSmart server.
5Upon initial login, the application synchronizes project metadata, active stores, and local cryptography tokens.
Automated Role Dispatch
How TrackSmart routes users to role-specific interfaces.
After authentication, TrackSmart automatically detects your profile permissions and loads the corresponding dashboard:
Storekeepers are directed to the Storekeeper Home screen displaying Stock In, Stock Out, and Mark as Damaged tiles.
Supervisors are directed to the Supervisor Home screen displaying their personal Virtual Store summary, Stock In, Stock Out (Returns/Transfers), and Installation tools.
TrackSmart Mobile Operations ManualModule 2 of 15
Module 03 : Web AdministrationTS-REF #103
Projects & Stores Setup
Creating construction projects and physical site stores in the TrackSmart Web Portal — the foundation that every order, user assignment, and installation references.
Creating & Managing Projects
Every TrackSmart workflow is scoped to a project. Set projects up first.
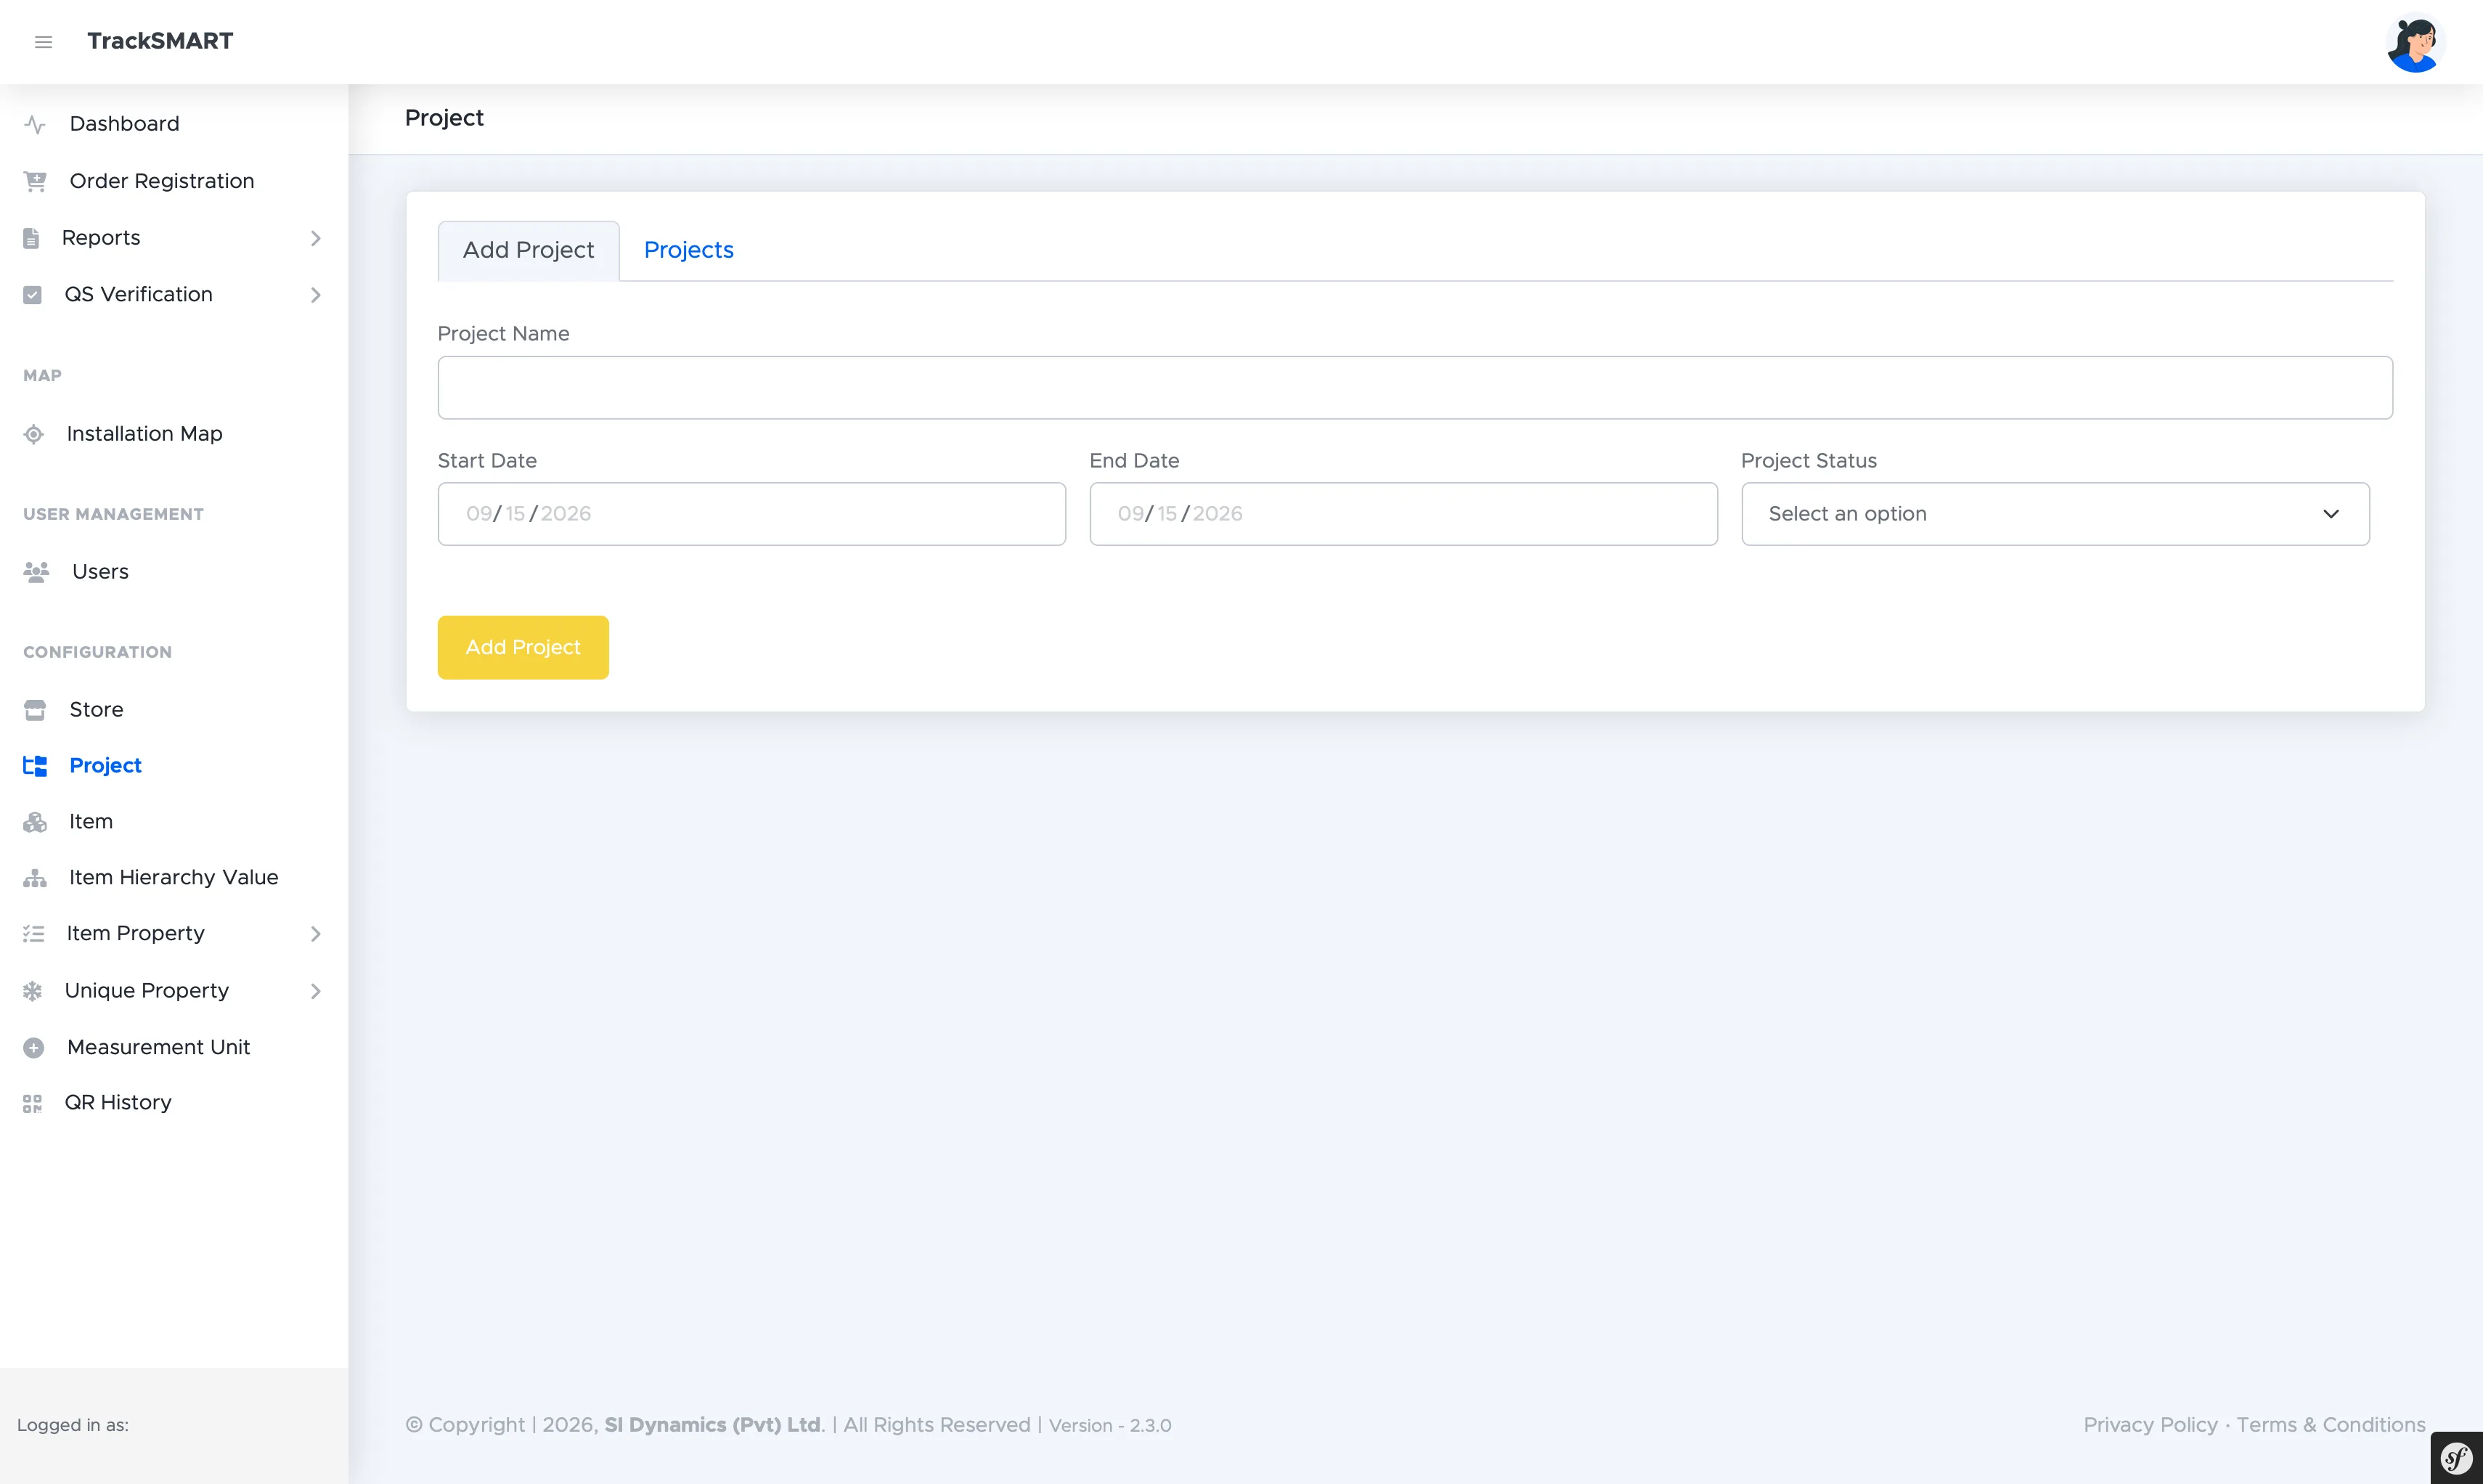
A Project represents one construction jobsite (e.g. Kandy). Before stores, items, users, or orders can be assigned anywhere, at least one project must exist. The Project module lives under CONFIGURATION > Project and uses an Add Project / Projects tab pair.
app.tracksmart.lk
Add Project: entering the project name, start and end dates, and project status.
1From the left navigation, open CONFIGURATION > Project.
2On the Add Project tab, enter the Project Name.
3Set the Start Date and End Date for the construction program.
4Select the Project Status from the dropdown.
5Click Add Project to save. The project immediately becomes available across stores, users, orders, and reports.
app.tracksmart.lk
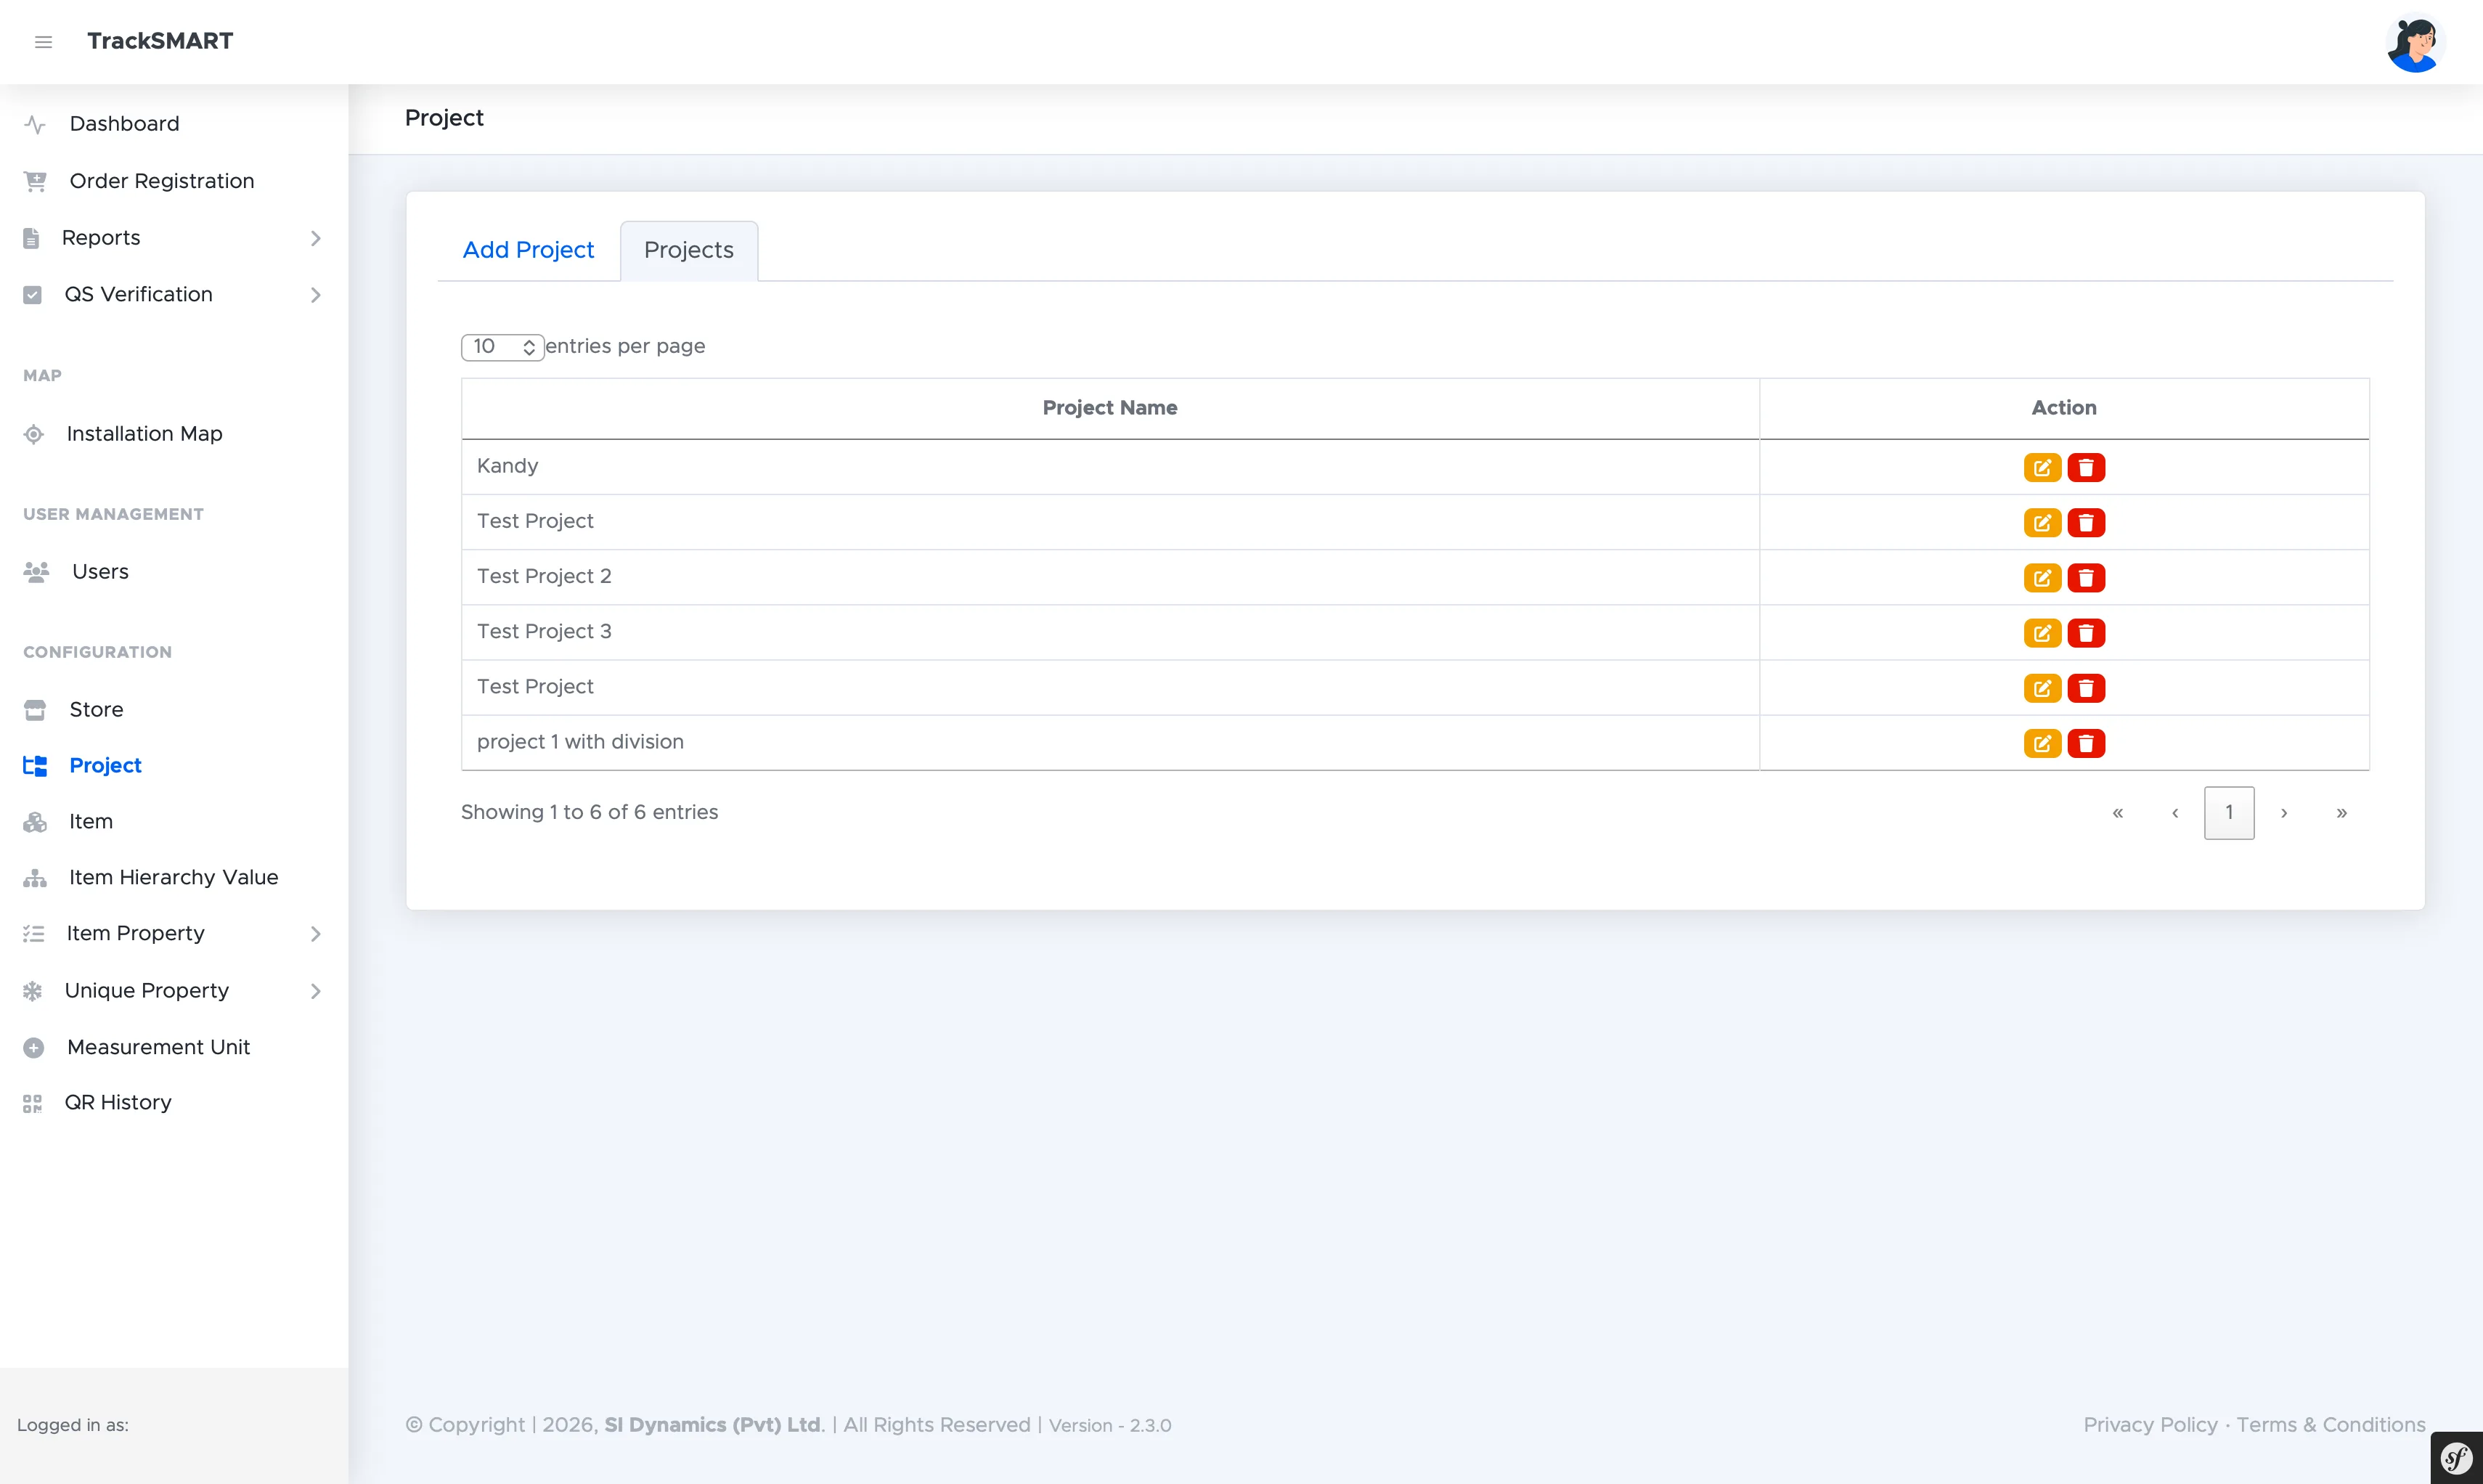
Projects: register of all jobsites with edit and delete actions per row.
Use the entries-per-page control and pagination to browse large project portfolios.
The Action column allows editing project details or removing decommissioned projects.
Every downstream filter (orders, reports, QS verification, installation map) is scoped by project.
Creating & Managing Stores
Physical warehouses and supervisor-linked stores on each site.
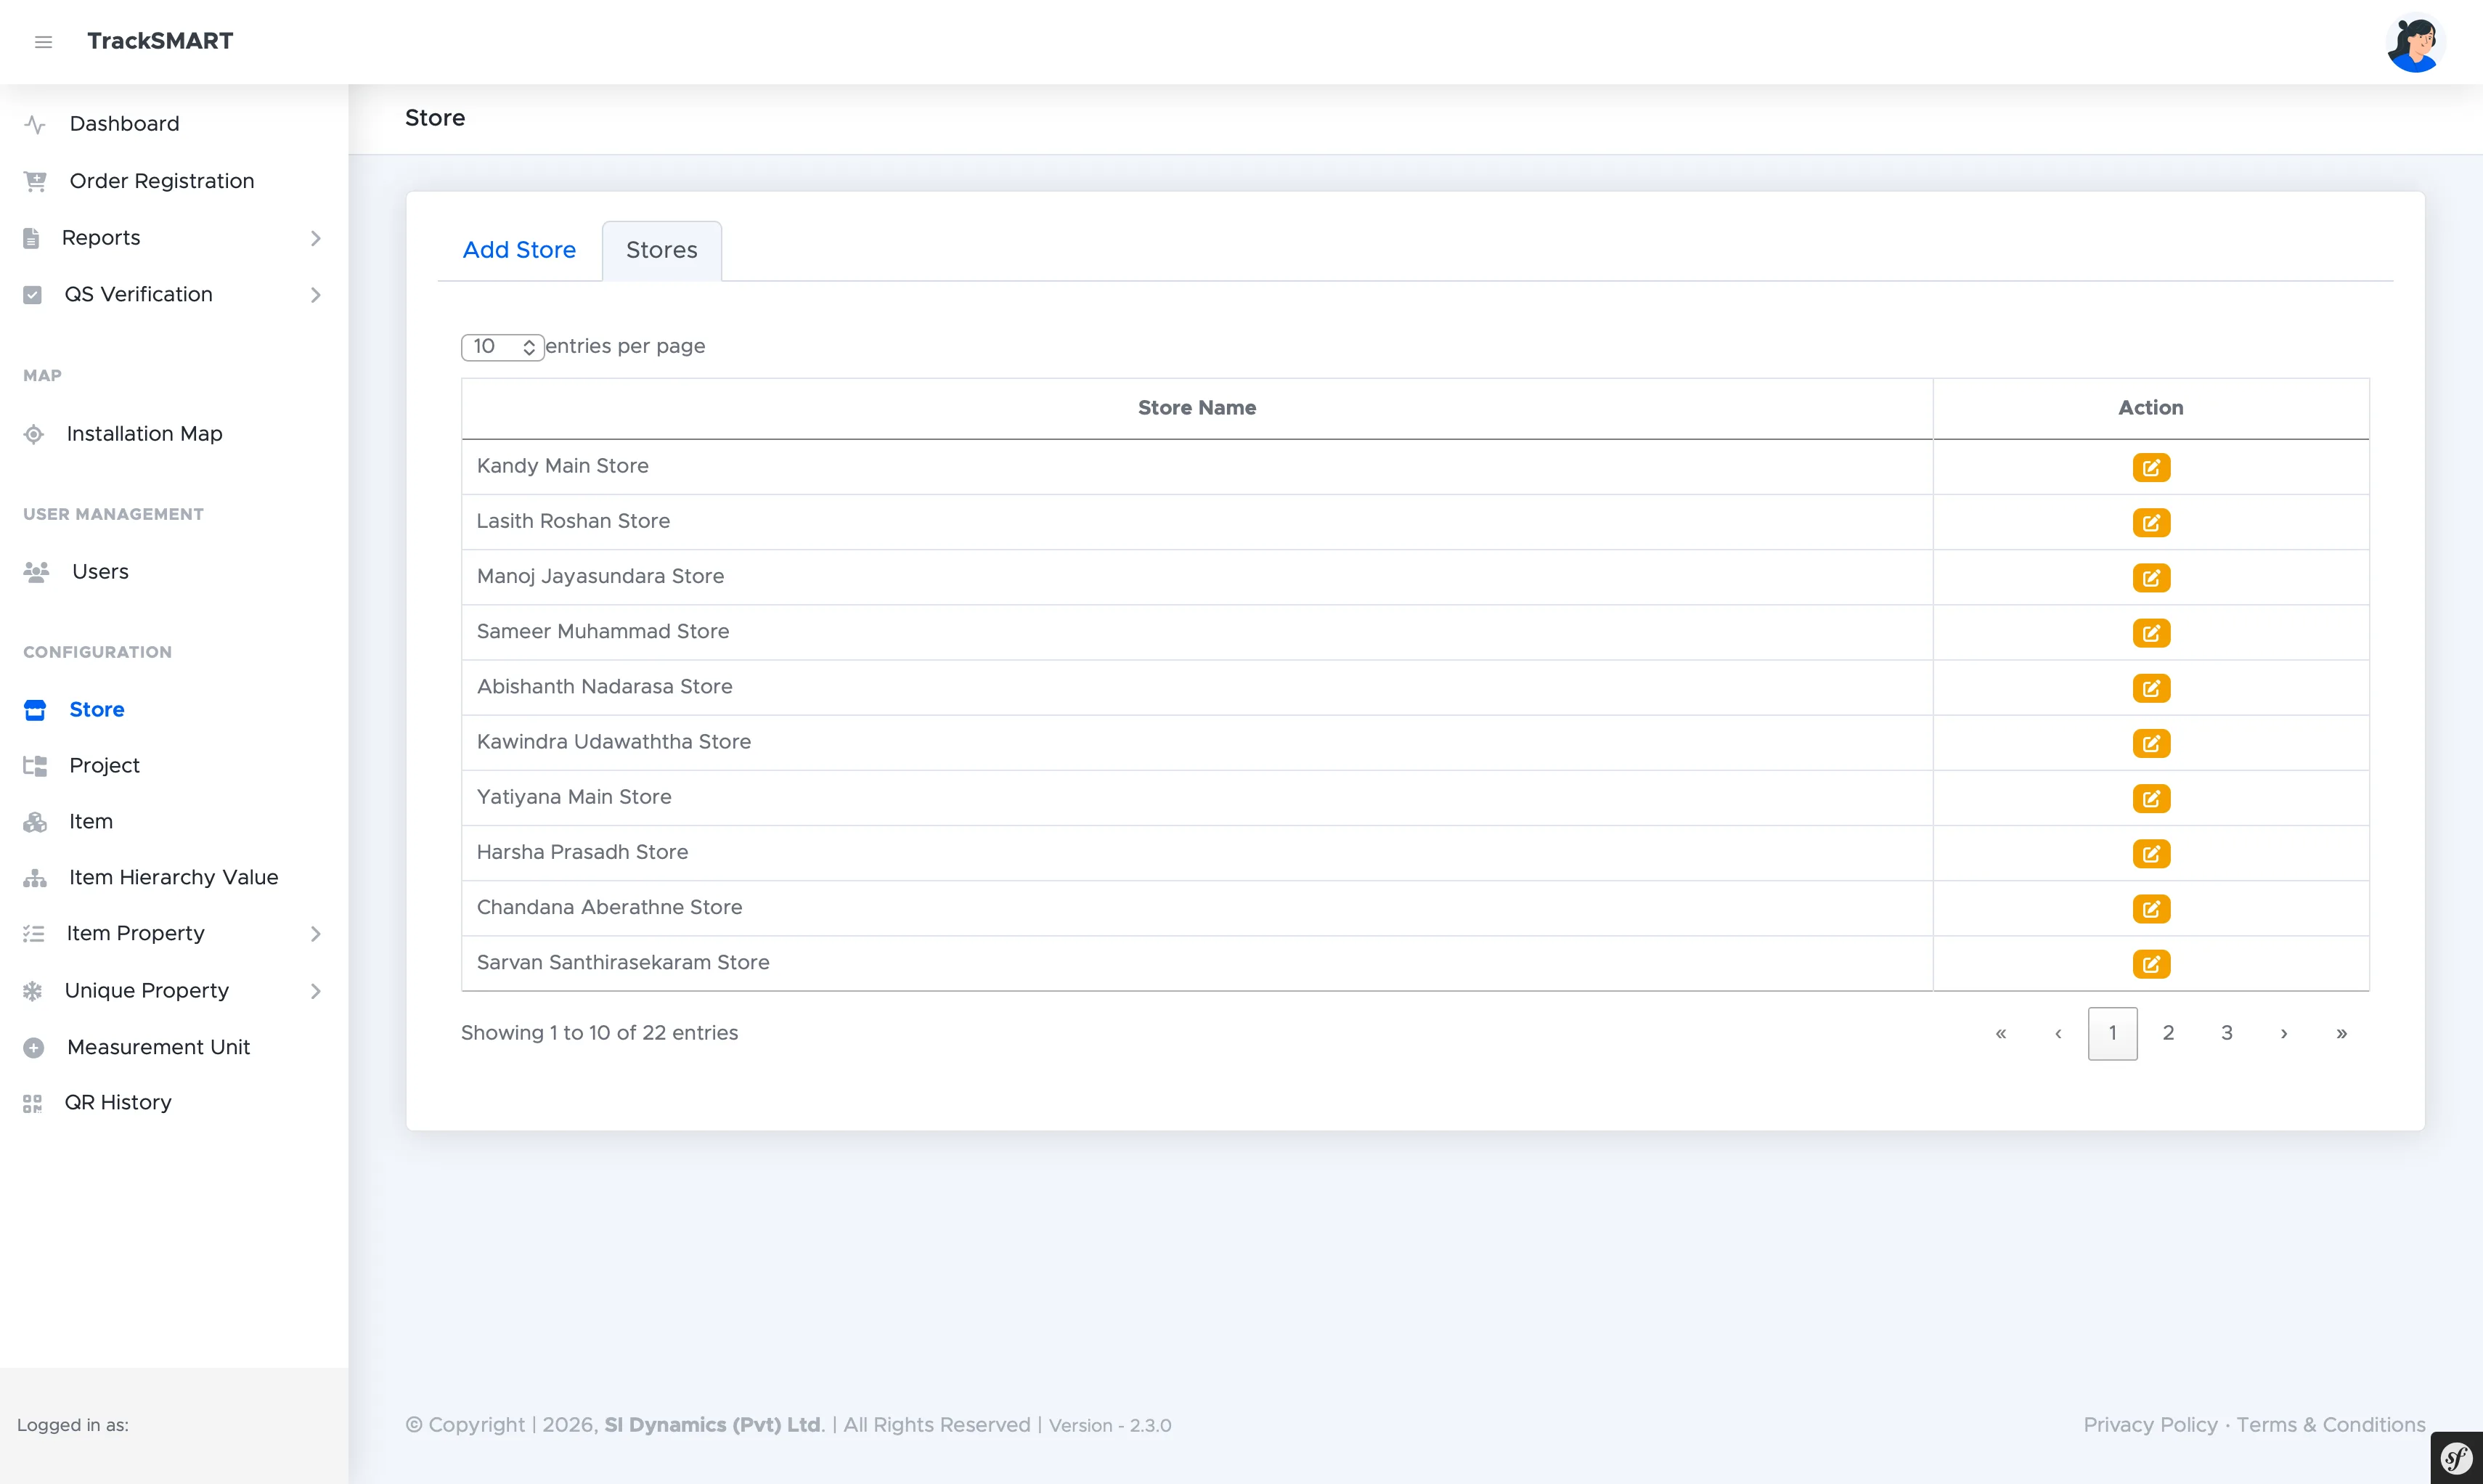
A Store is a physical warehouse or laydown yard on a jobsite. The Stores list shows both main site stores (e.g. Kandy Main Store) and supervisor-linked stores. Storekeepers operate against these stores in the mobile app.
app.tracksmart.lk
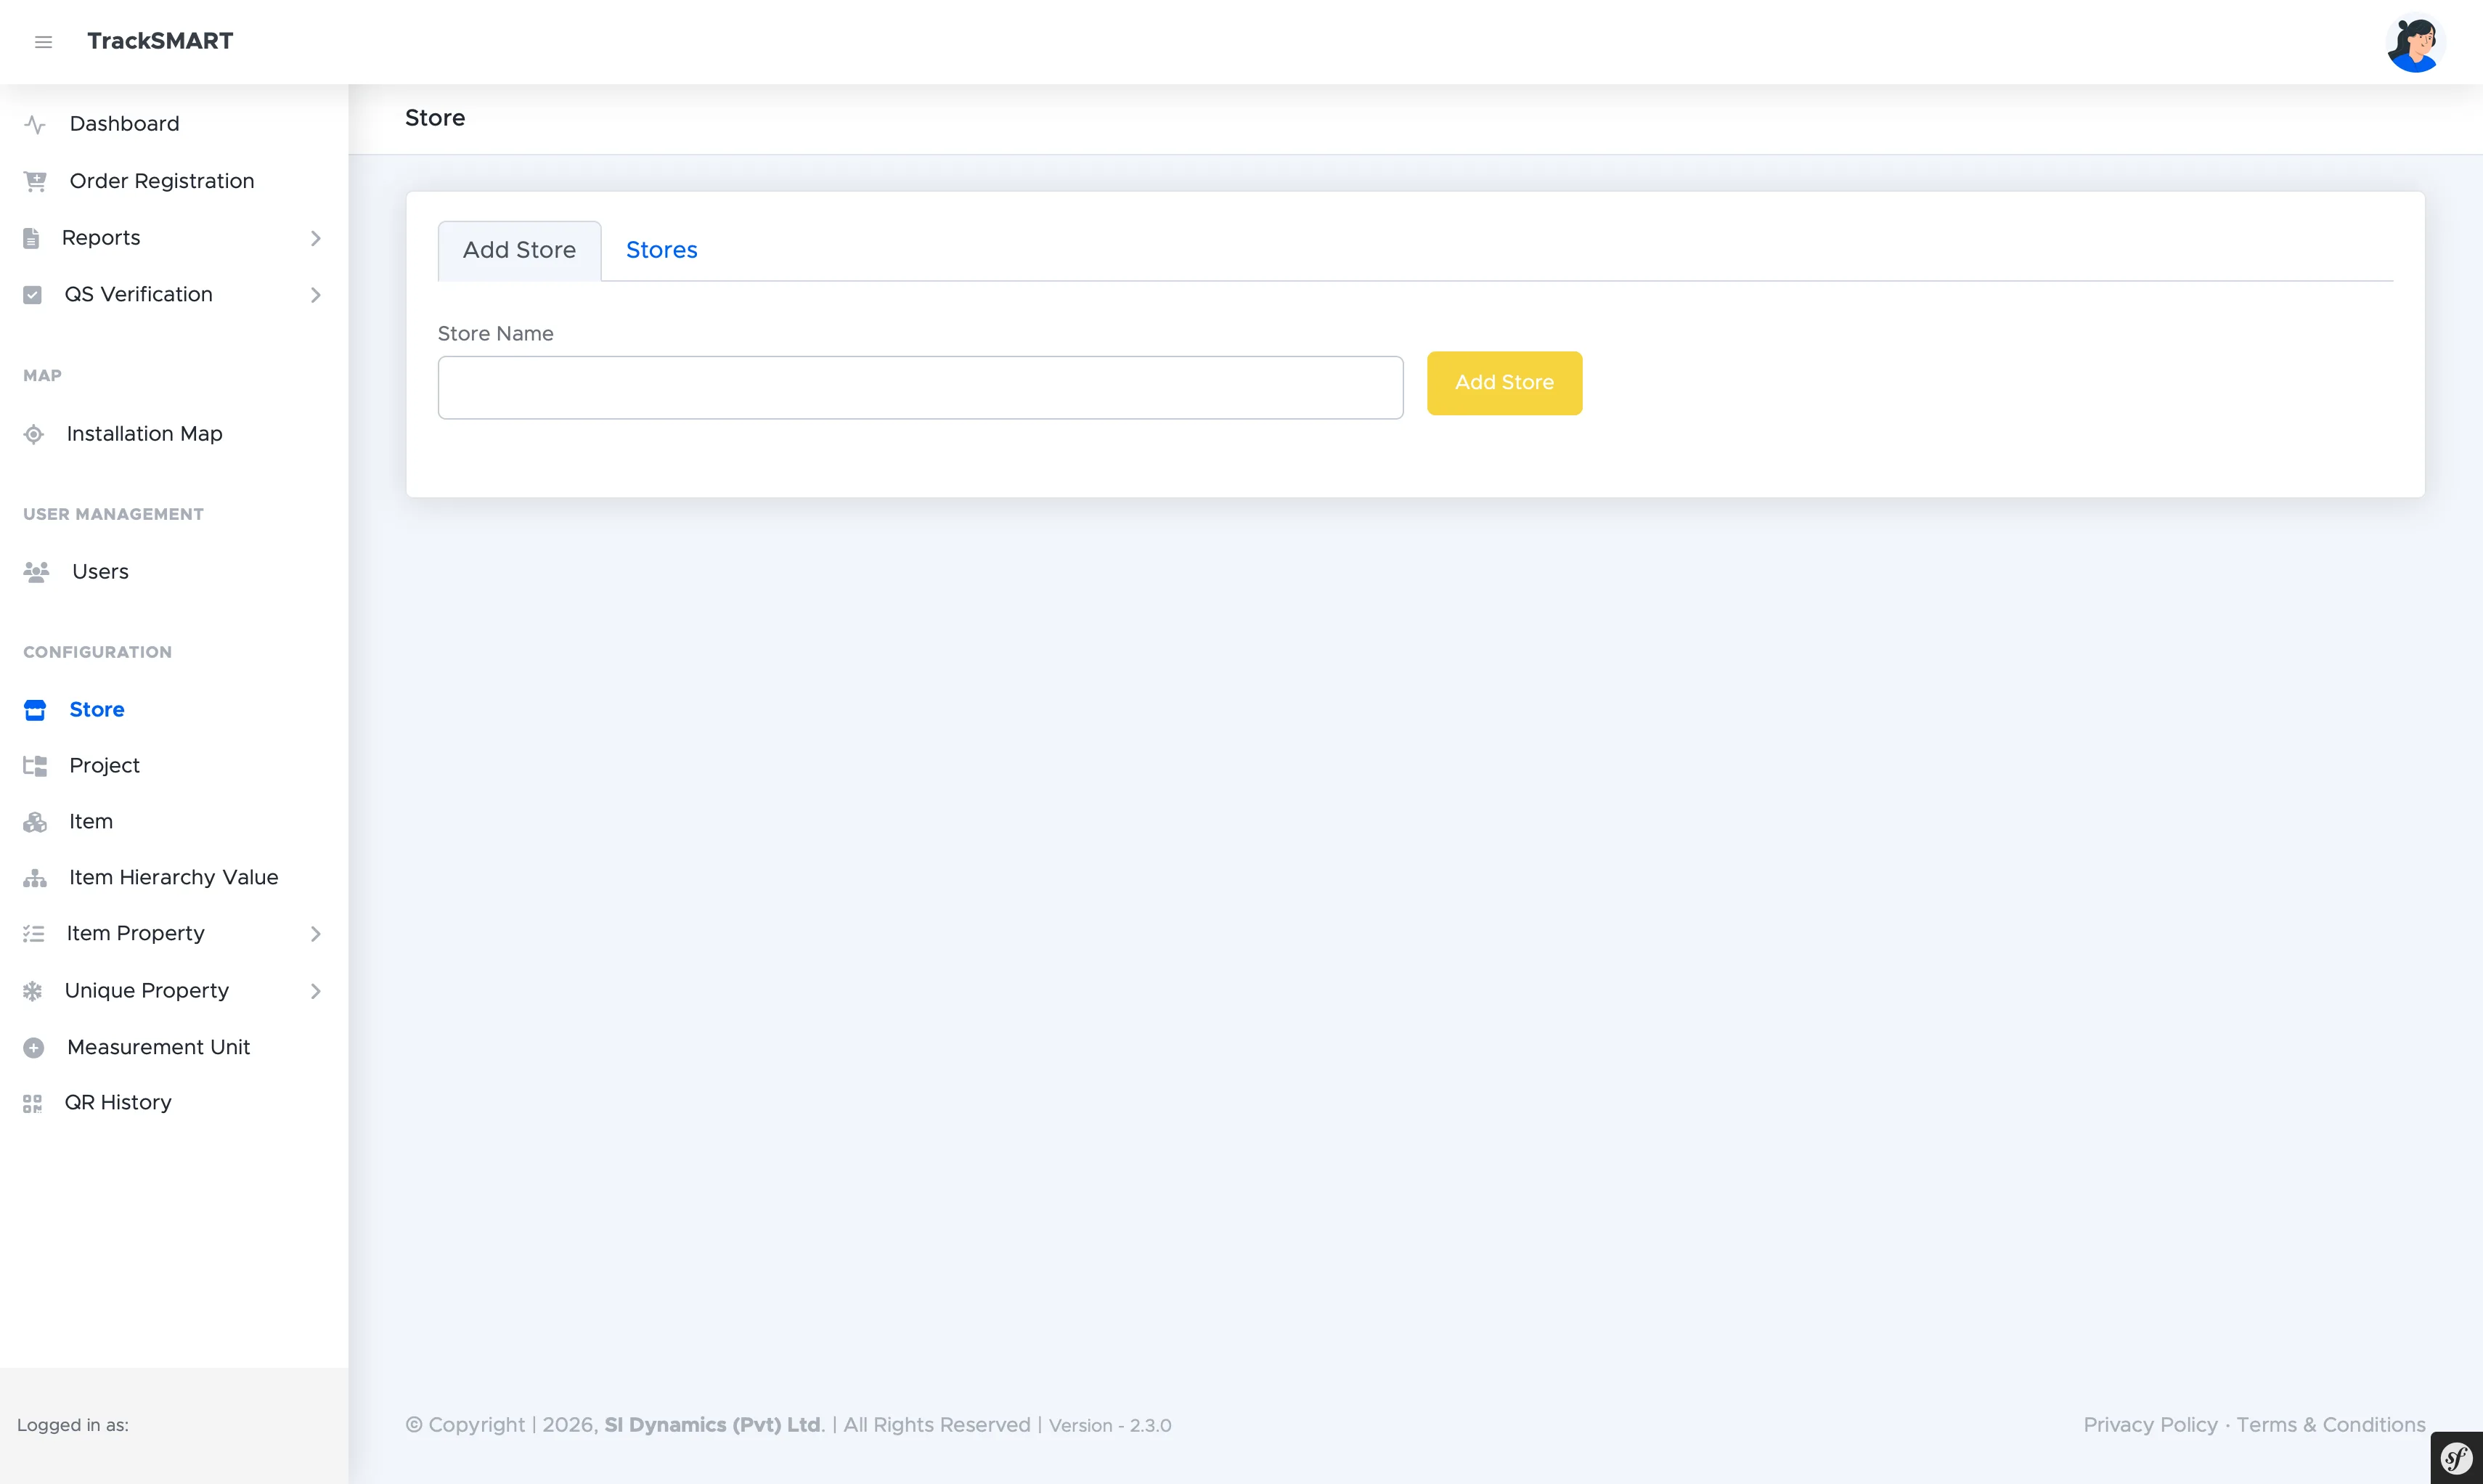
Add Store: entering the store name and saving it to the project.
1From the left navigation, open CONFIGURATION > Store.
2On the Add Store tab, enter the Store Name.
3Click Add Store to save.
app.tracksmart.lk
Stores: main site stores and supervisor-linked stores with edit actions.
TrackSmart Mobile Operations ManualModule 3 of 15
Module 04 : Web AdministrationTS-REF #104
Items & Catalog Configuration
Defining the item master: hierarchy groups and values, items, shared specification properties, per-QR unique properties, and measurement units.
Items & Hierarchy Groups
The master list of trackable materials and tools.
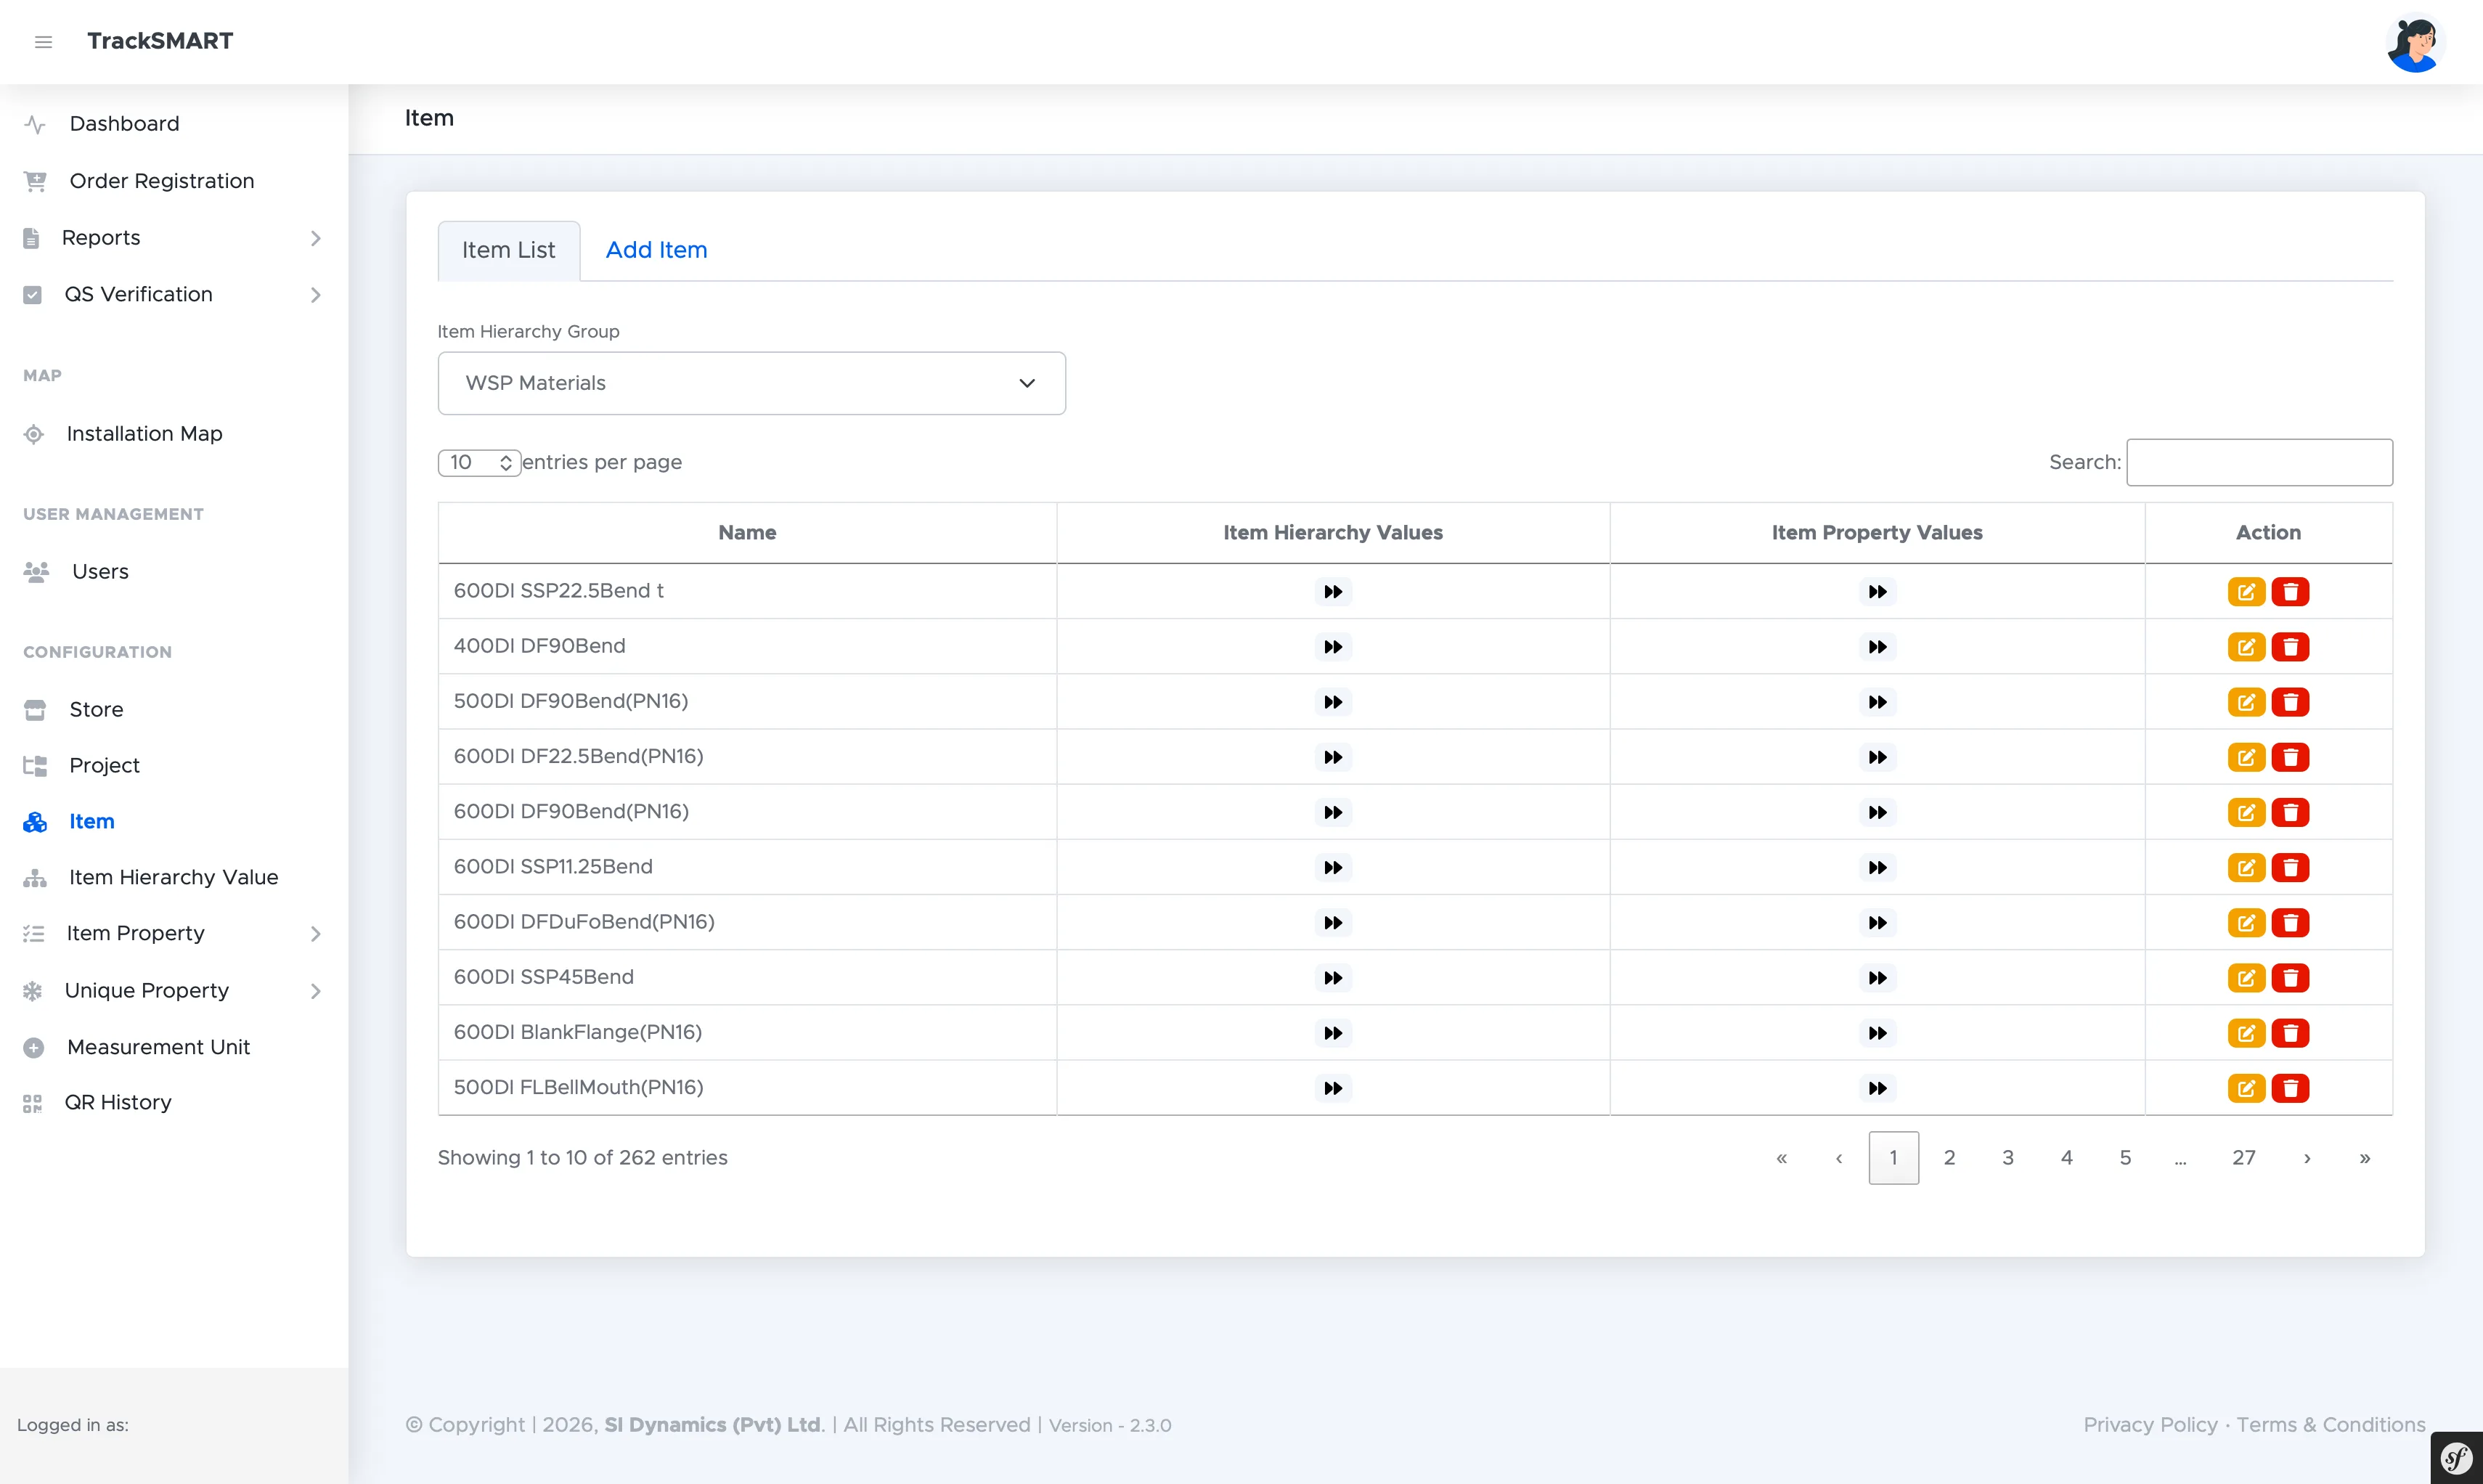
The Item module (CONFIGURATION > Item) is the master catalog of everything TrackSmart can track — from 600DI bends and flanges to power tools. Items are organized by Item Hierarchy Group (e.g. WSP Materials), and the Item List can be filtered by group with search and pagination.
app.tracksmart.lk
Item List: filter by Item Hierarchy Group, then expand any row to inspect its hierarchy and property values.
app.tracksmart.lk
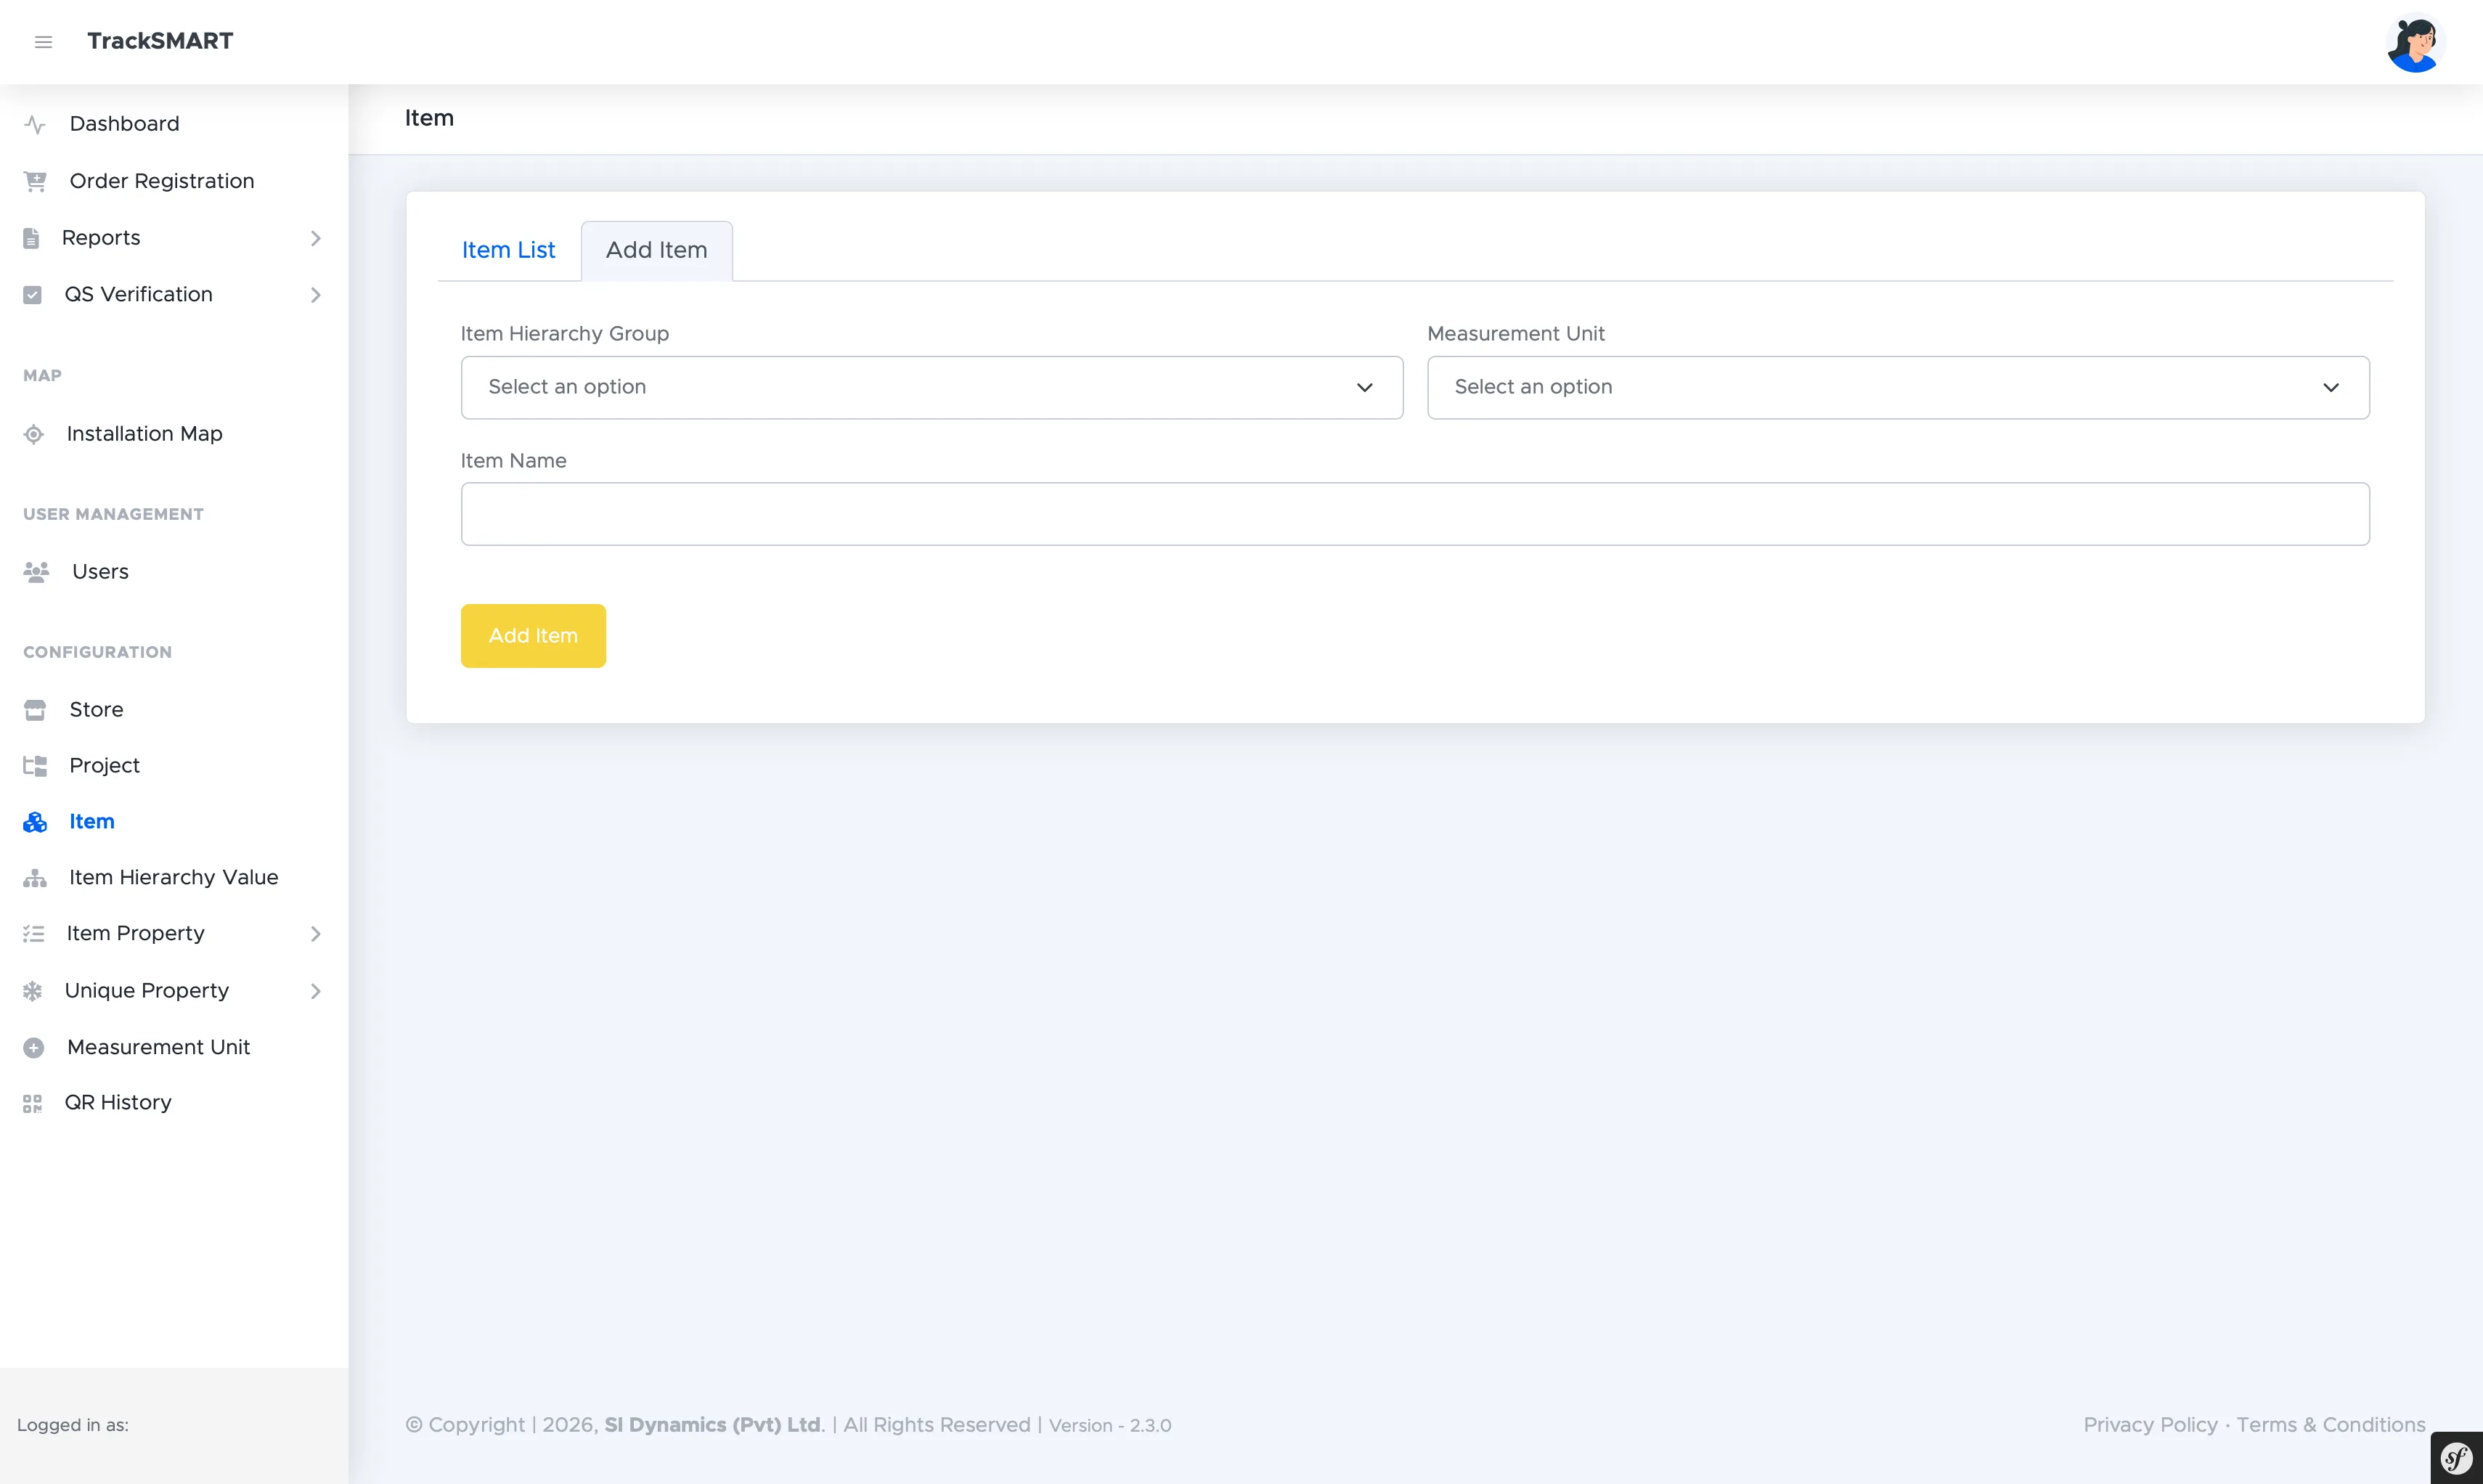
Add Item: selecting the hierarchy group and measurement unit, then naming the item.
1Open CONFIGURATION > Item and switch to the Add Item tab.
2Select the Item Hierarchy Group the item belongs to.
3Select the Measurement Unit (e.g. Nos, mm).
4Enter the Item Name using site convention (e.g. 600DI DF90Bend(PN16)).
5Click Add Item to save. Hierarchy values and properties are attached afterwards.
Item Hierarchy Values
Category trees that classify every item.
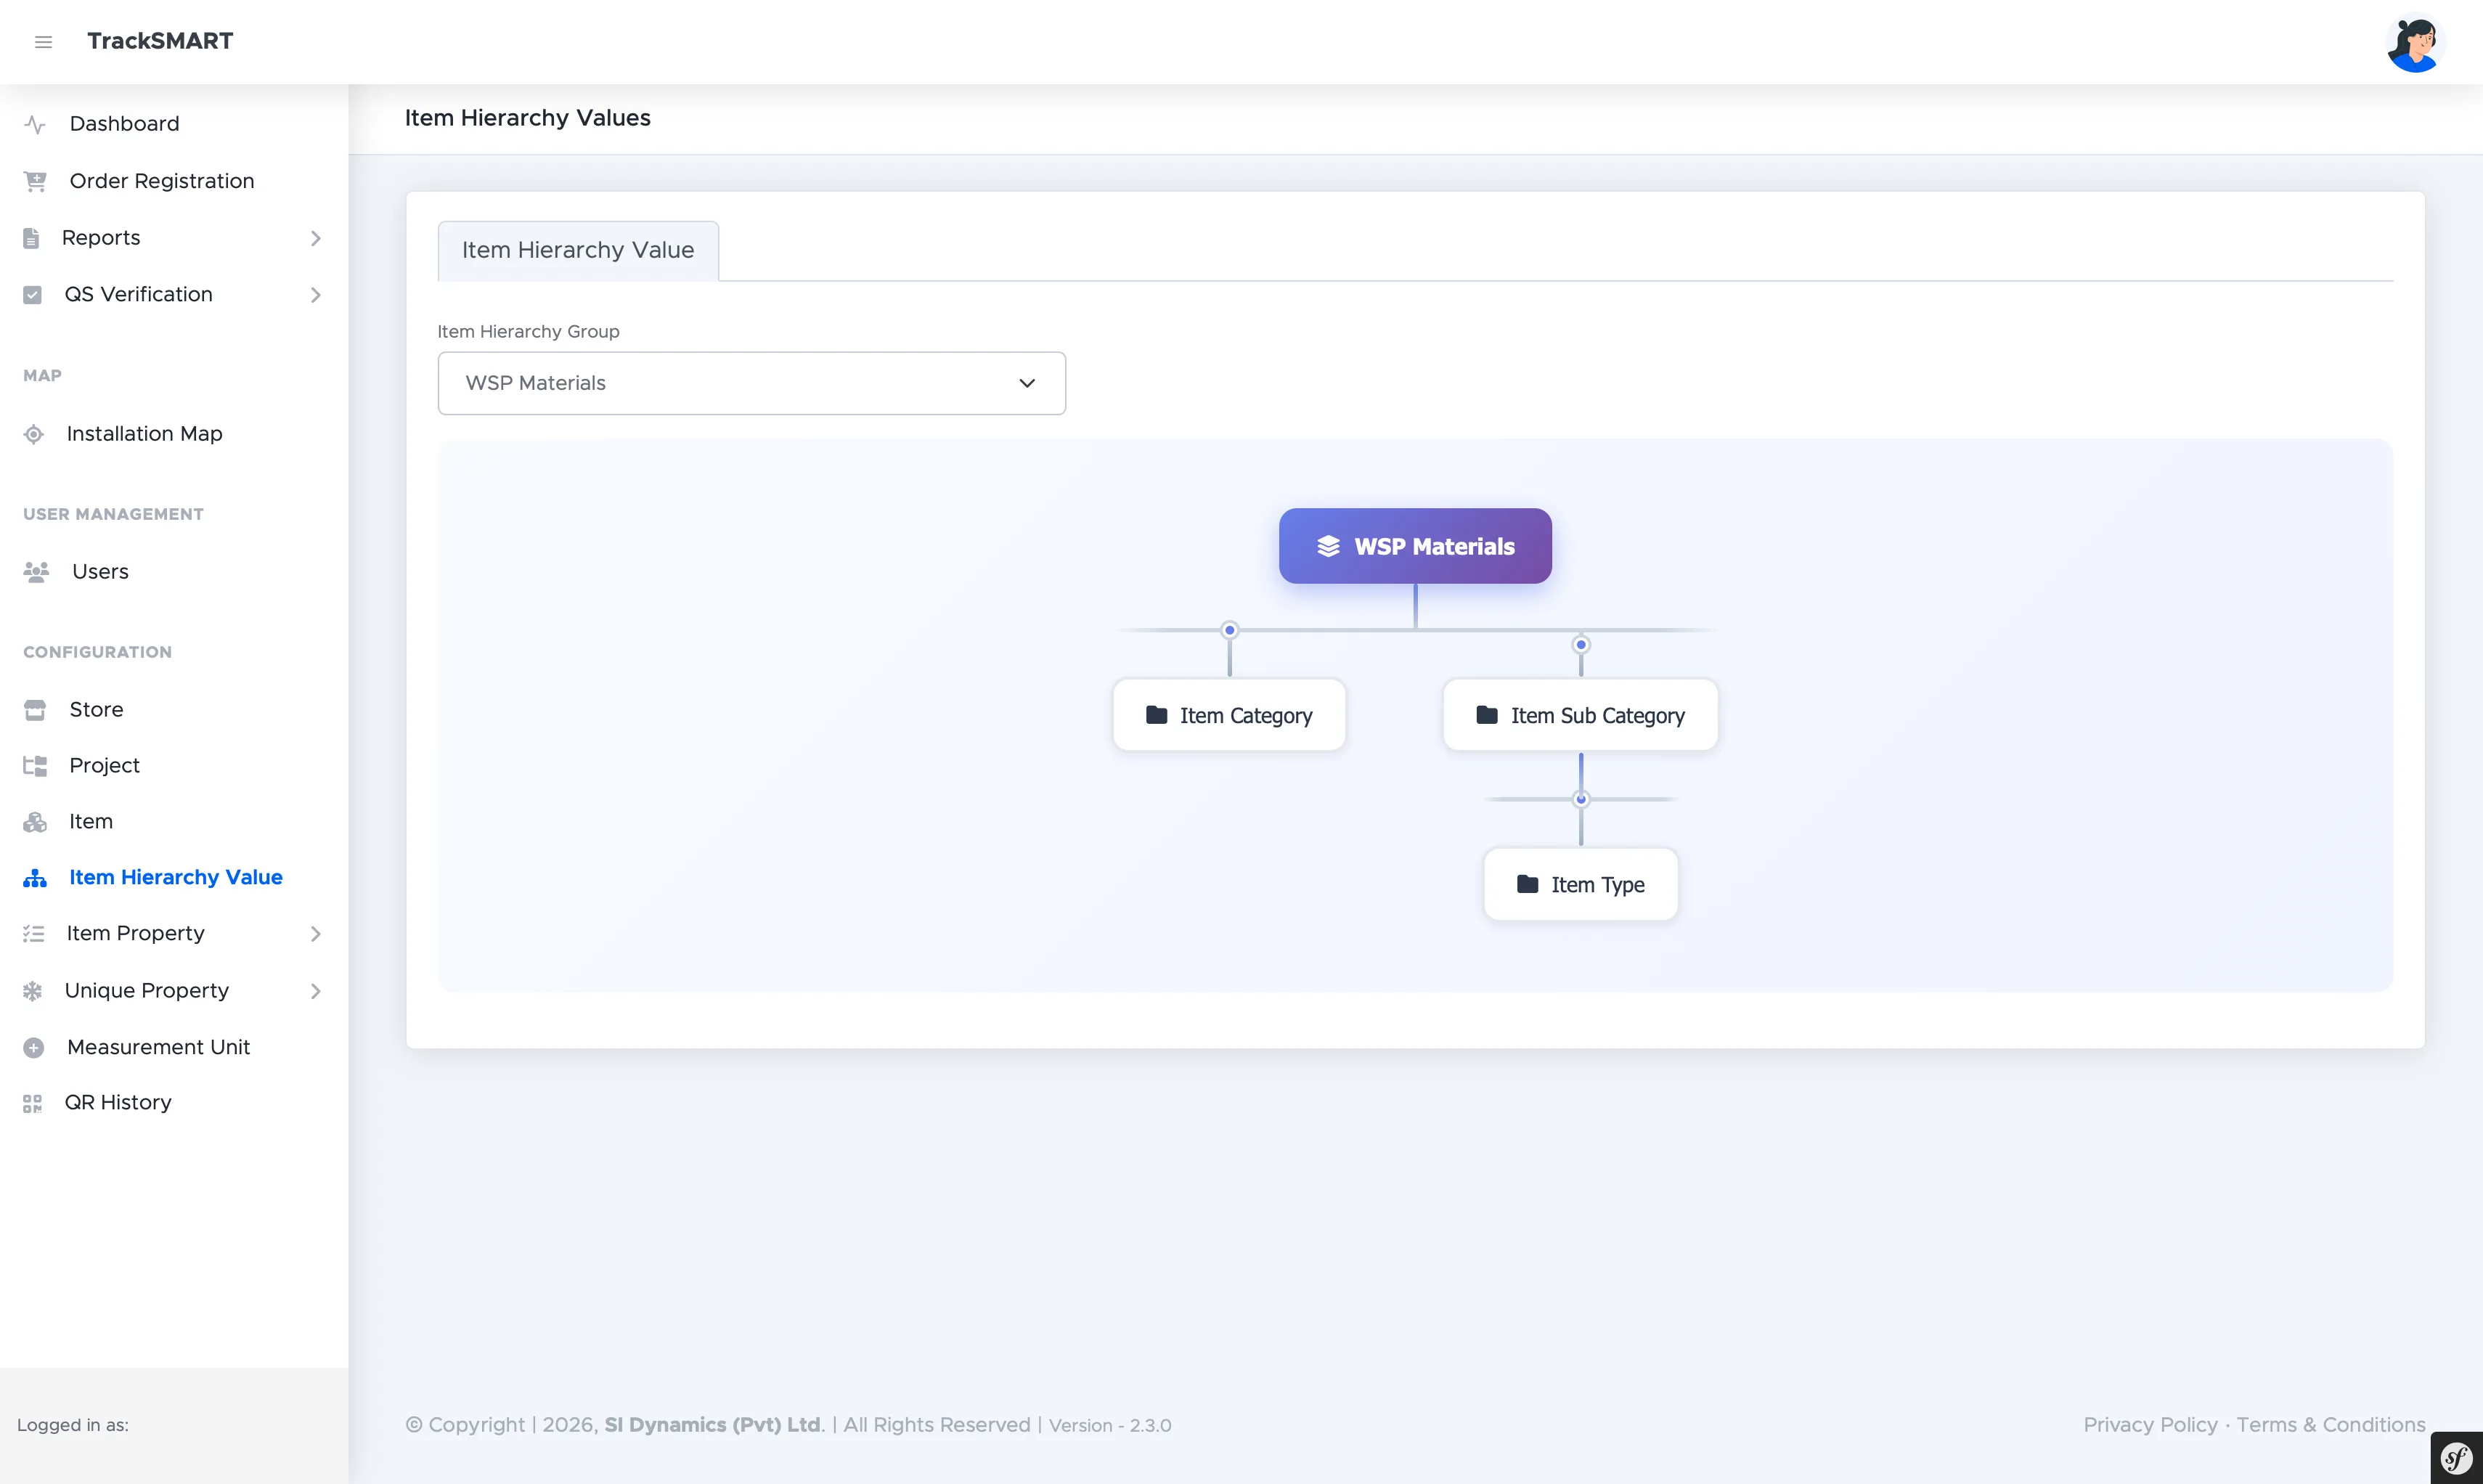
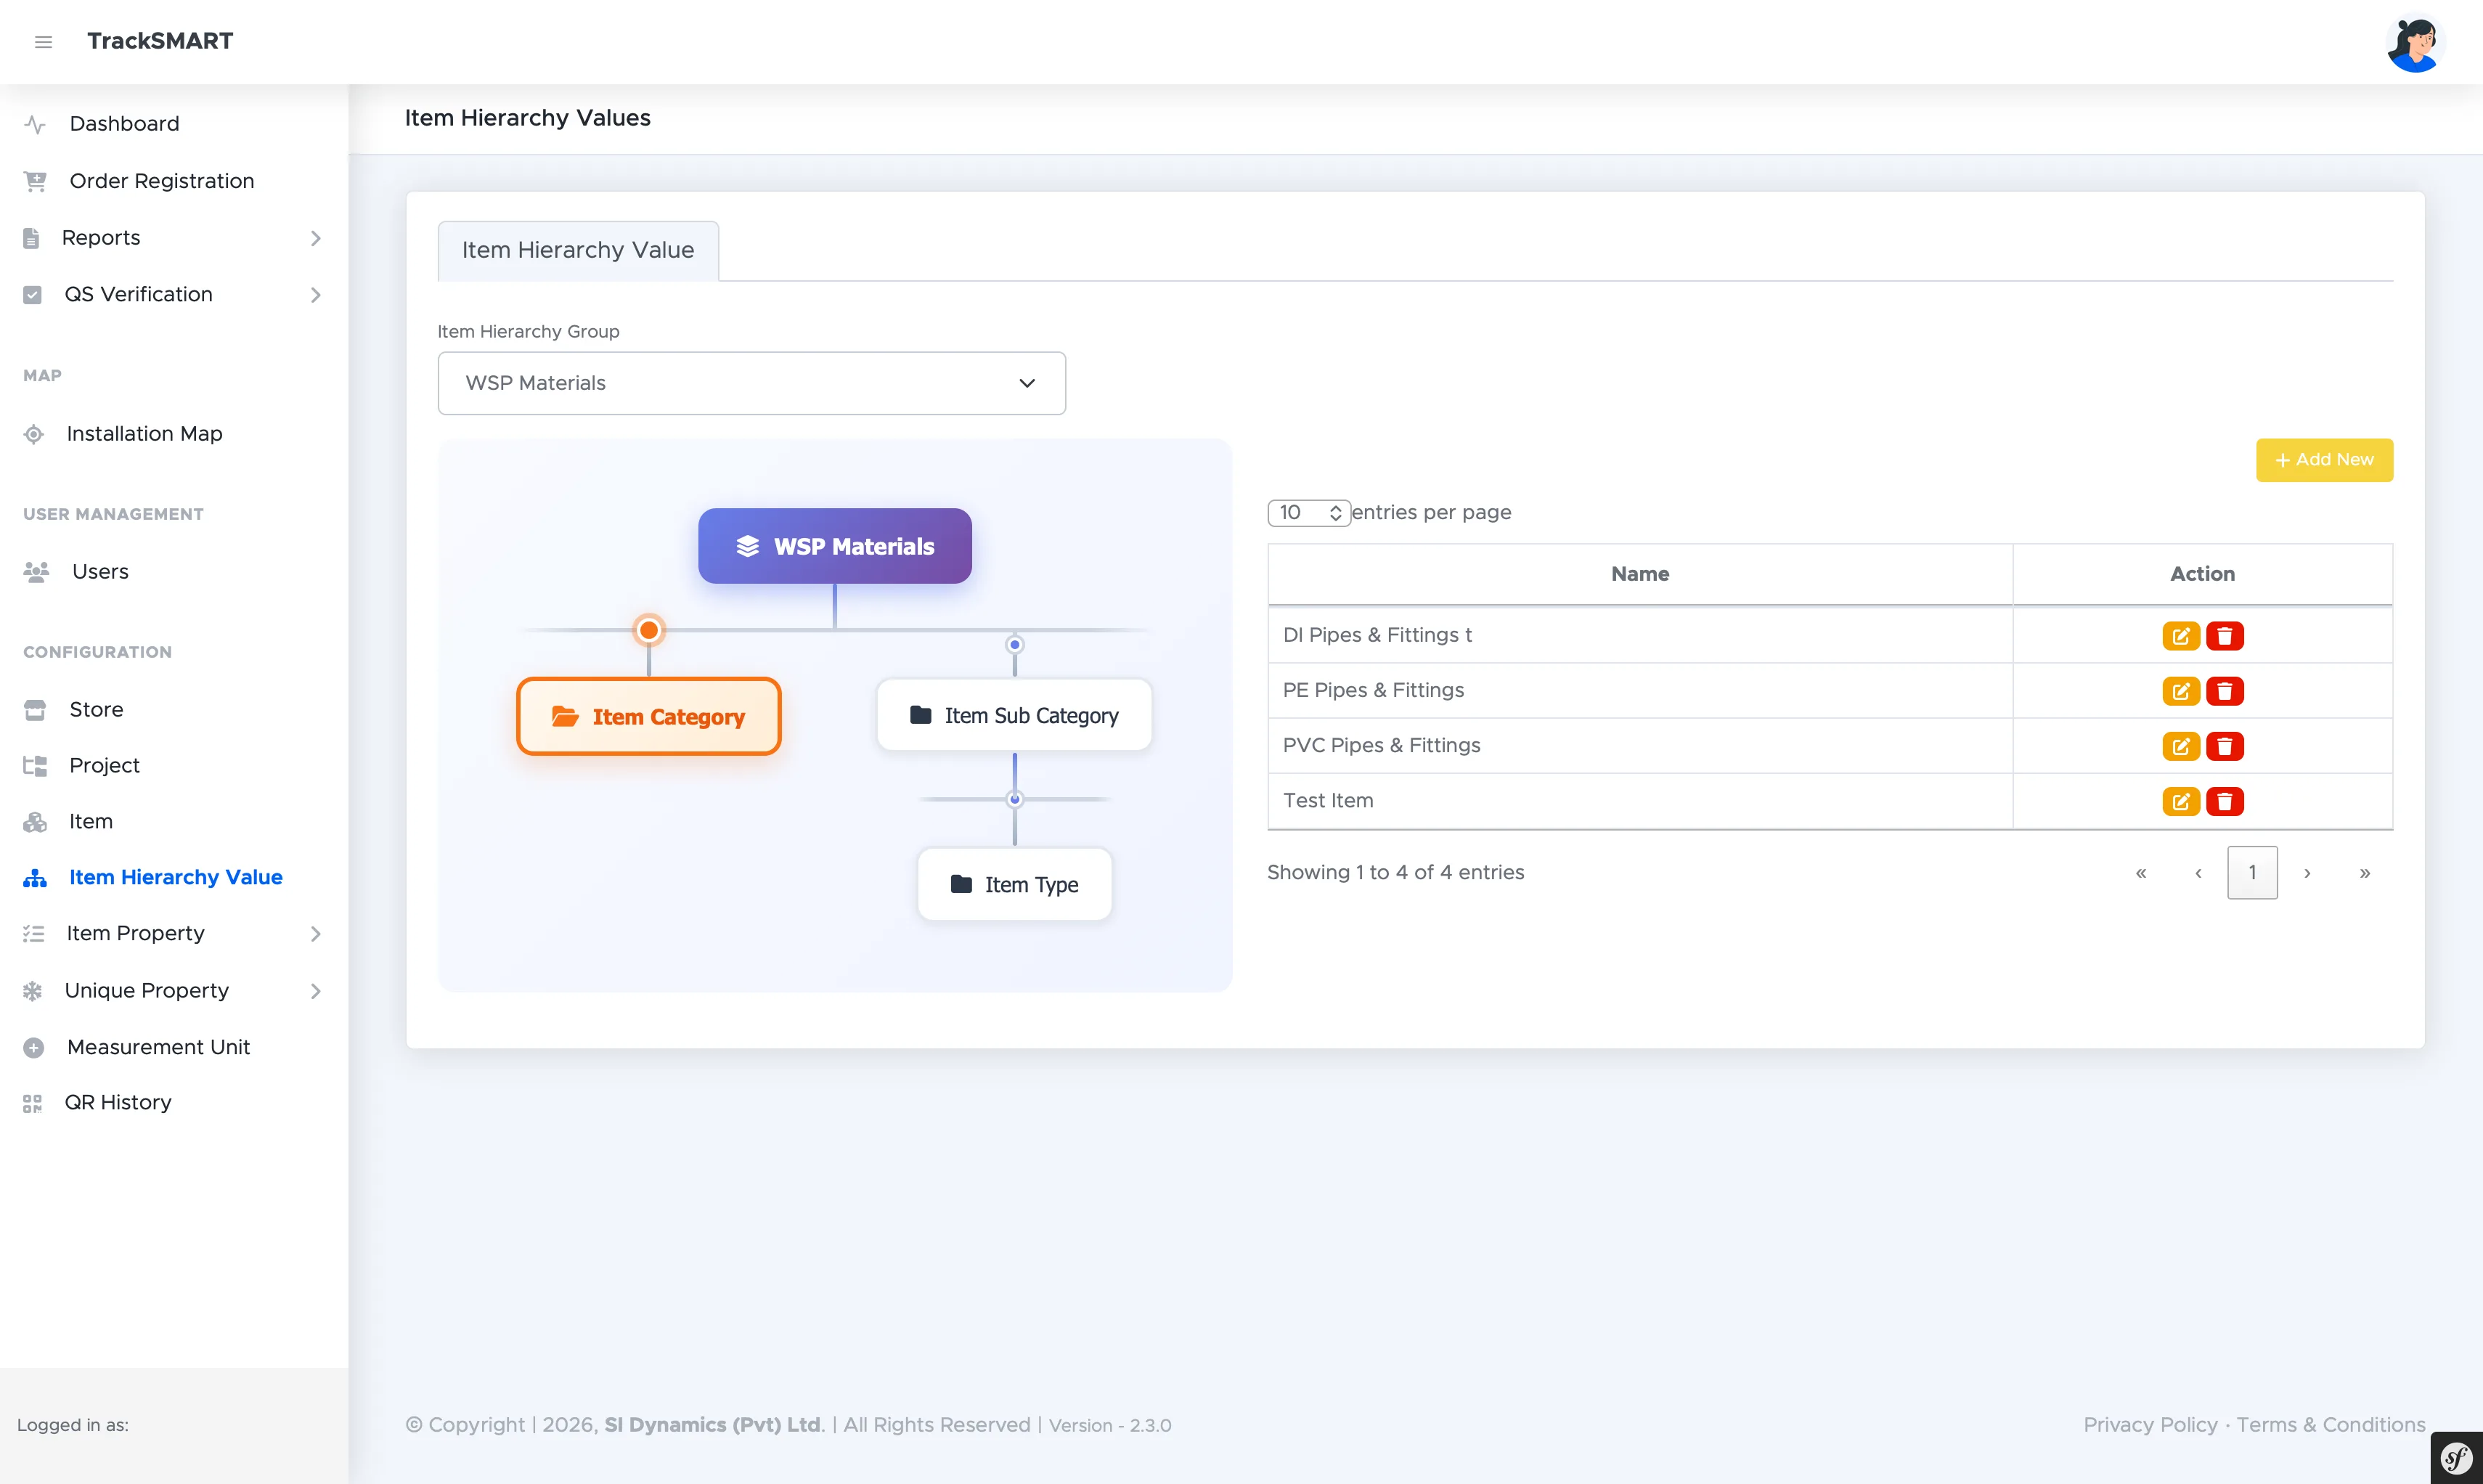
Item Hierarchy Values define the classification tree inside each hierarchy group. For WSP Materials the tree runs Item Category and Item Sub Category down to Item Type. Selecting a node in the tree opens its values table, where entries like DI Pipes & Fittings, PE Pipes & Fittings, and PVC Pipes & Fittings are maintained with Add New, edit, and delete actions.
app.tracksmart.lk
Hierarchy tree: WSP Materials branching into Item Category, Item Sub Category, and Item Type.
app.tracksmart.lk
Selecting Item Category shows its values (DI, PE, and PVC Pipes & Fittings) with row actions.
Choose the Item Hierarchy Group first — the tree renders per group.
Click a tree node (Category, Sub Category, Type) to manage that level's values.
Keep value names consistent; they appear in mobile scanning and report filters.
Shared Item Properties
Specification attributes reused across many items.
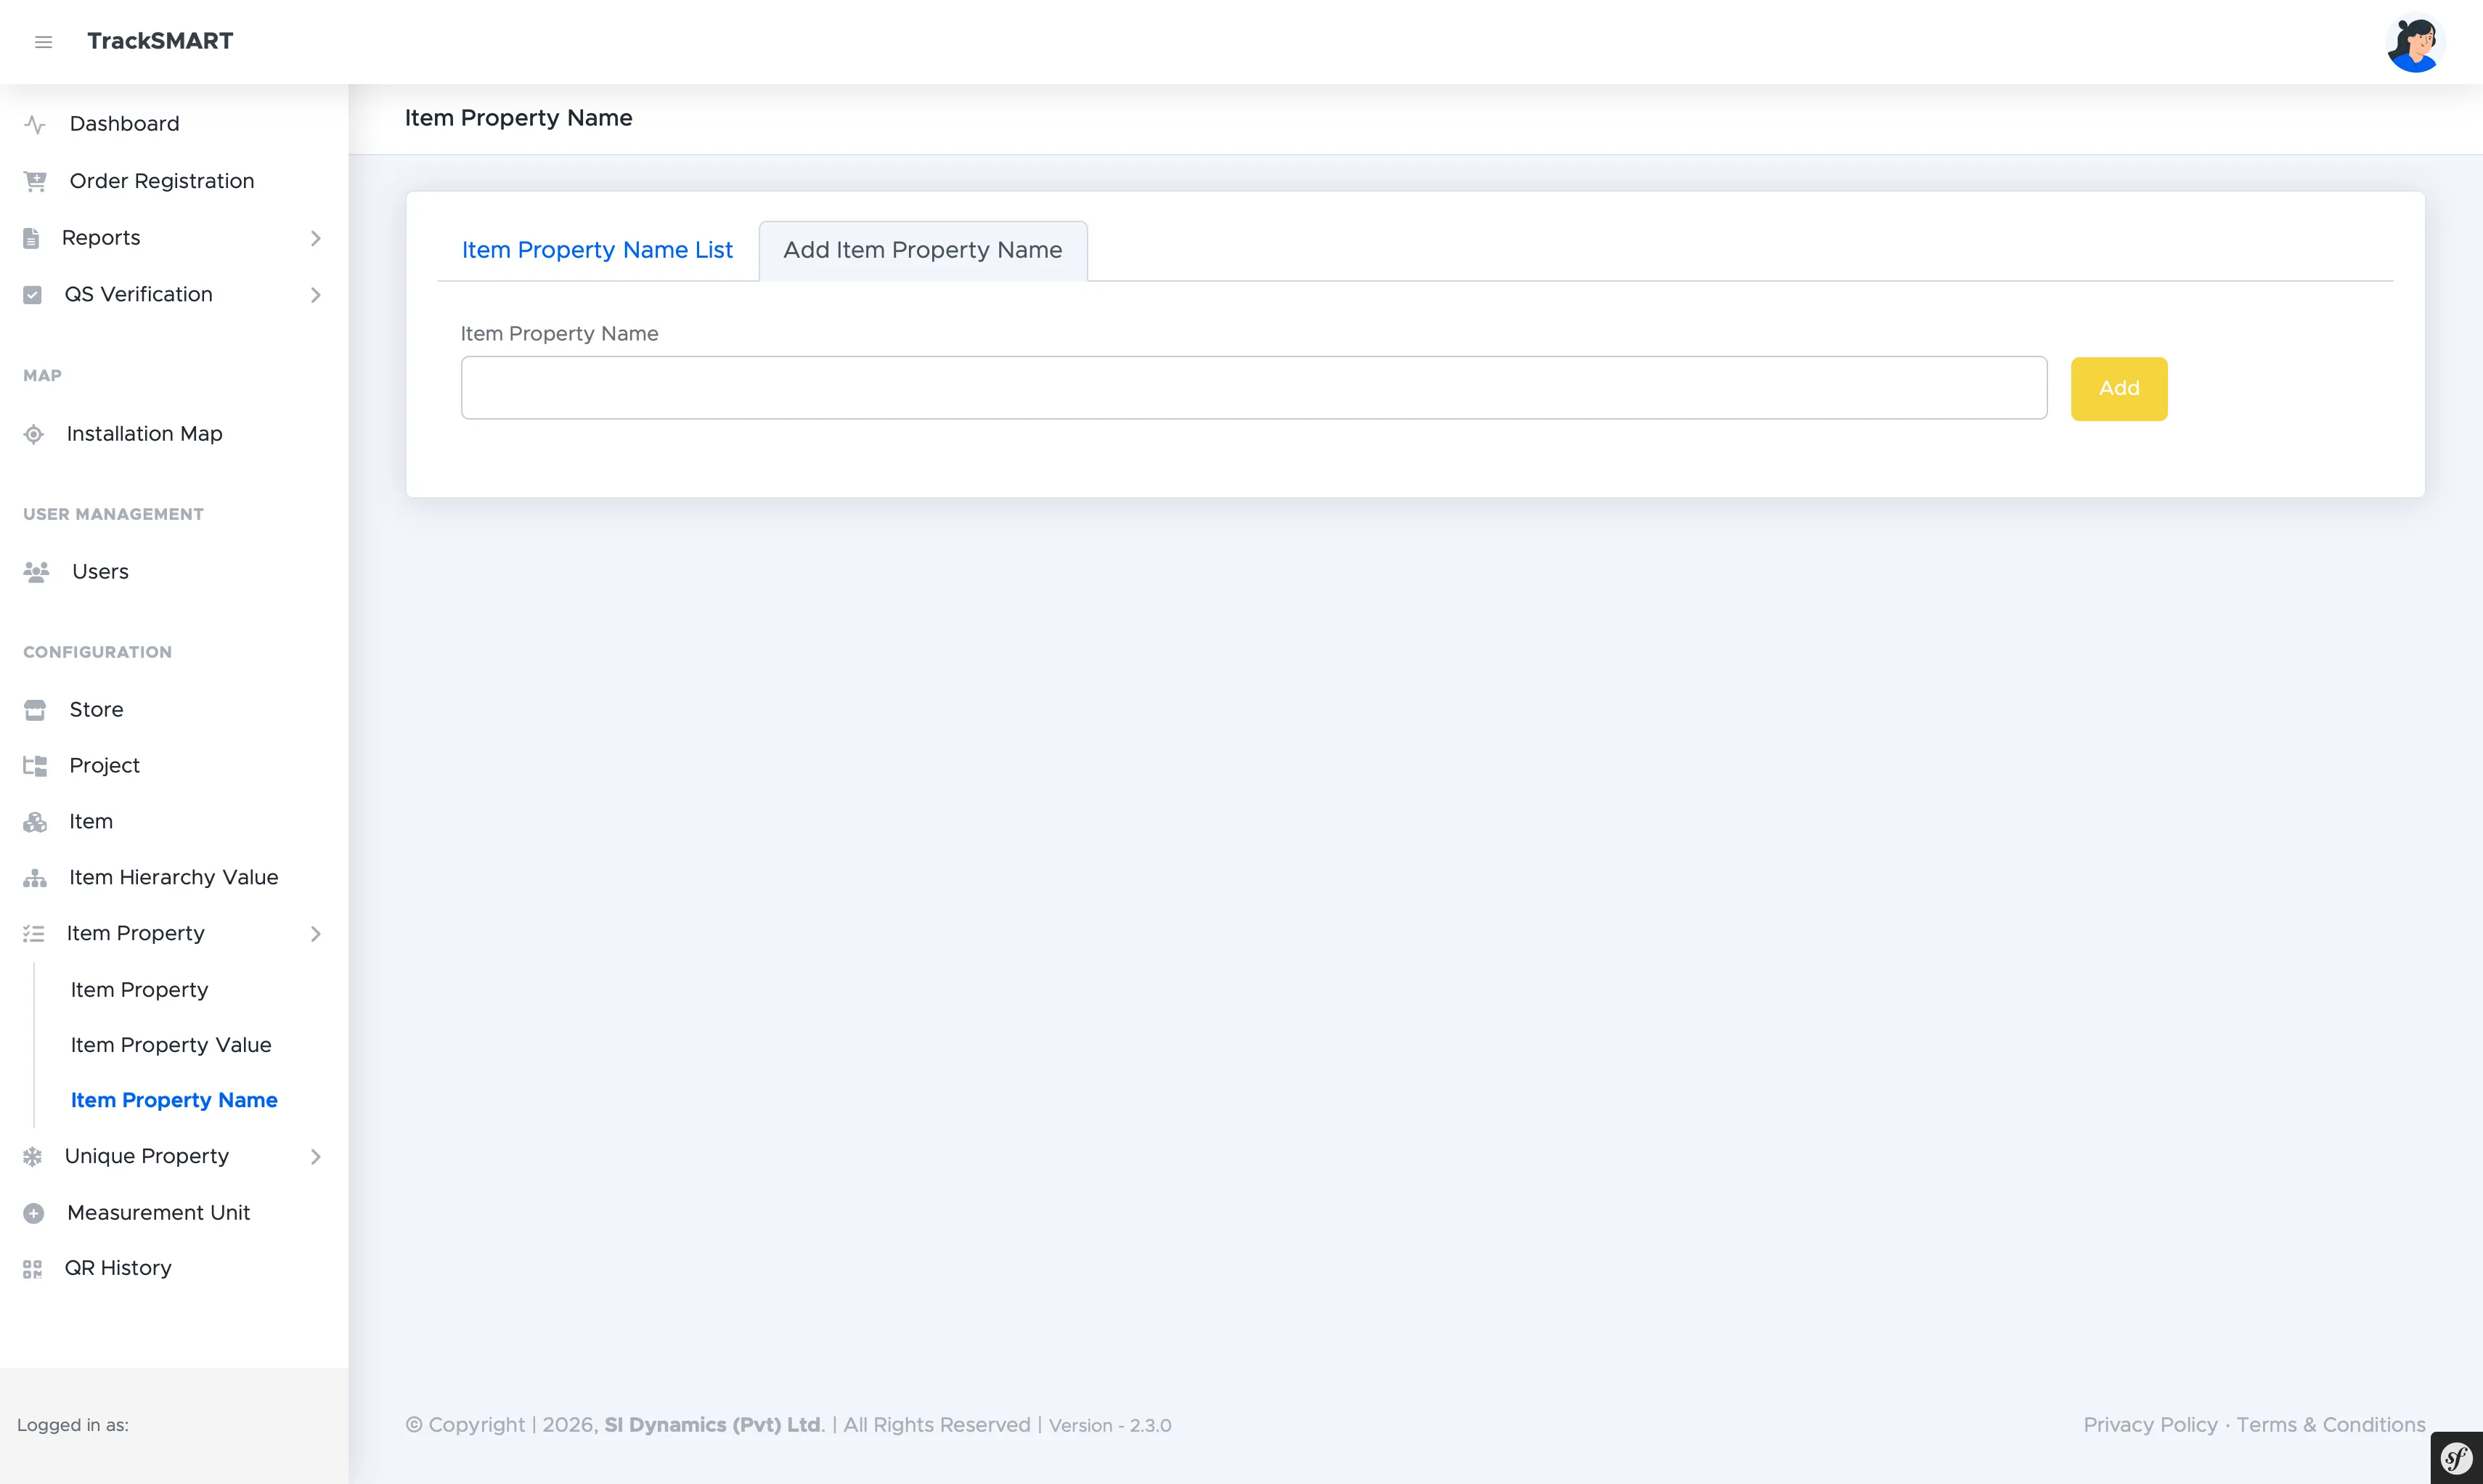
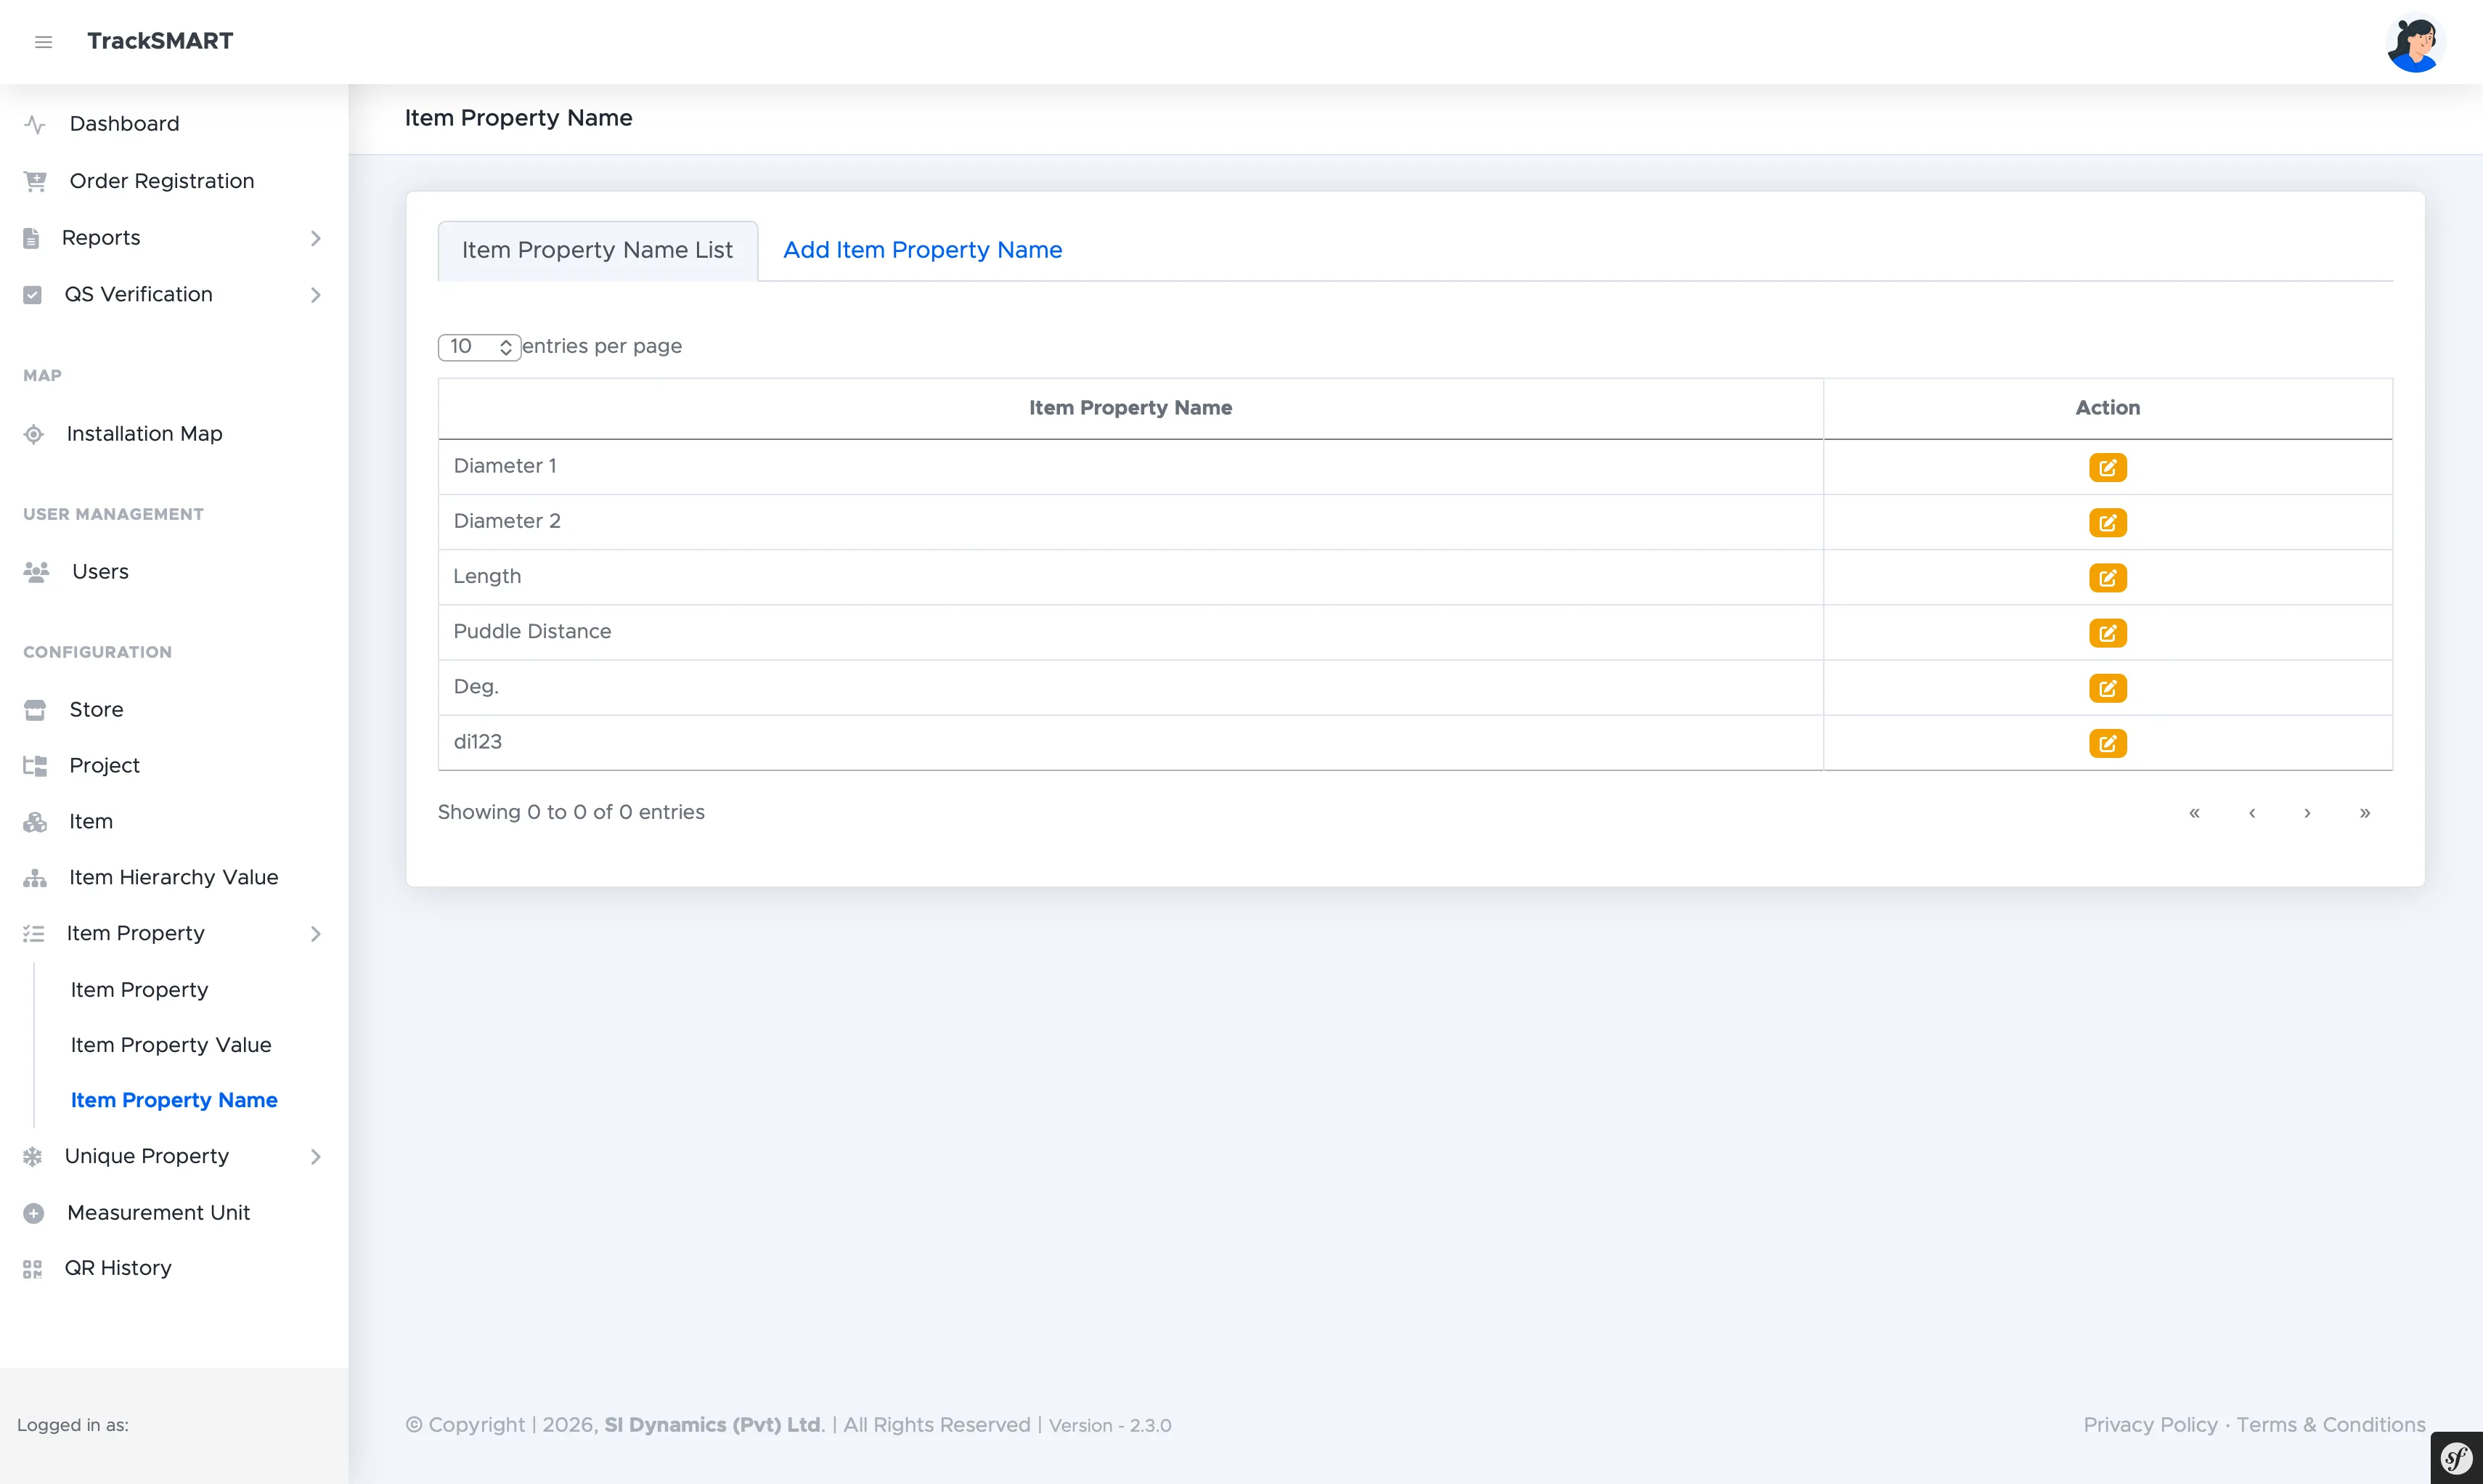
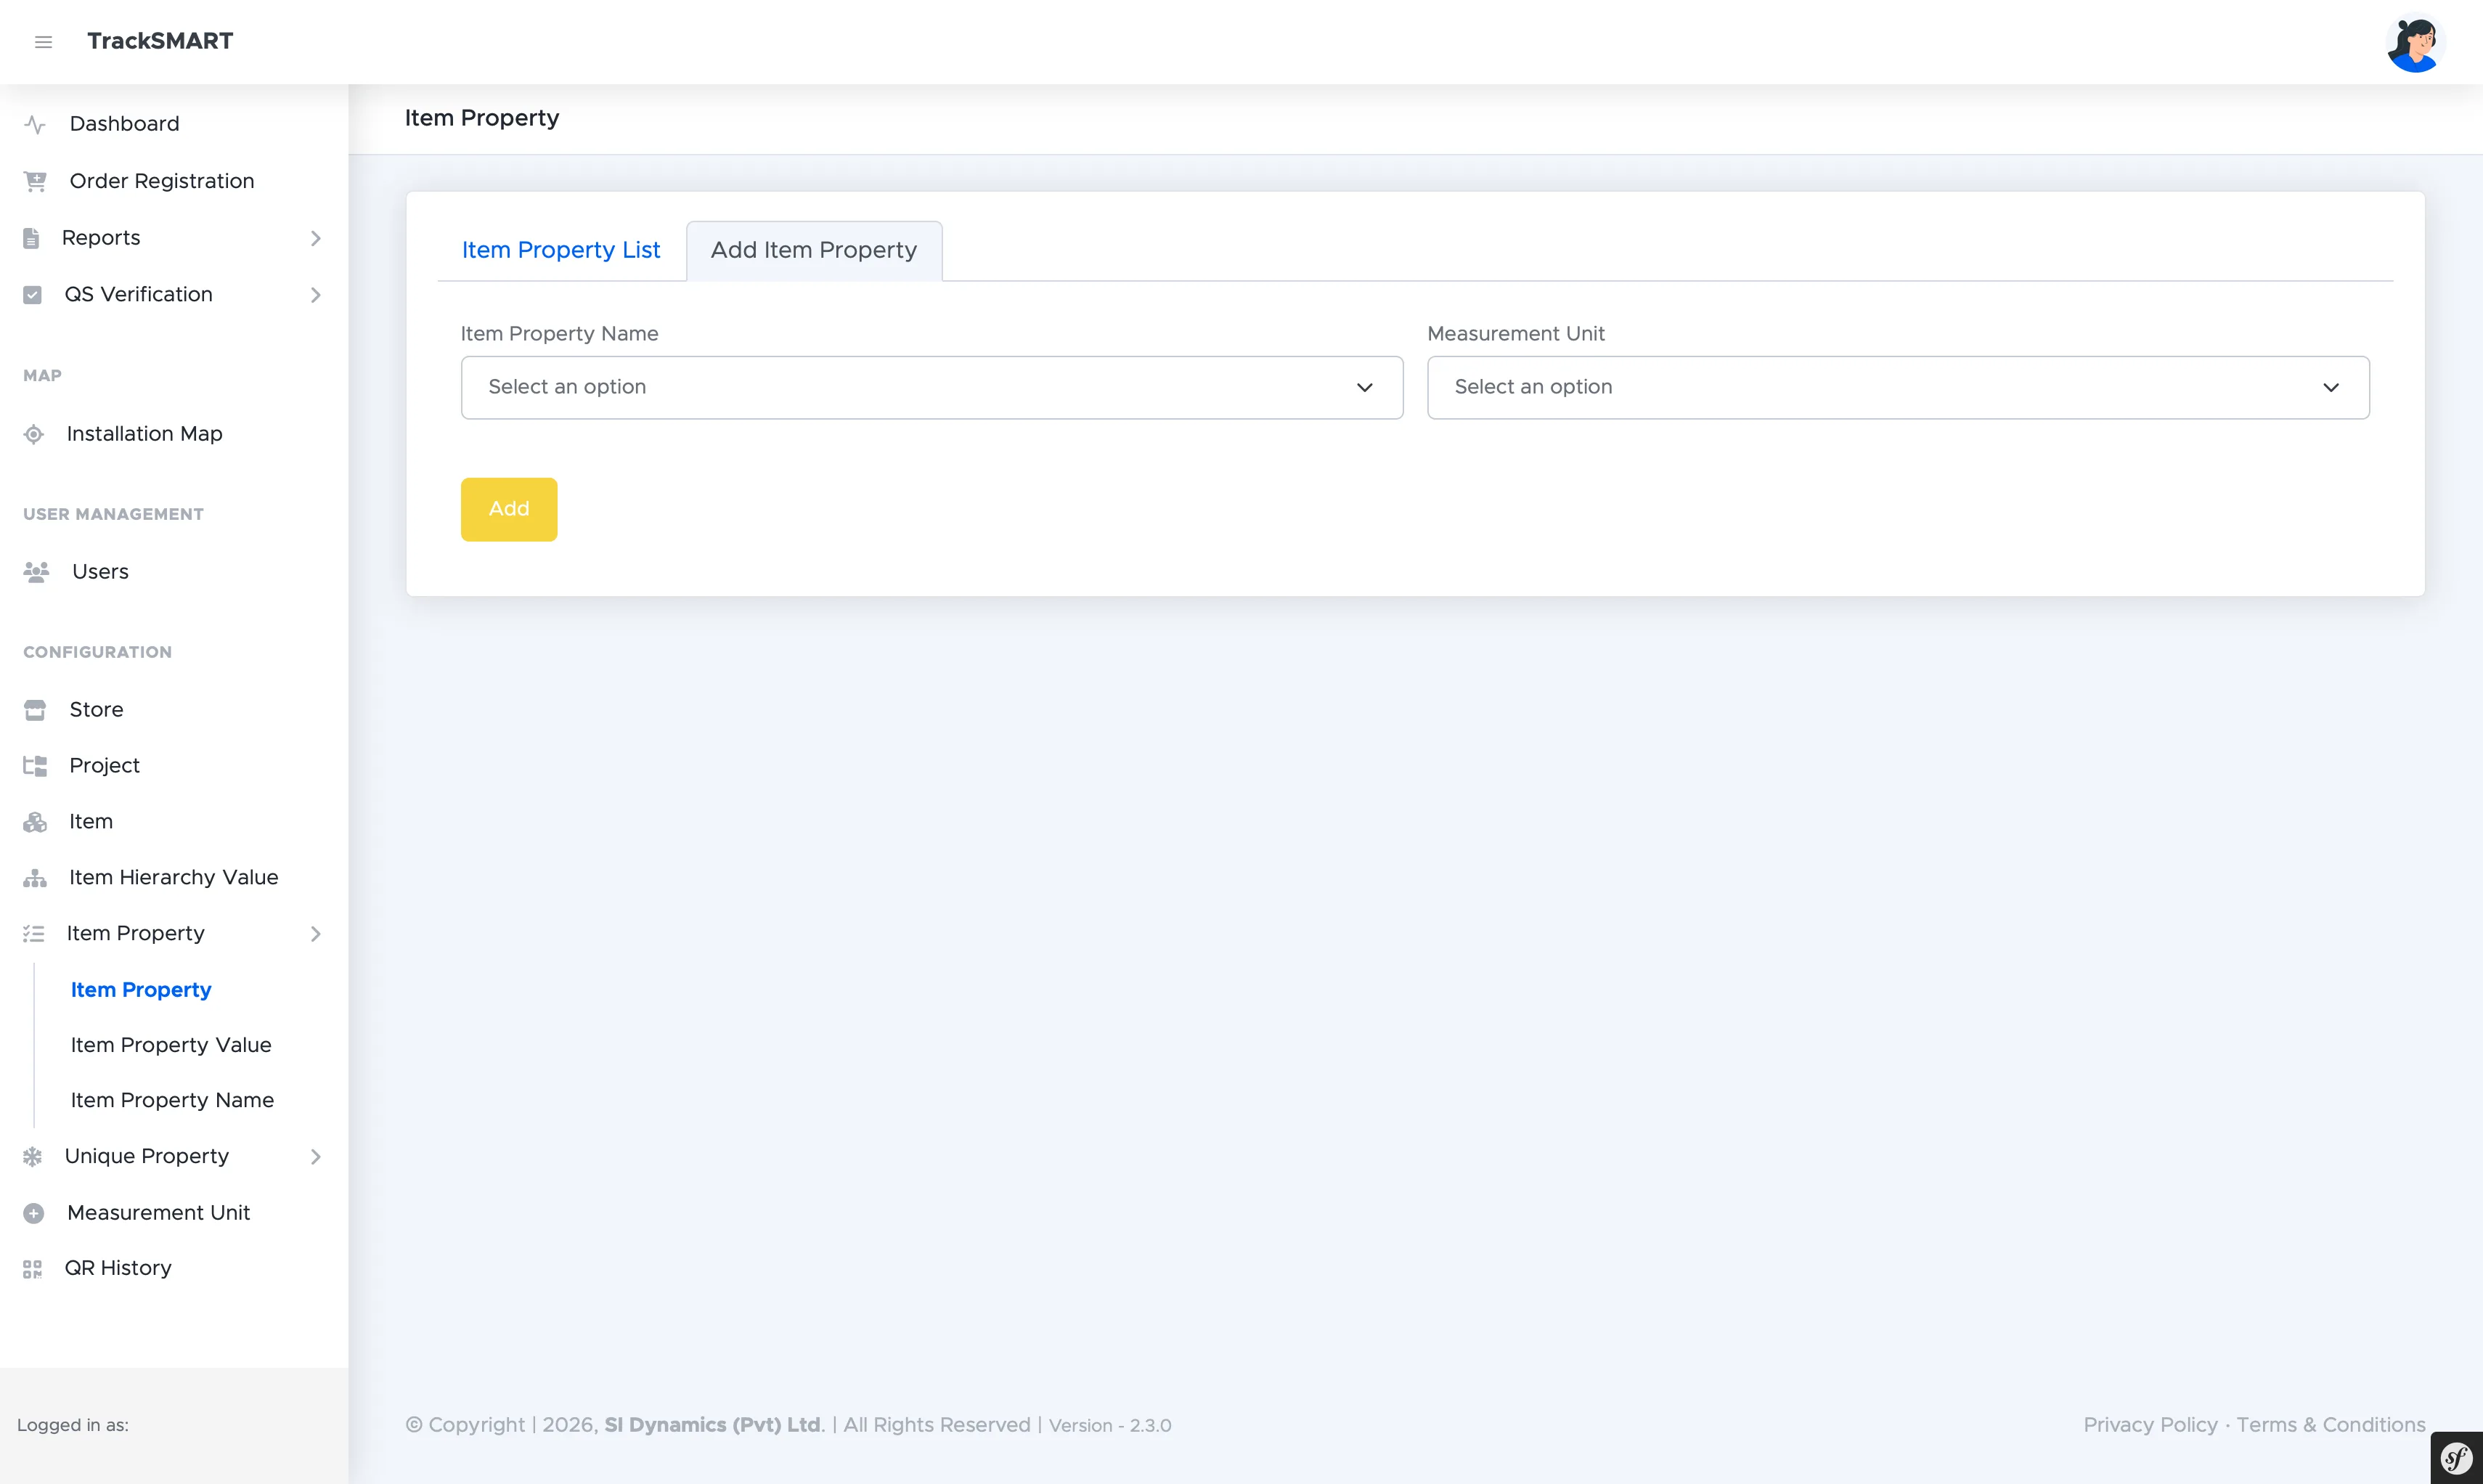
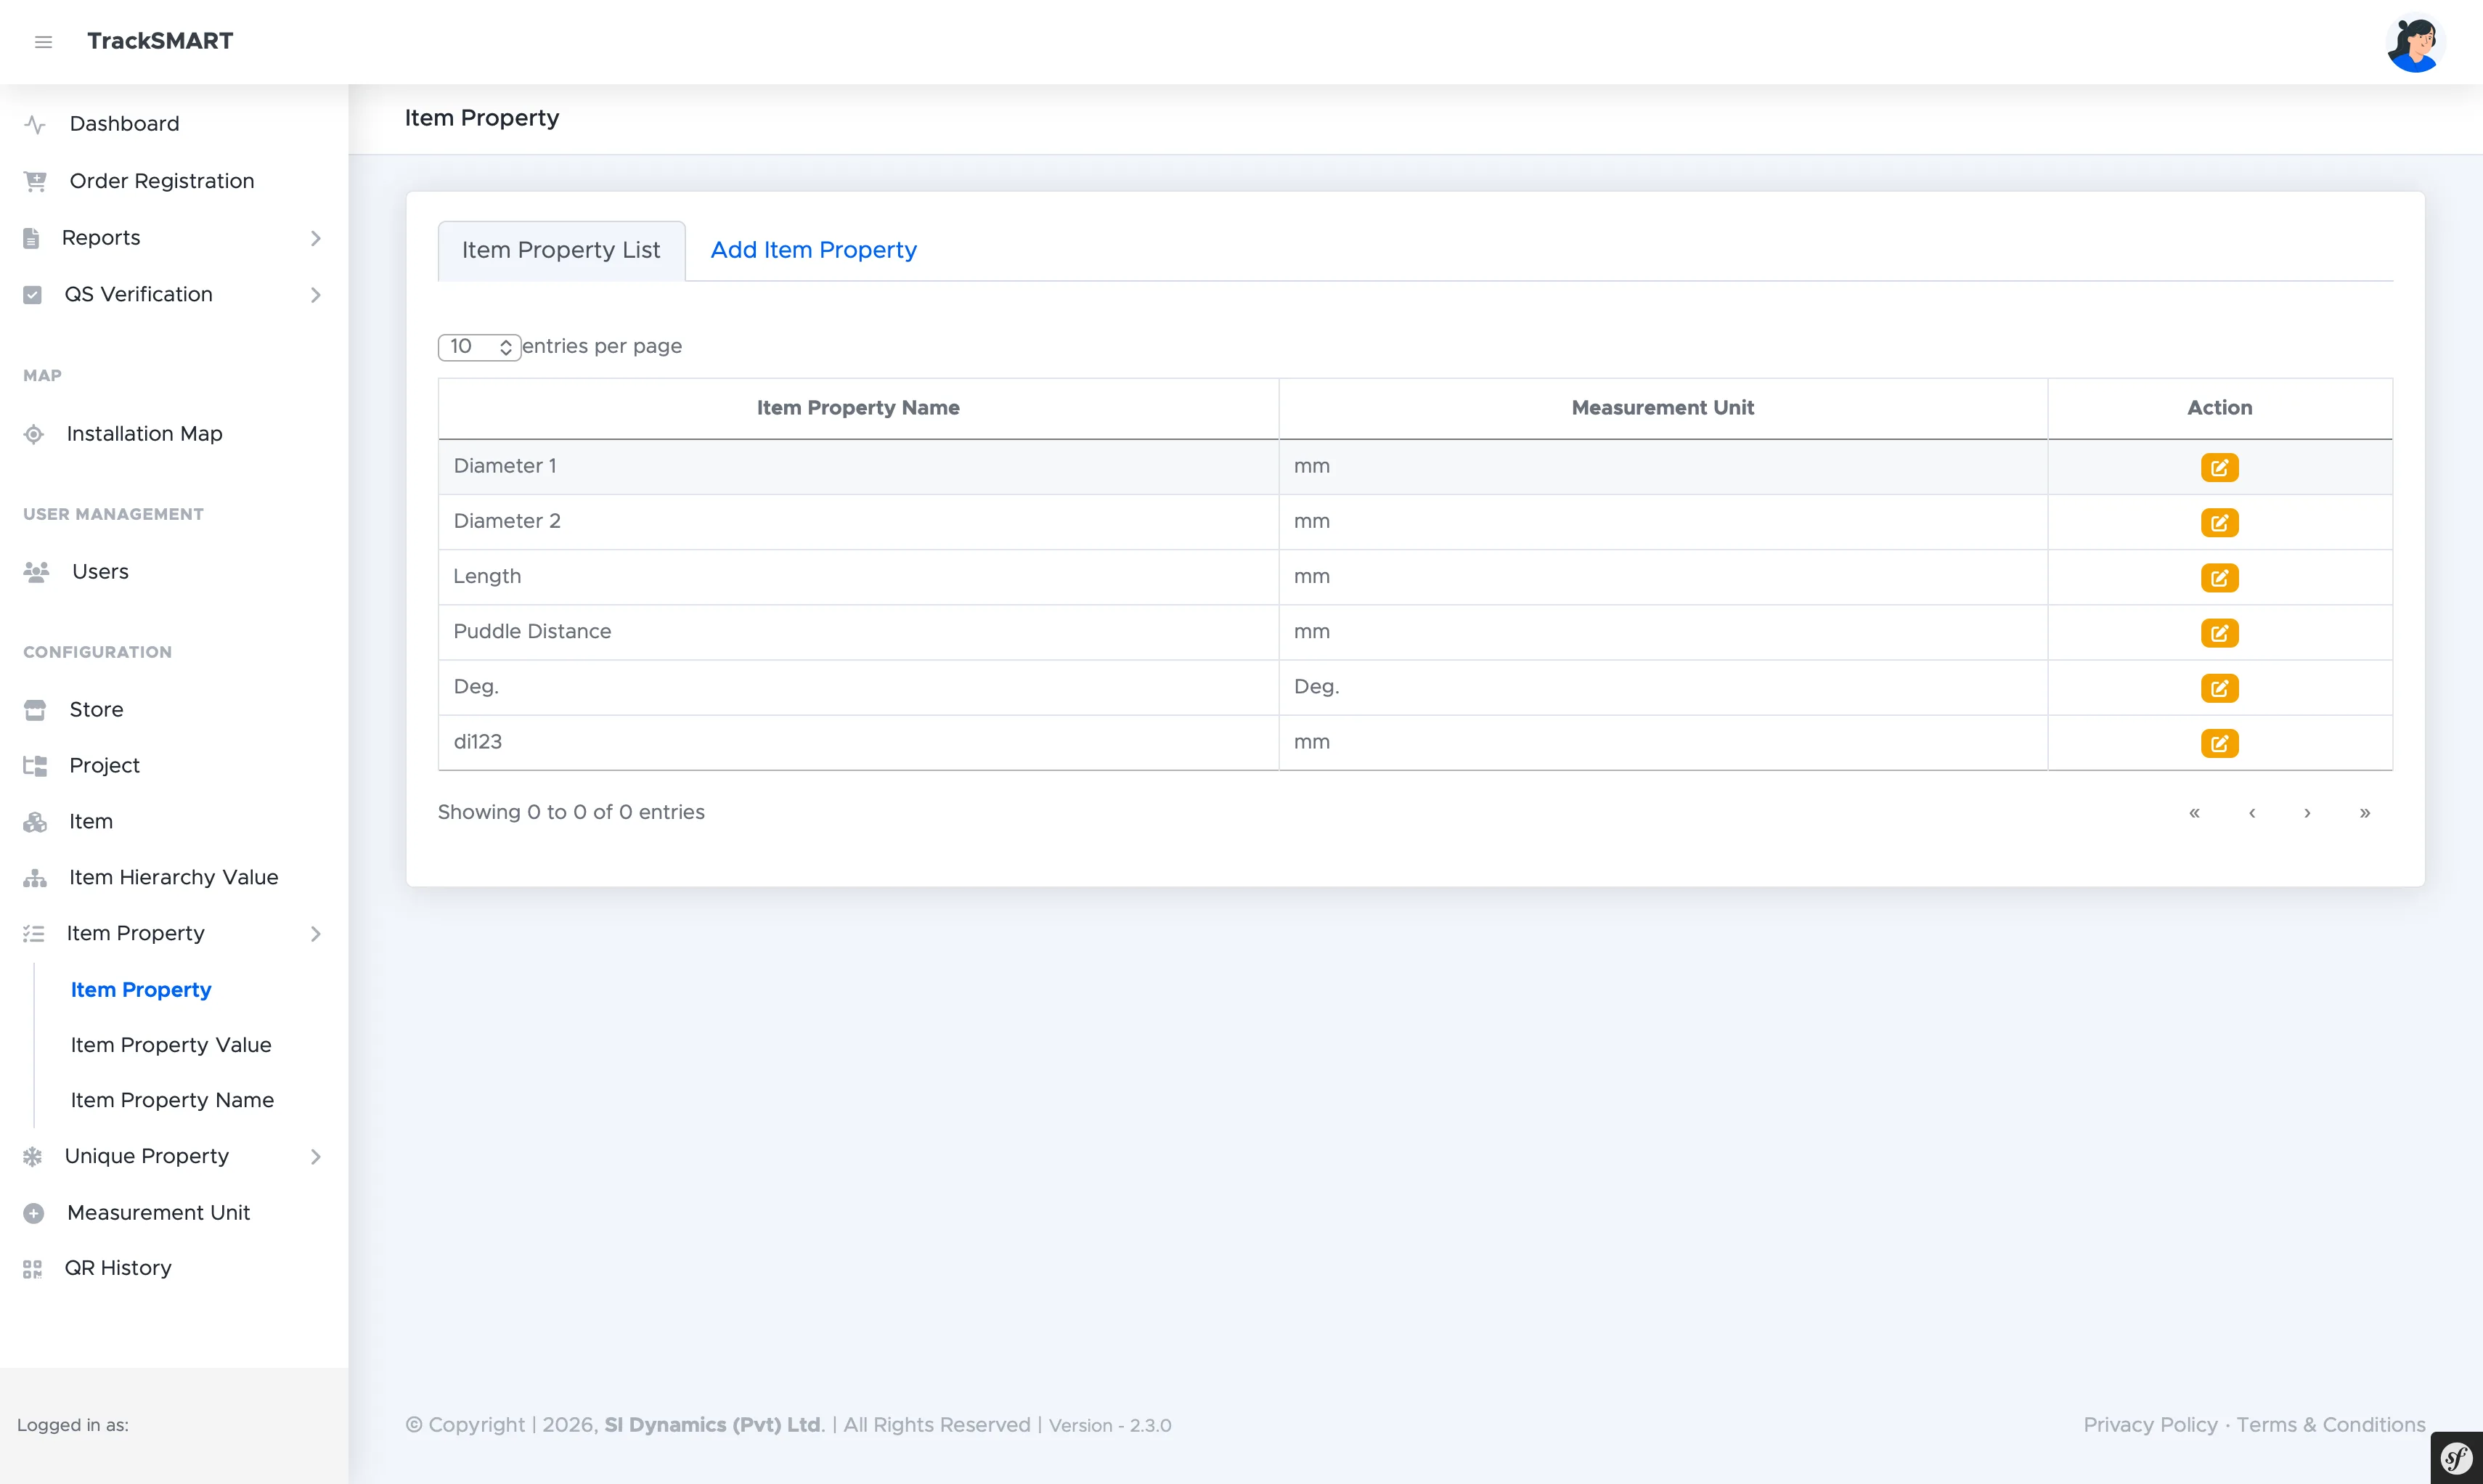
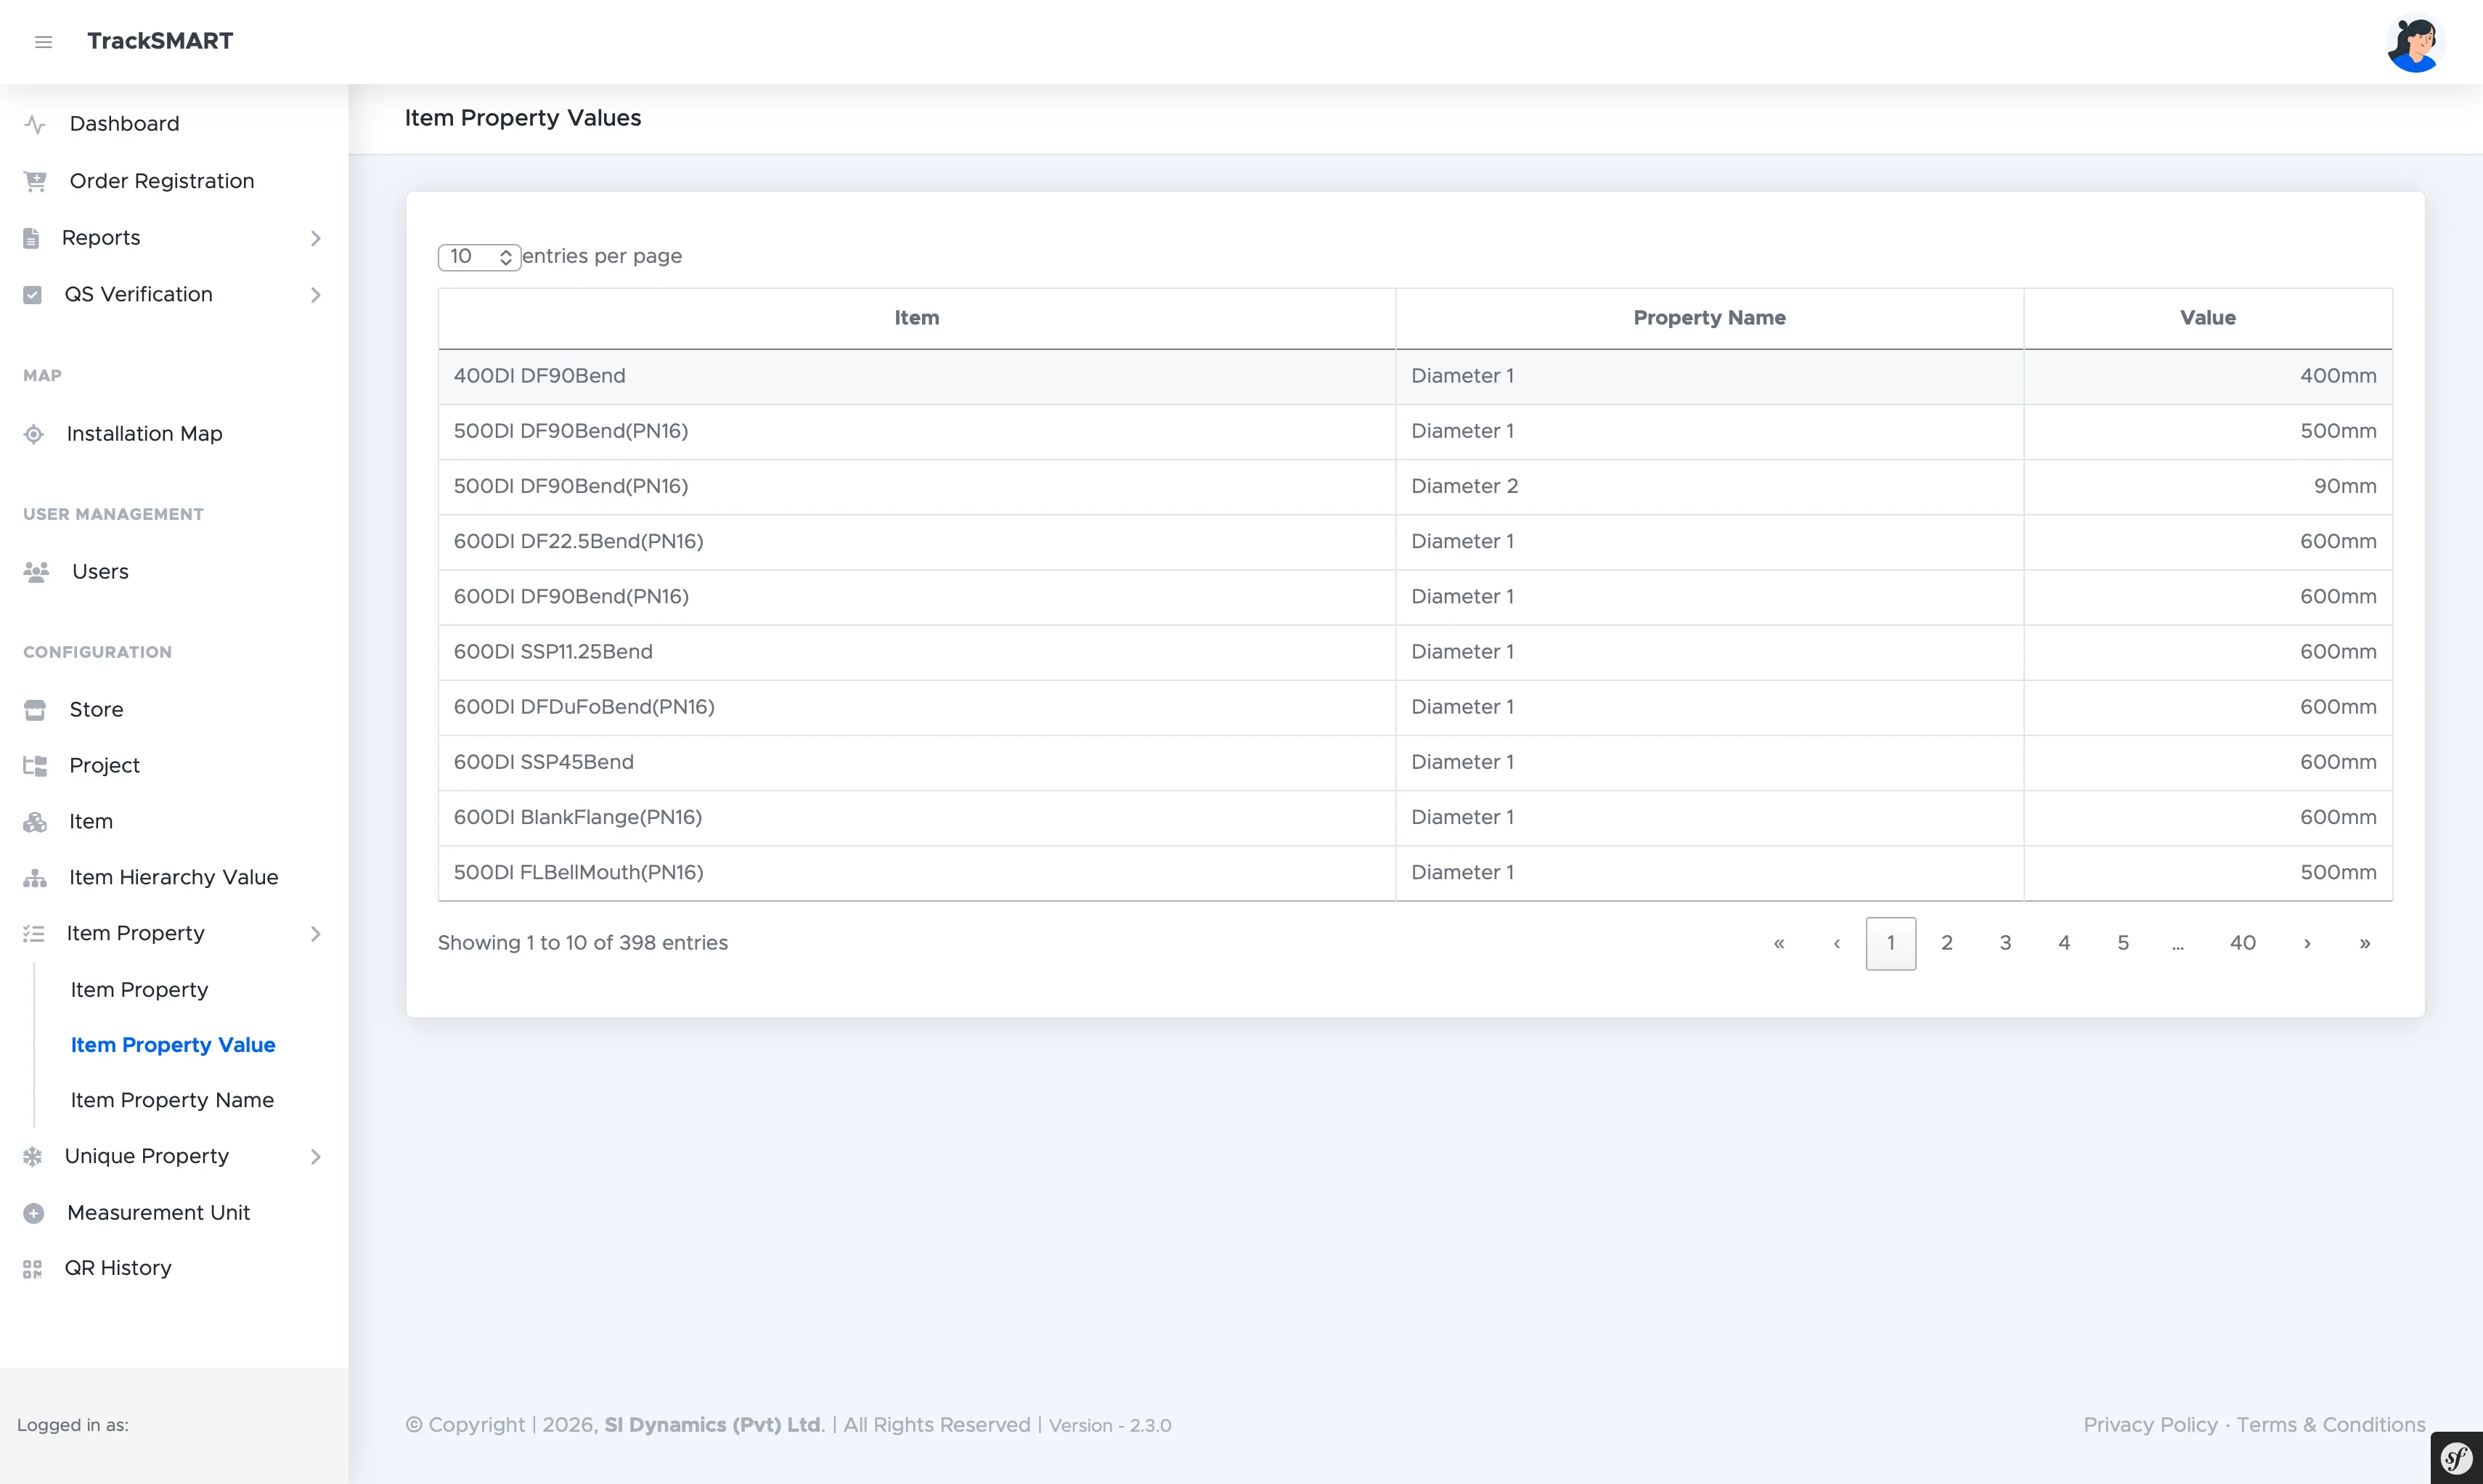
Shared properties describe specifications common to many items, such as diameters and lengths. The model has three levels: Item Property Name defines the attribute (e.g. Diameter 1), Item Property binds that attribute to a measurement unit (e.g. Diameter 1 in mm), and Item Property Value records the actual value per item (e.g. 400DI DF90Bend has Diameter 1 of 400mm).
app.tracksmart.lk
Add Item Property Name: defining a new attribute.
app.tracksmart.lk
Property names in use: Diameter 1 and 2, Length, Puddle Distance, Deg.
app.tracksmart.lk
Add Item Property: binding a property name to a measurement unit.
app.tracksmart.lk
Each property name paired with its unit (Diameter 1 in mm, Deg. in Deg.).
app.tracksmart.lk
Property values per item: hundreds of rows mapping items to dimensions.
Unique (Per-QR) Properties
Attributes tracked per serialized QR instance.
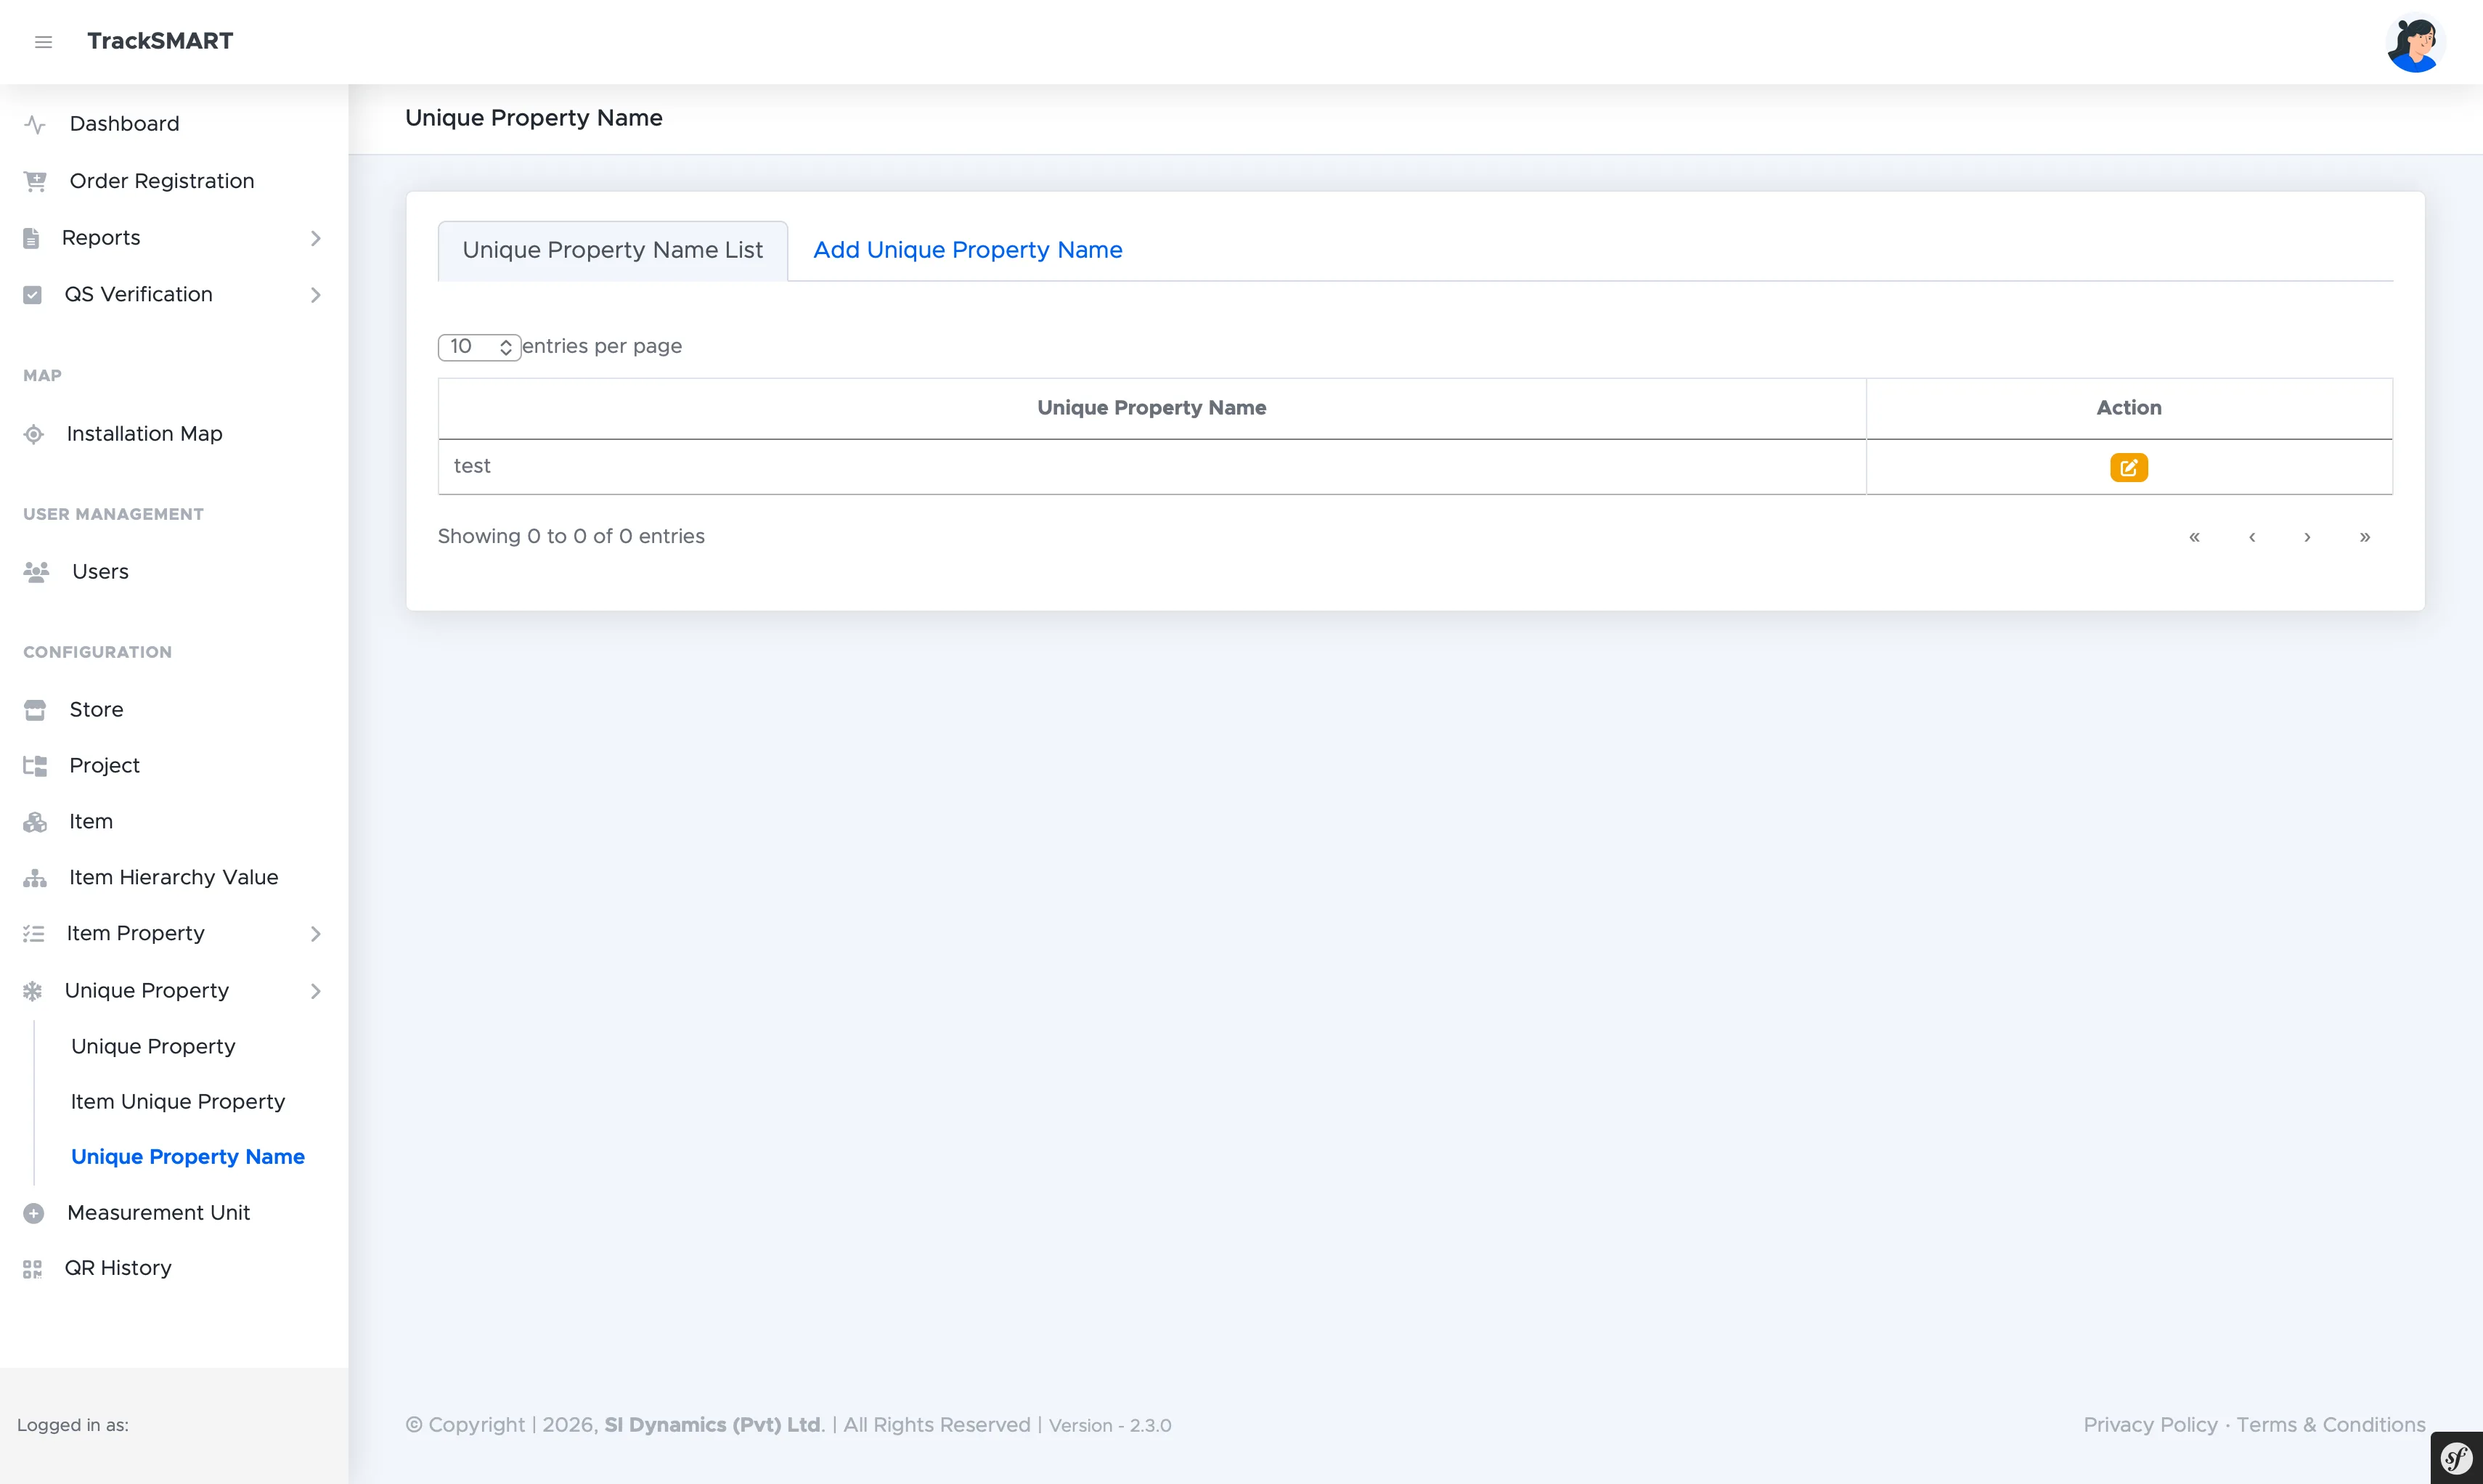
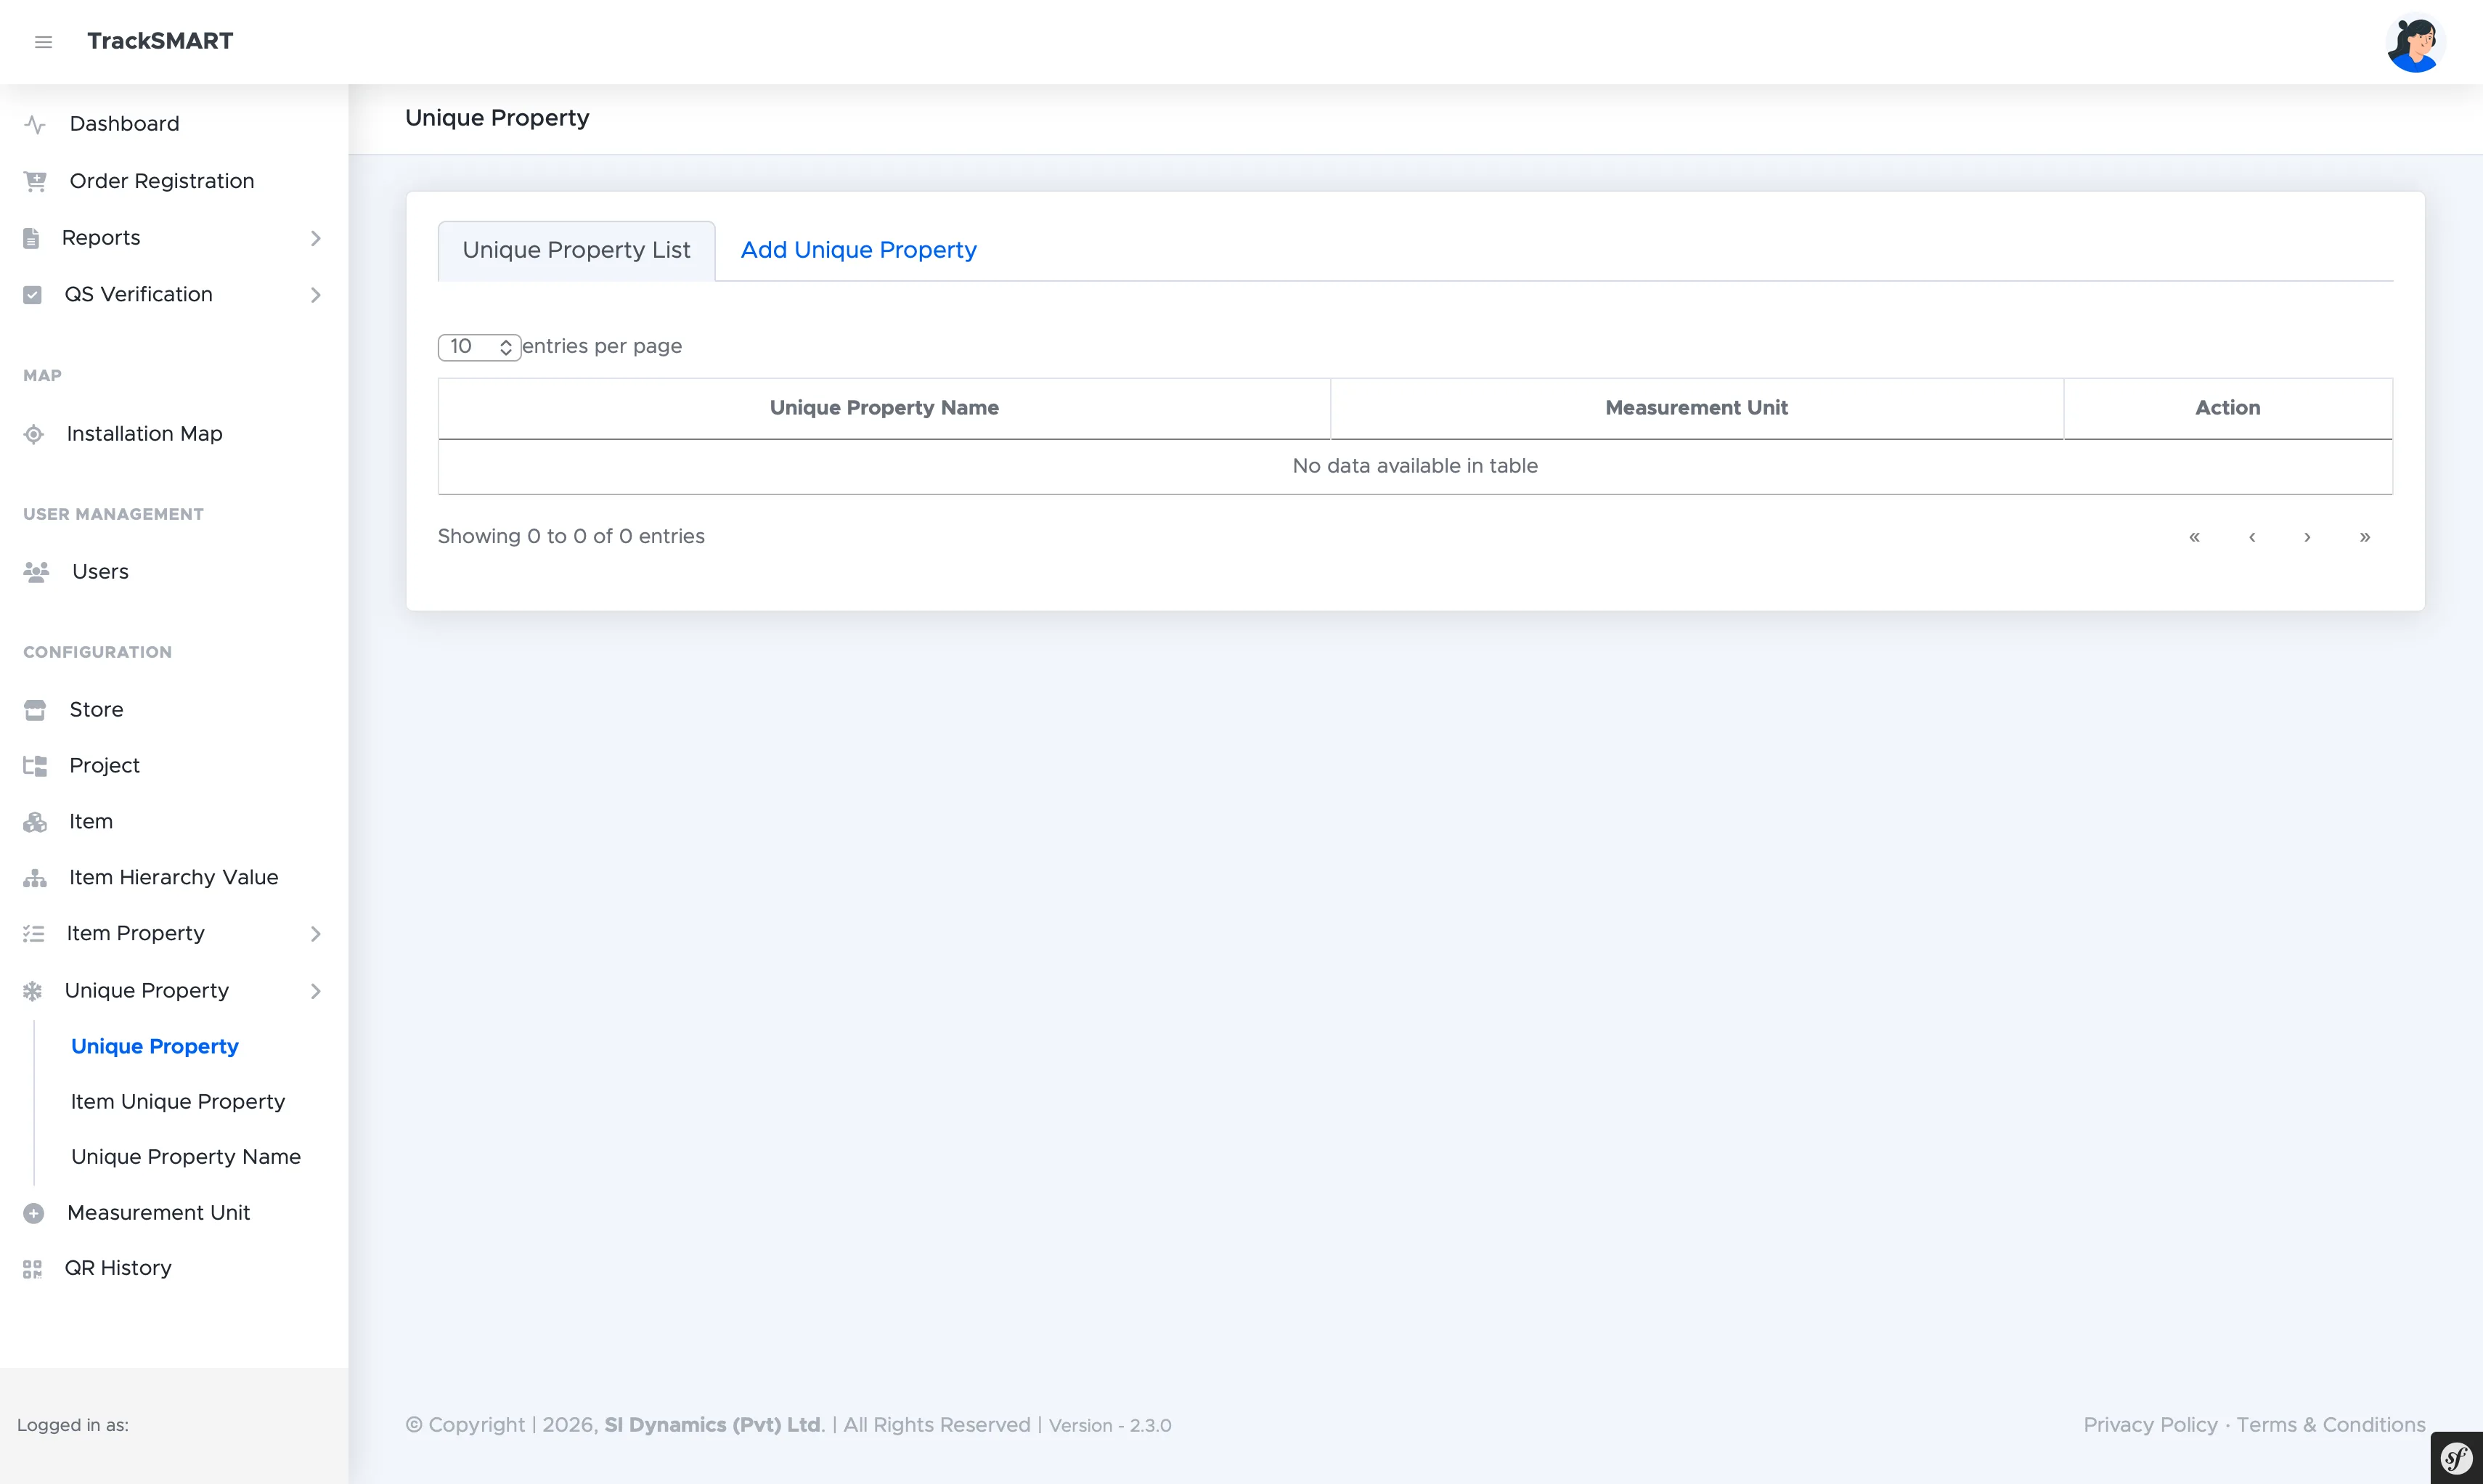
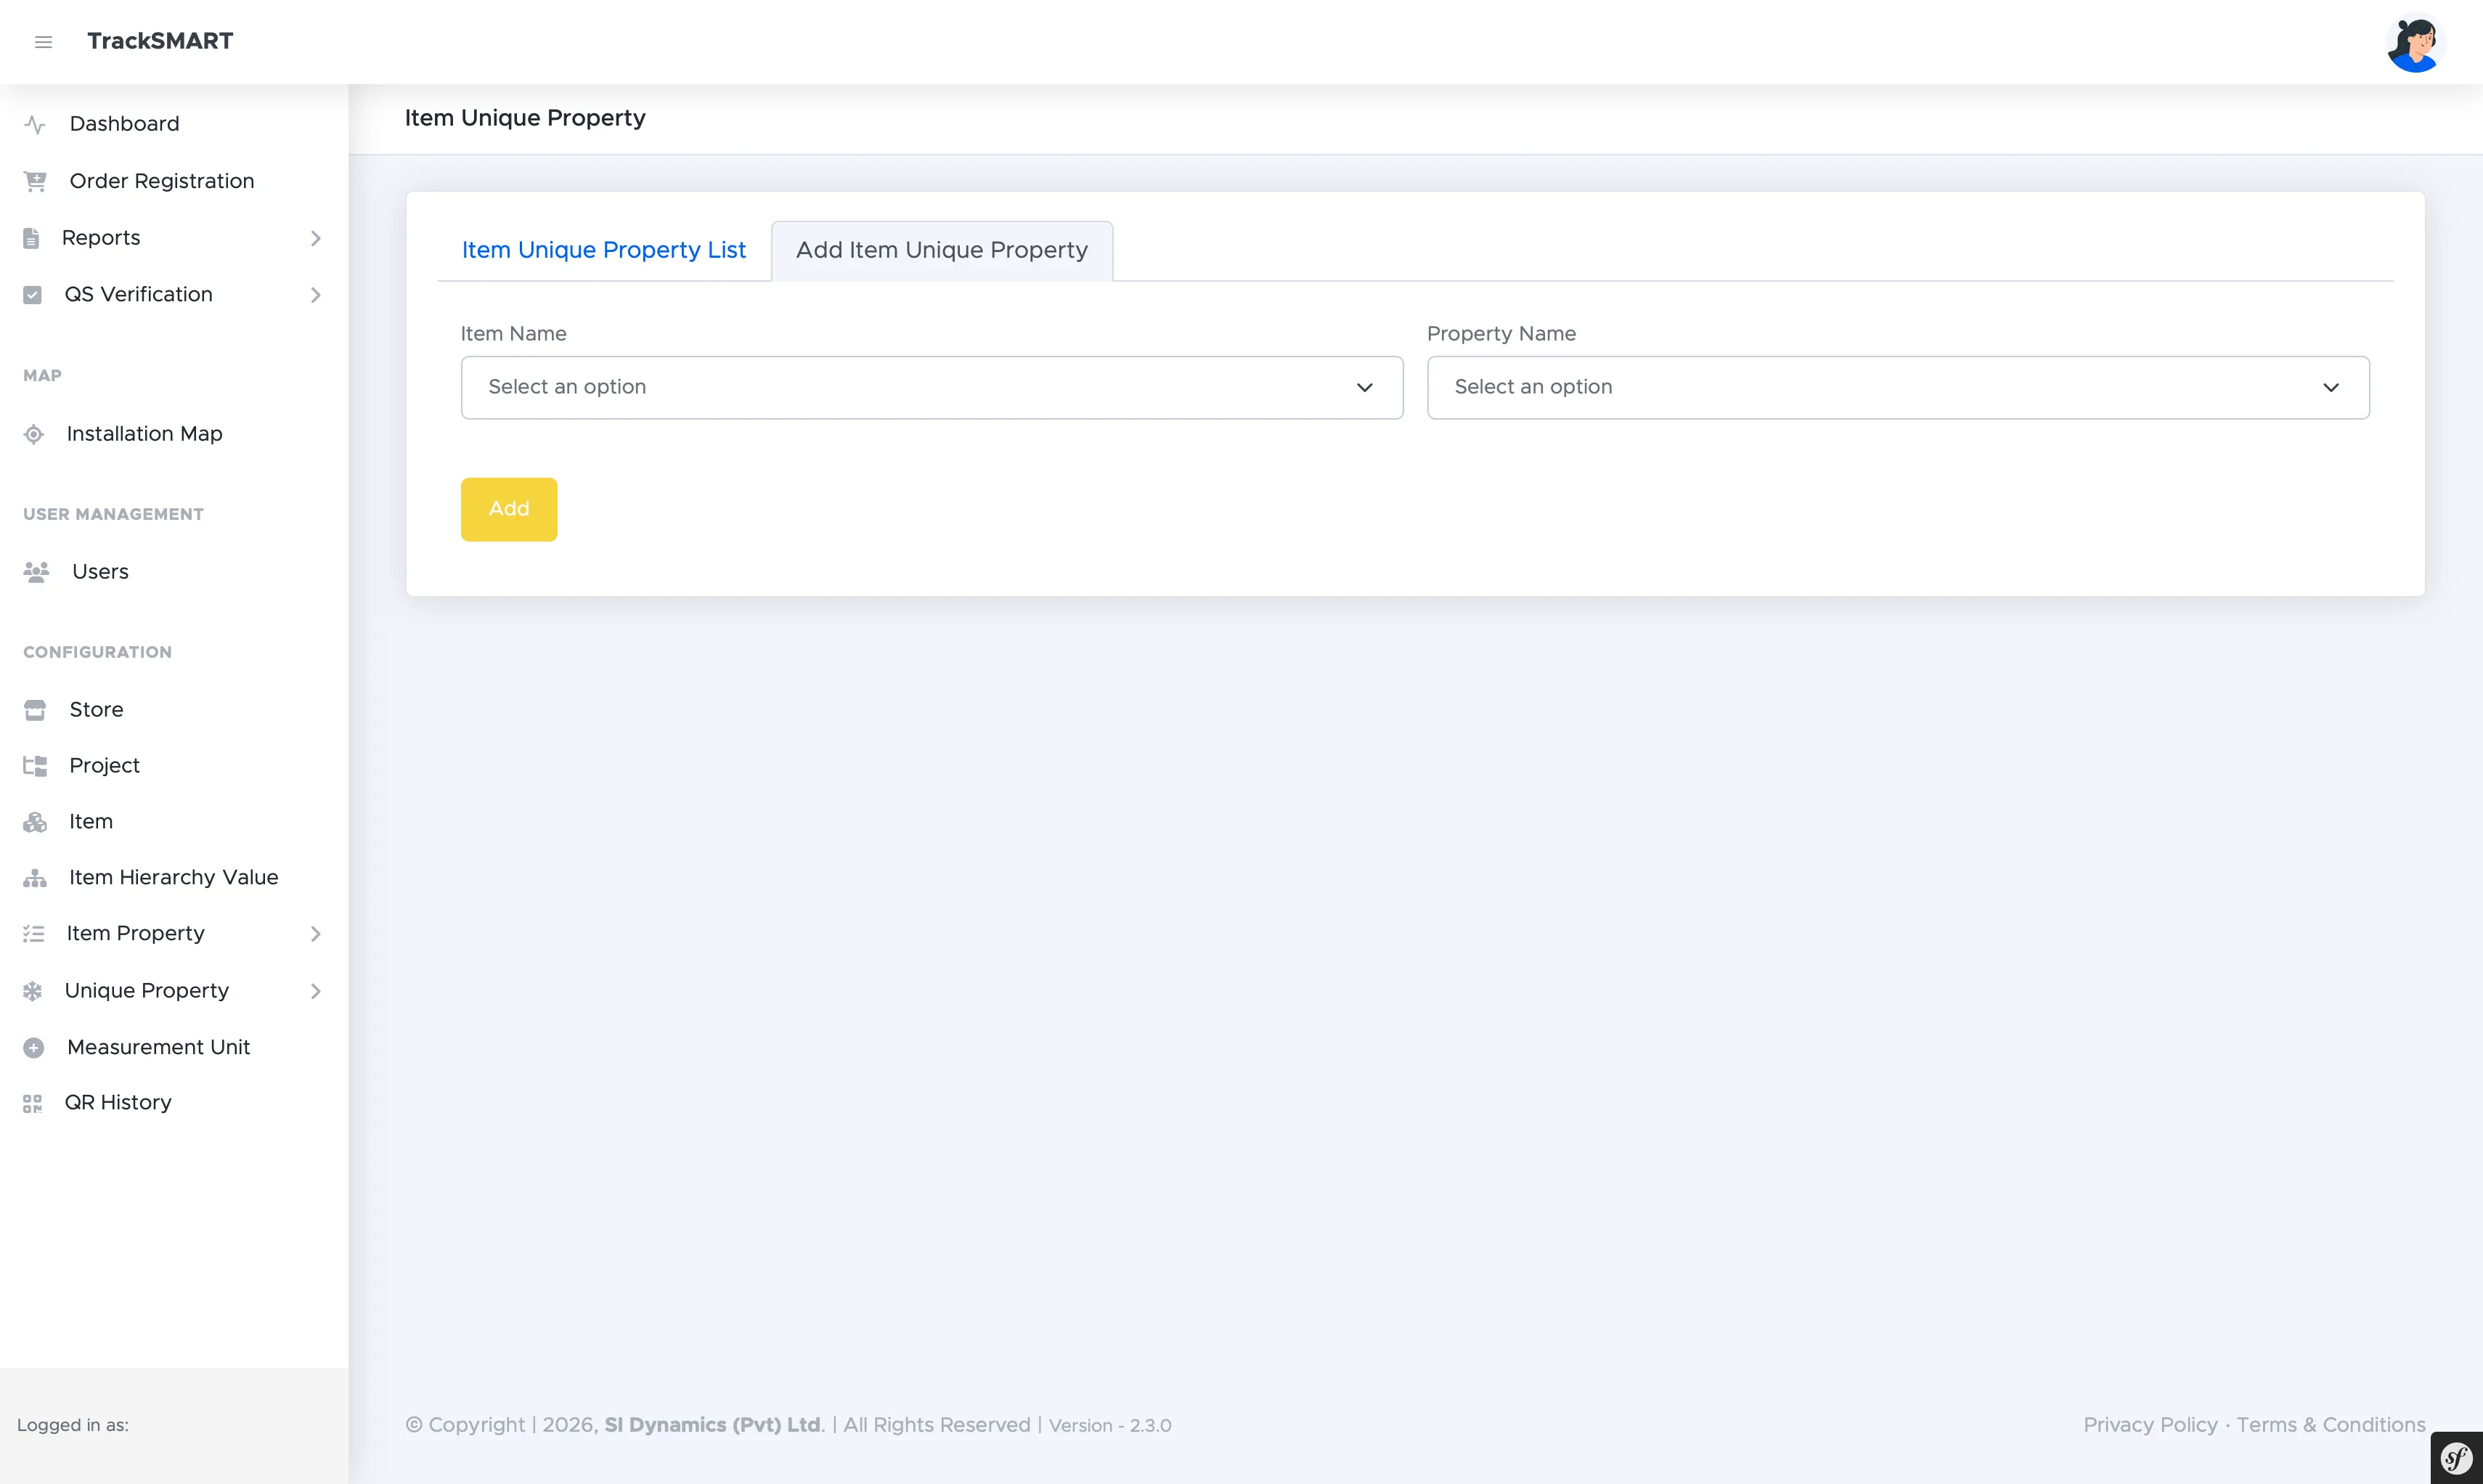
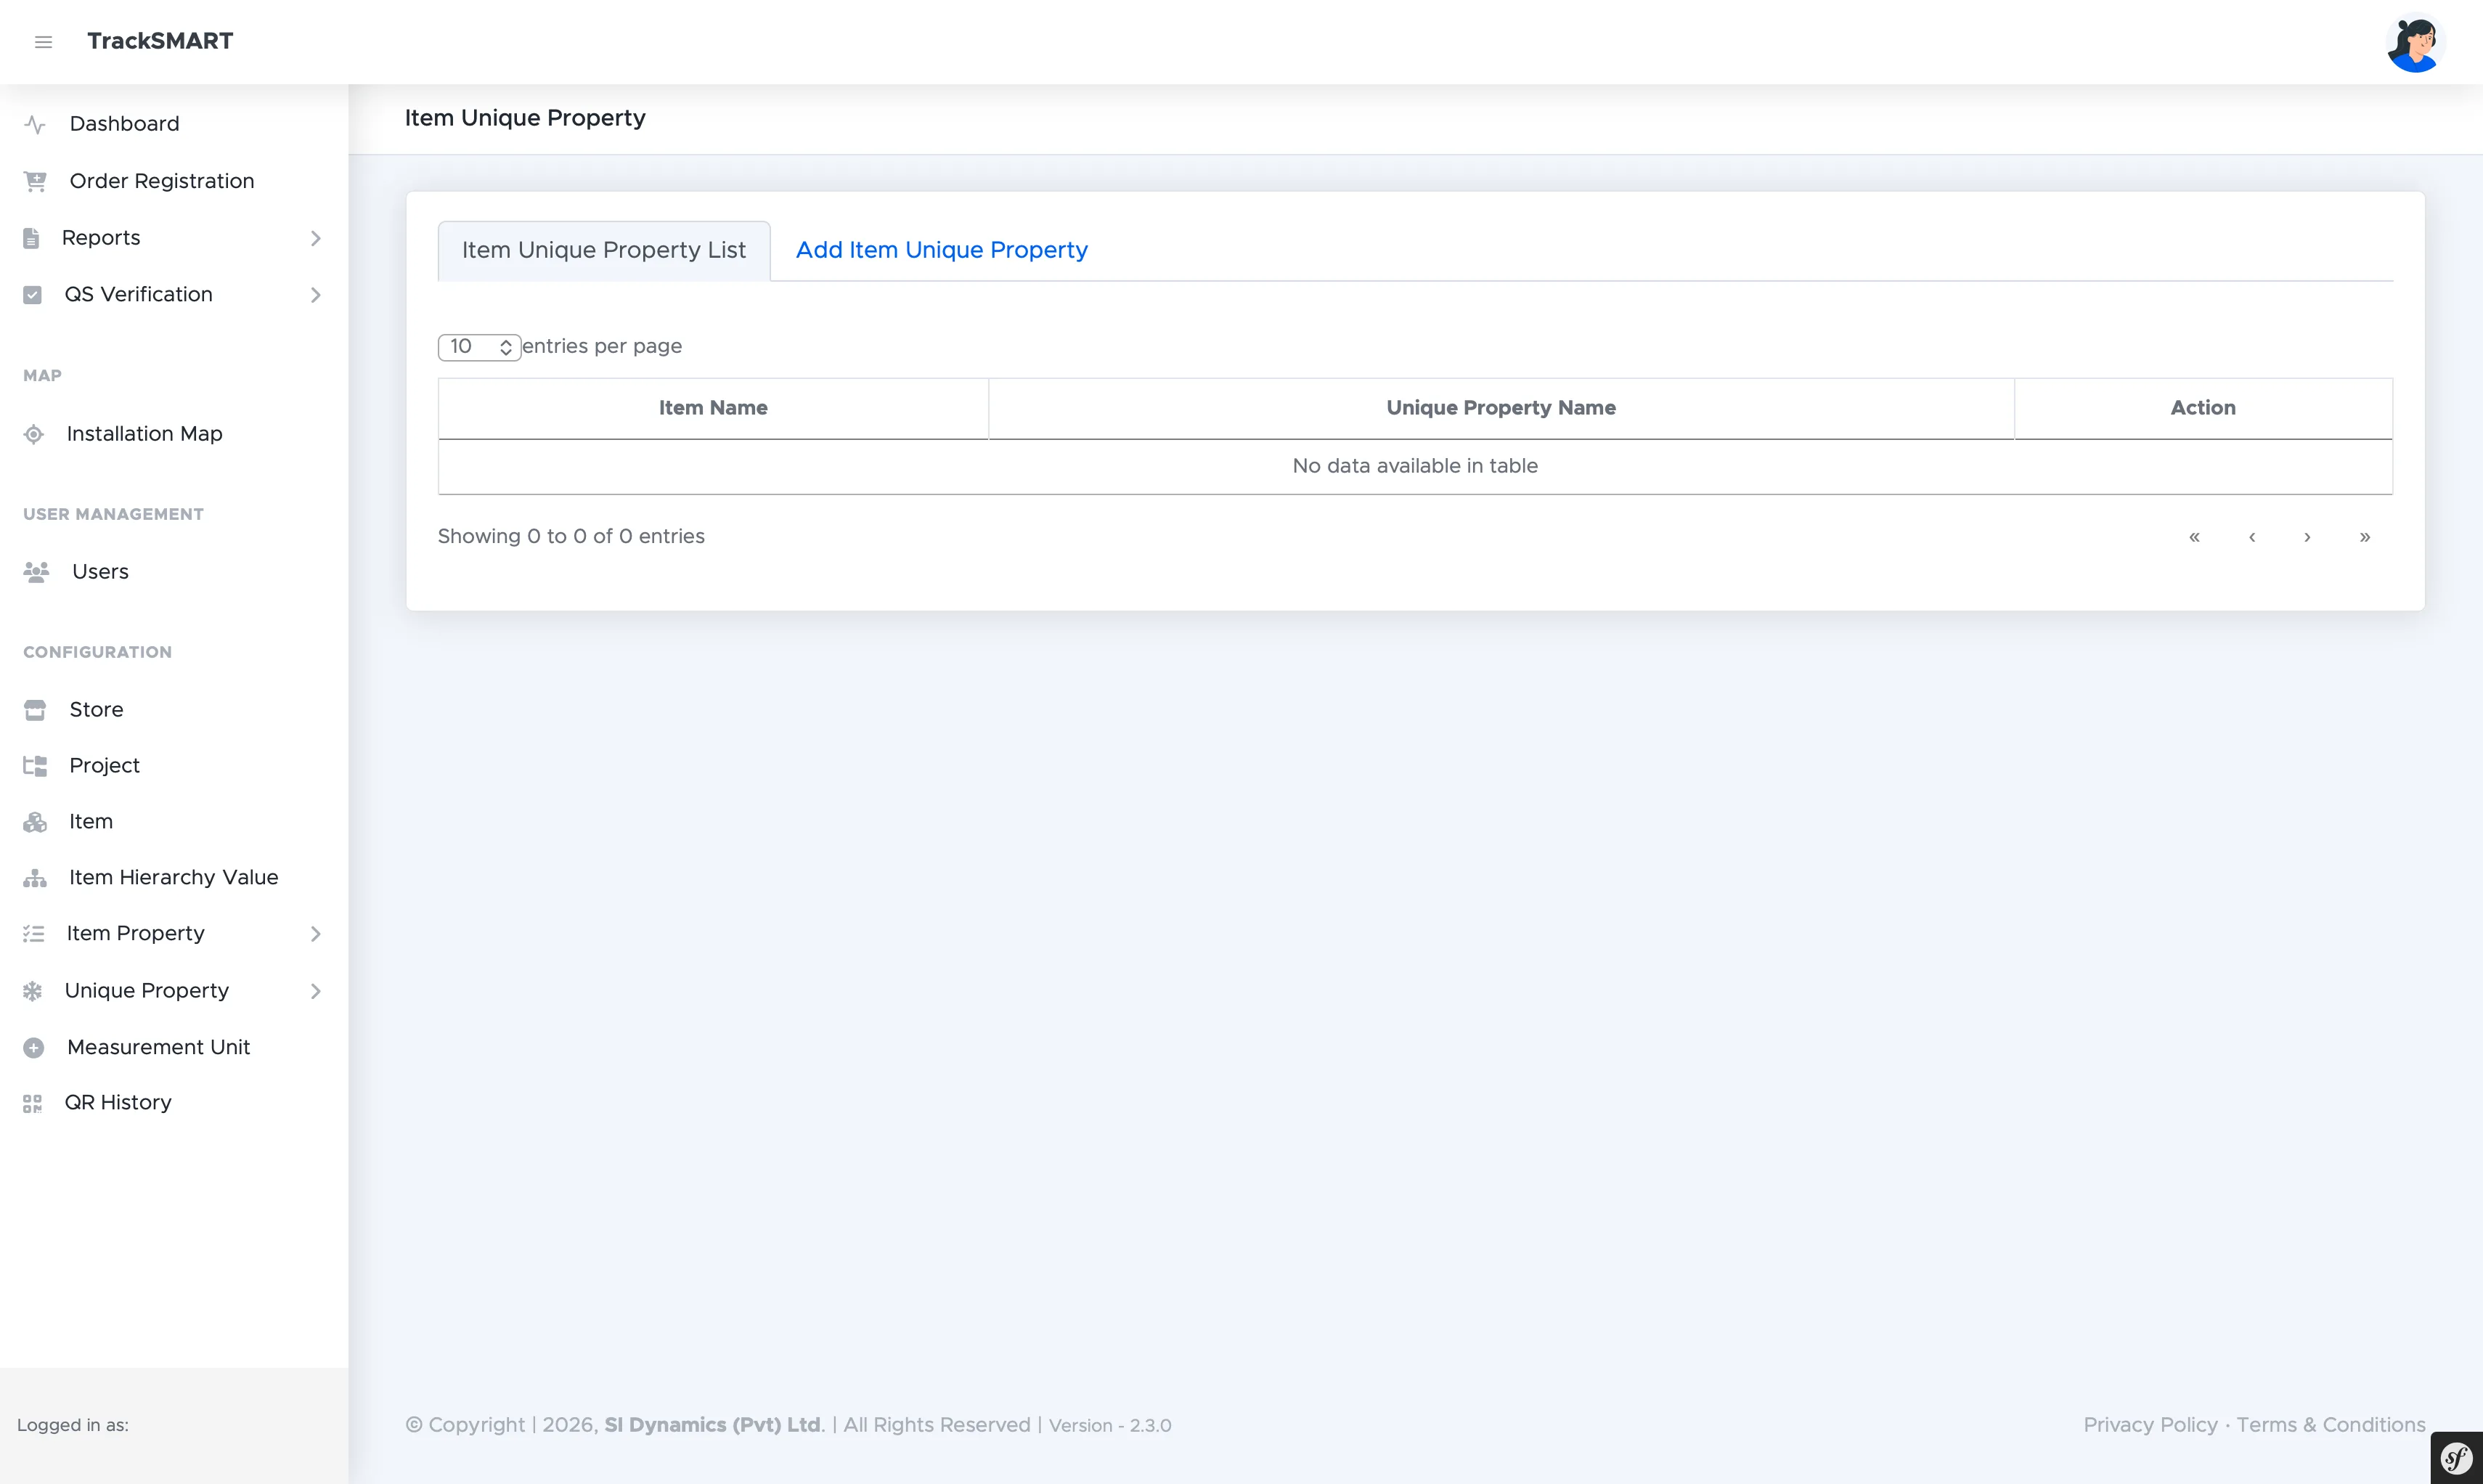
Where shared properties describe the specification, Unique Properties track per-QR-instance data — values that can differ between two physical copies of the same item. The setup mirrors shared properties: define a Unique Property Name, bind it to a unit as a Unique Property, then attach it to specific items via Item Unique Property.
app.tracksmart.lk
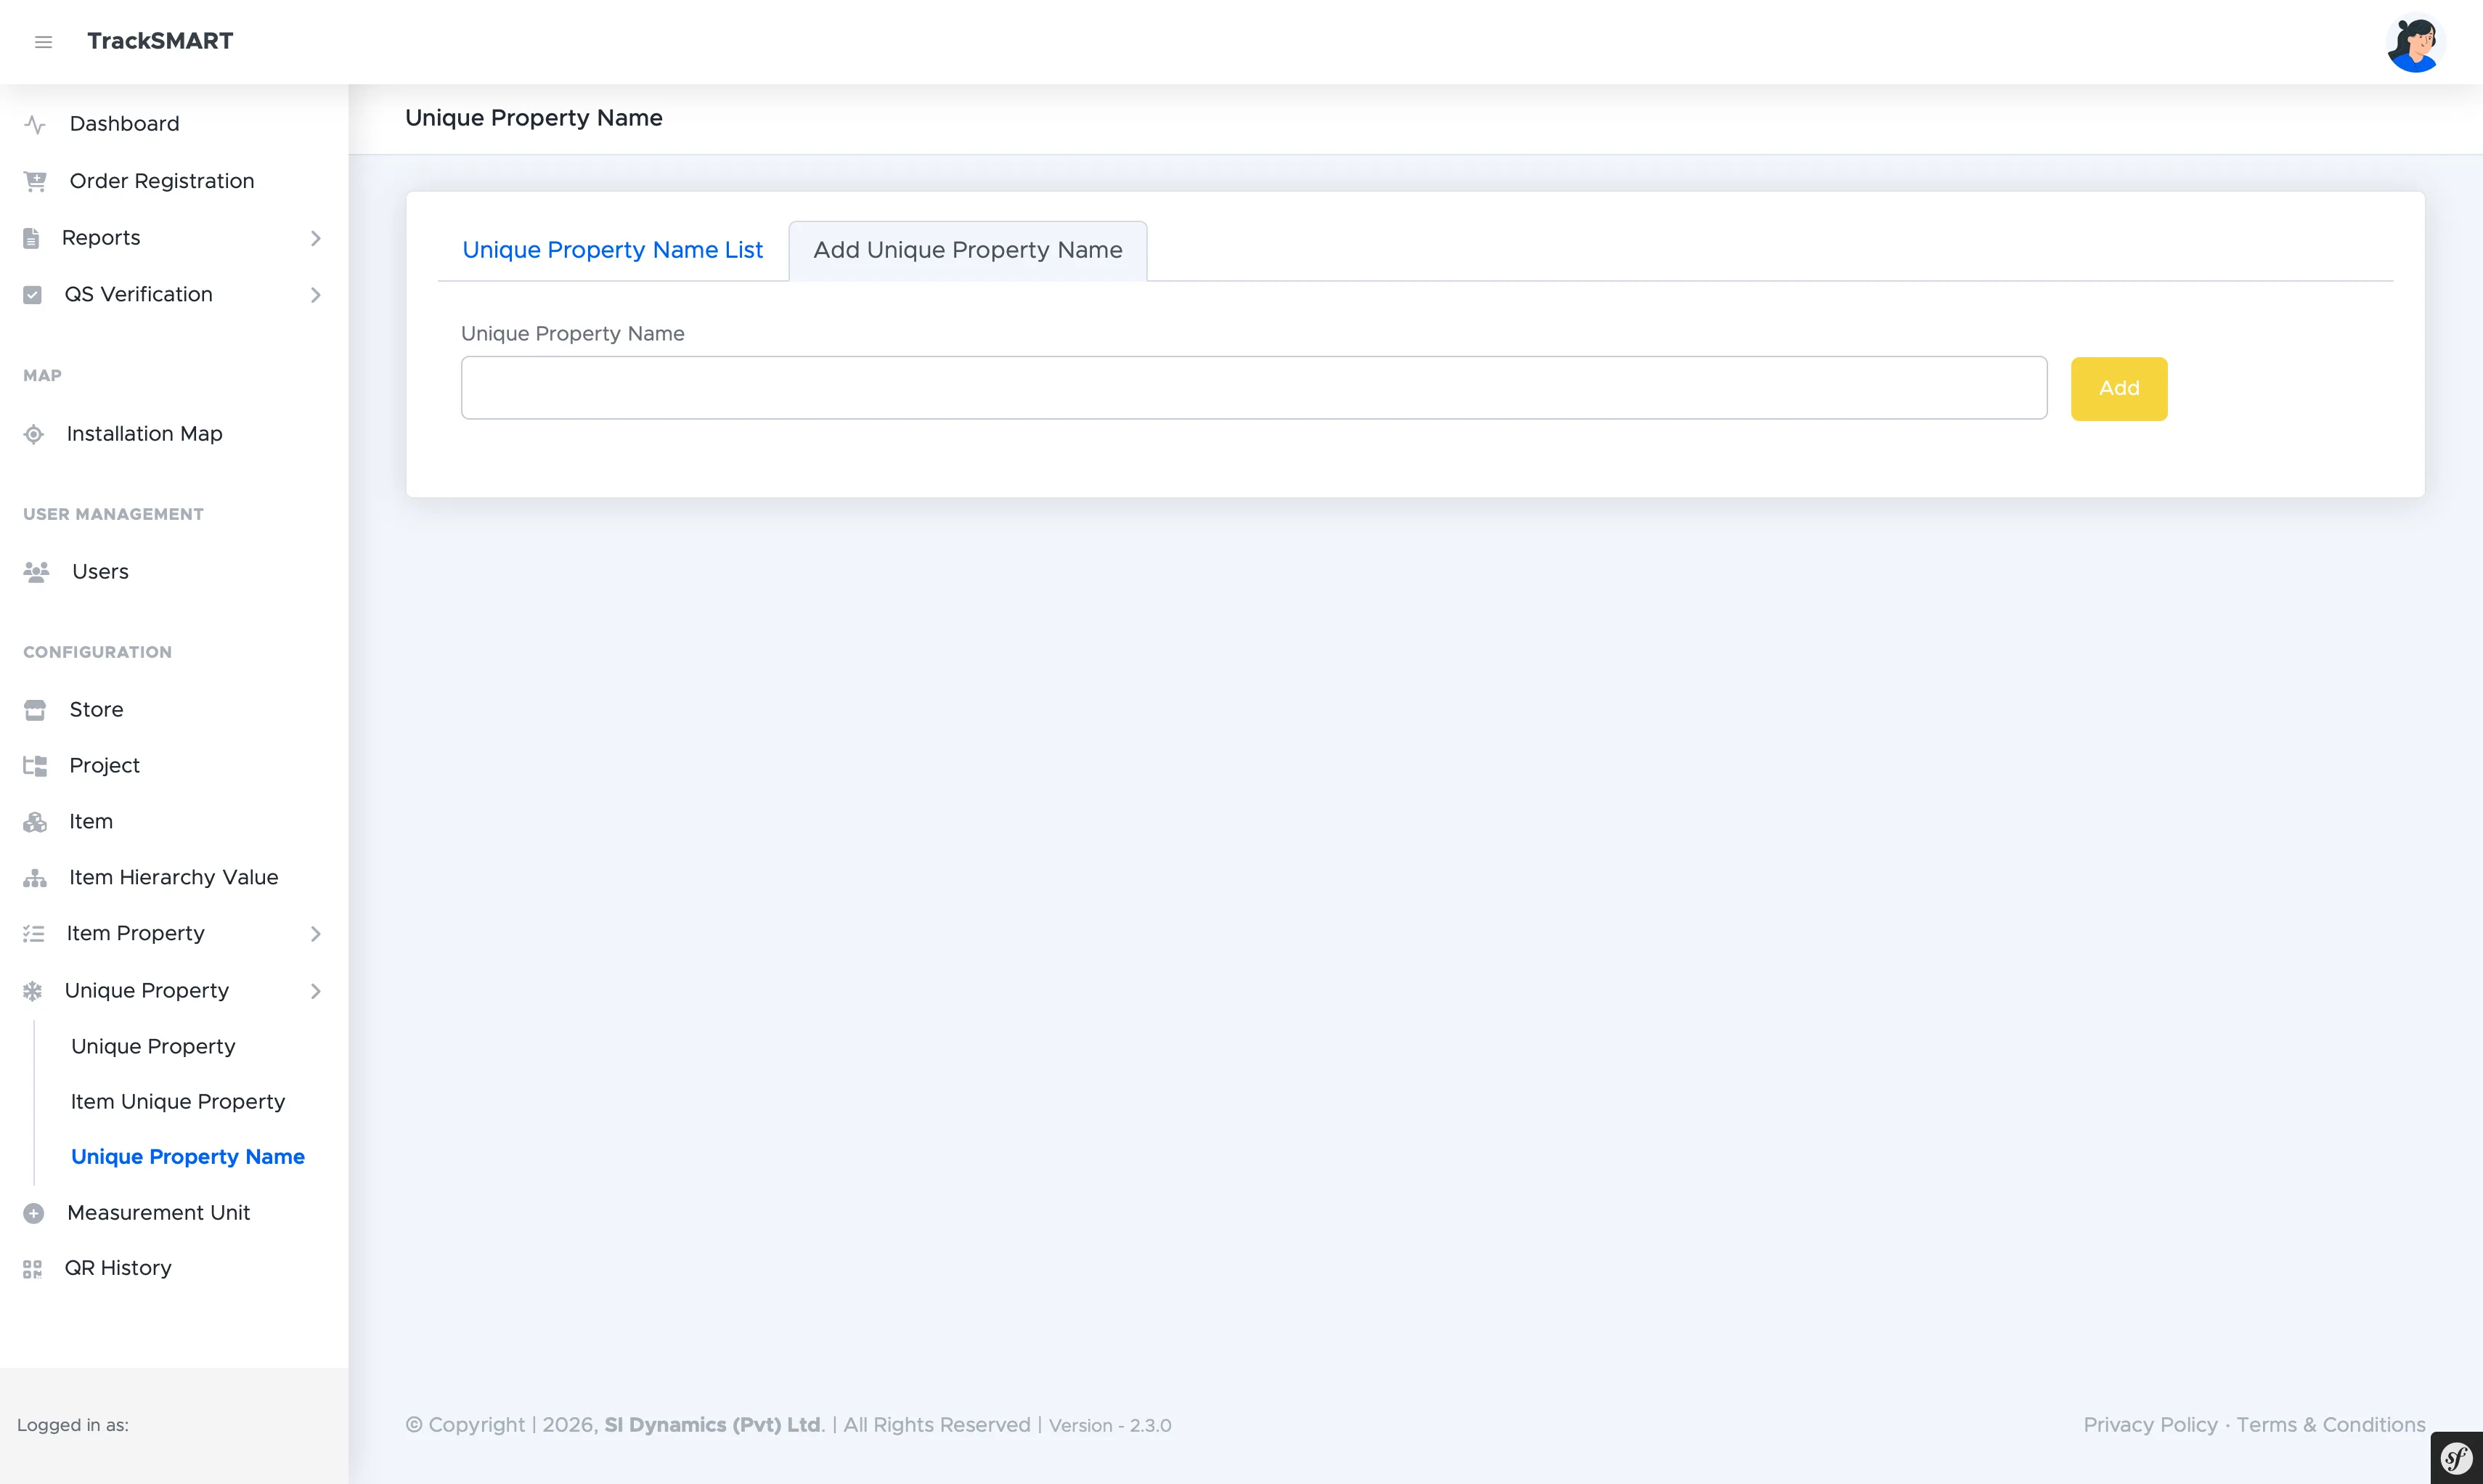
Add Unique Property Name: naming a per-QR attribute.
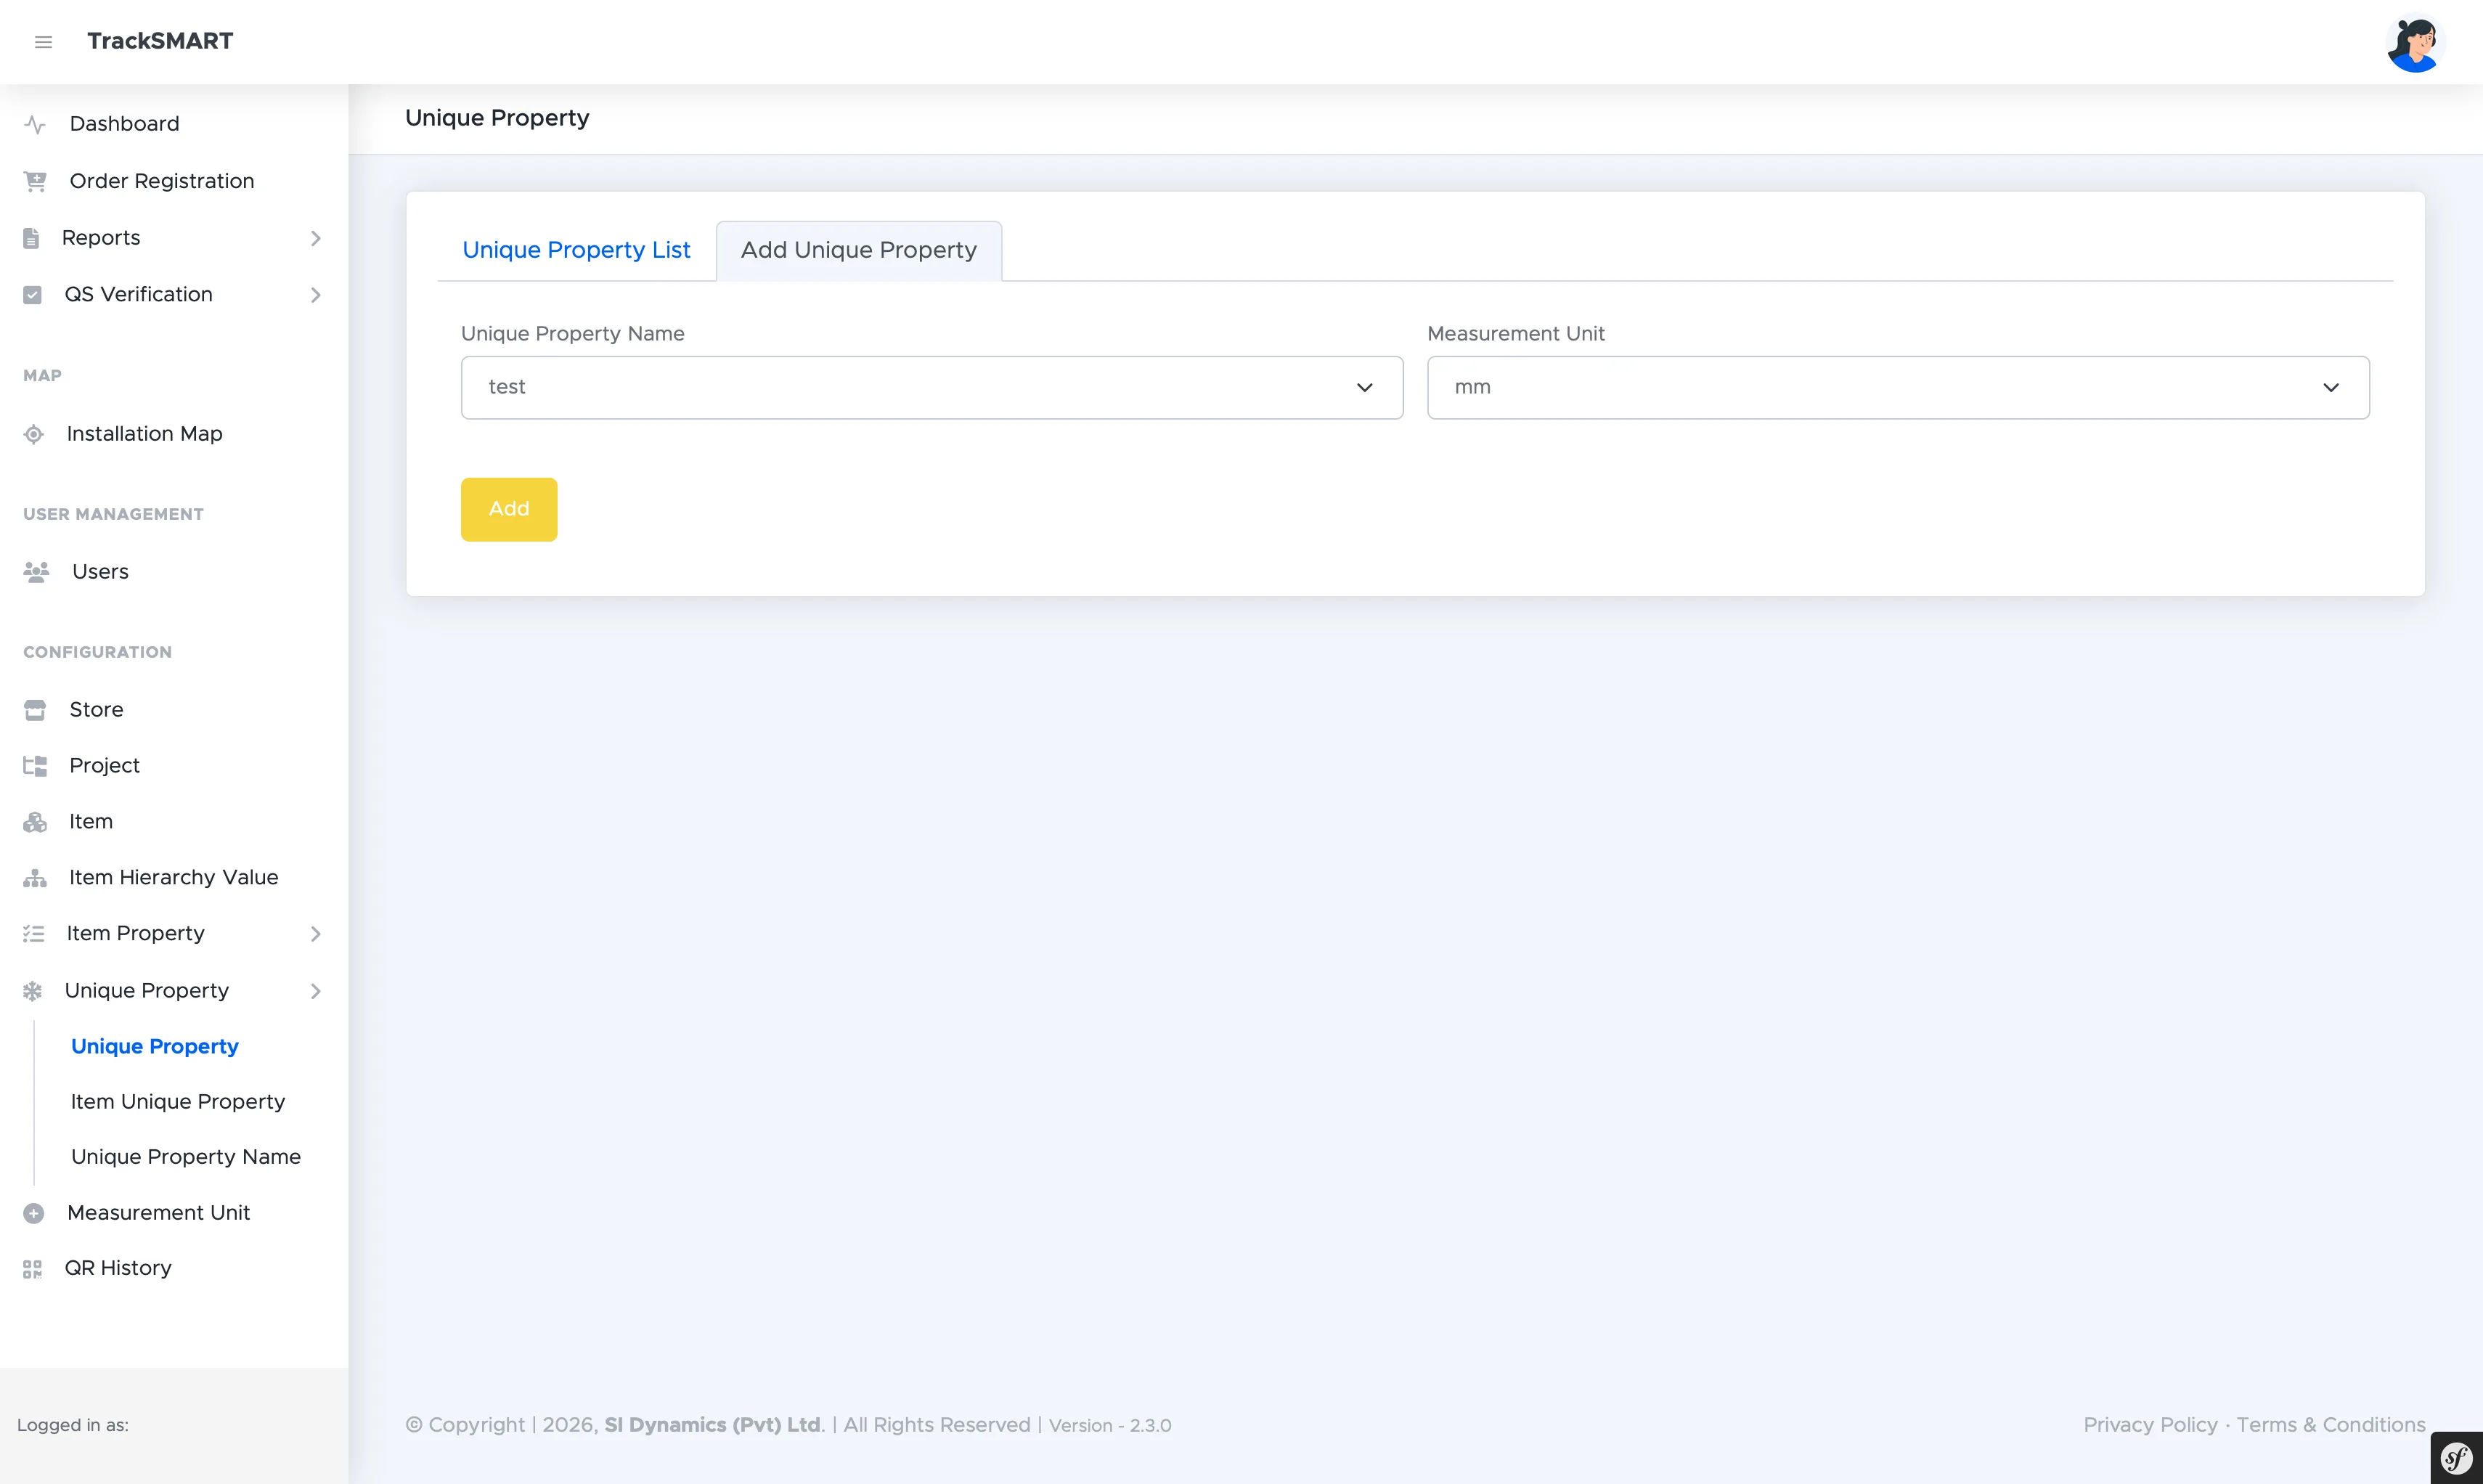
Add Unique Property: binding the name to a measurement unit.
app.tracksmart.lk
Unique properties with their units, ready to attach to items.
app.tracksmart.lk
Add Item Unique Property: linking an item to a unique property.
app.tracksmart.lk
Item-to-unique-property assignments. Empty until first linked.
Measurement Units
The unit dictionary behind every quantity.
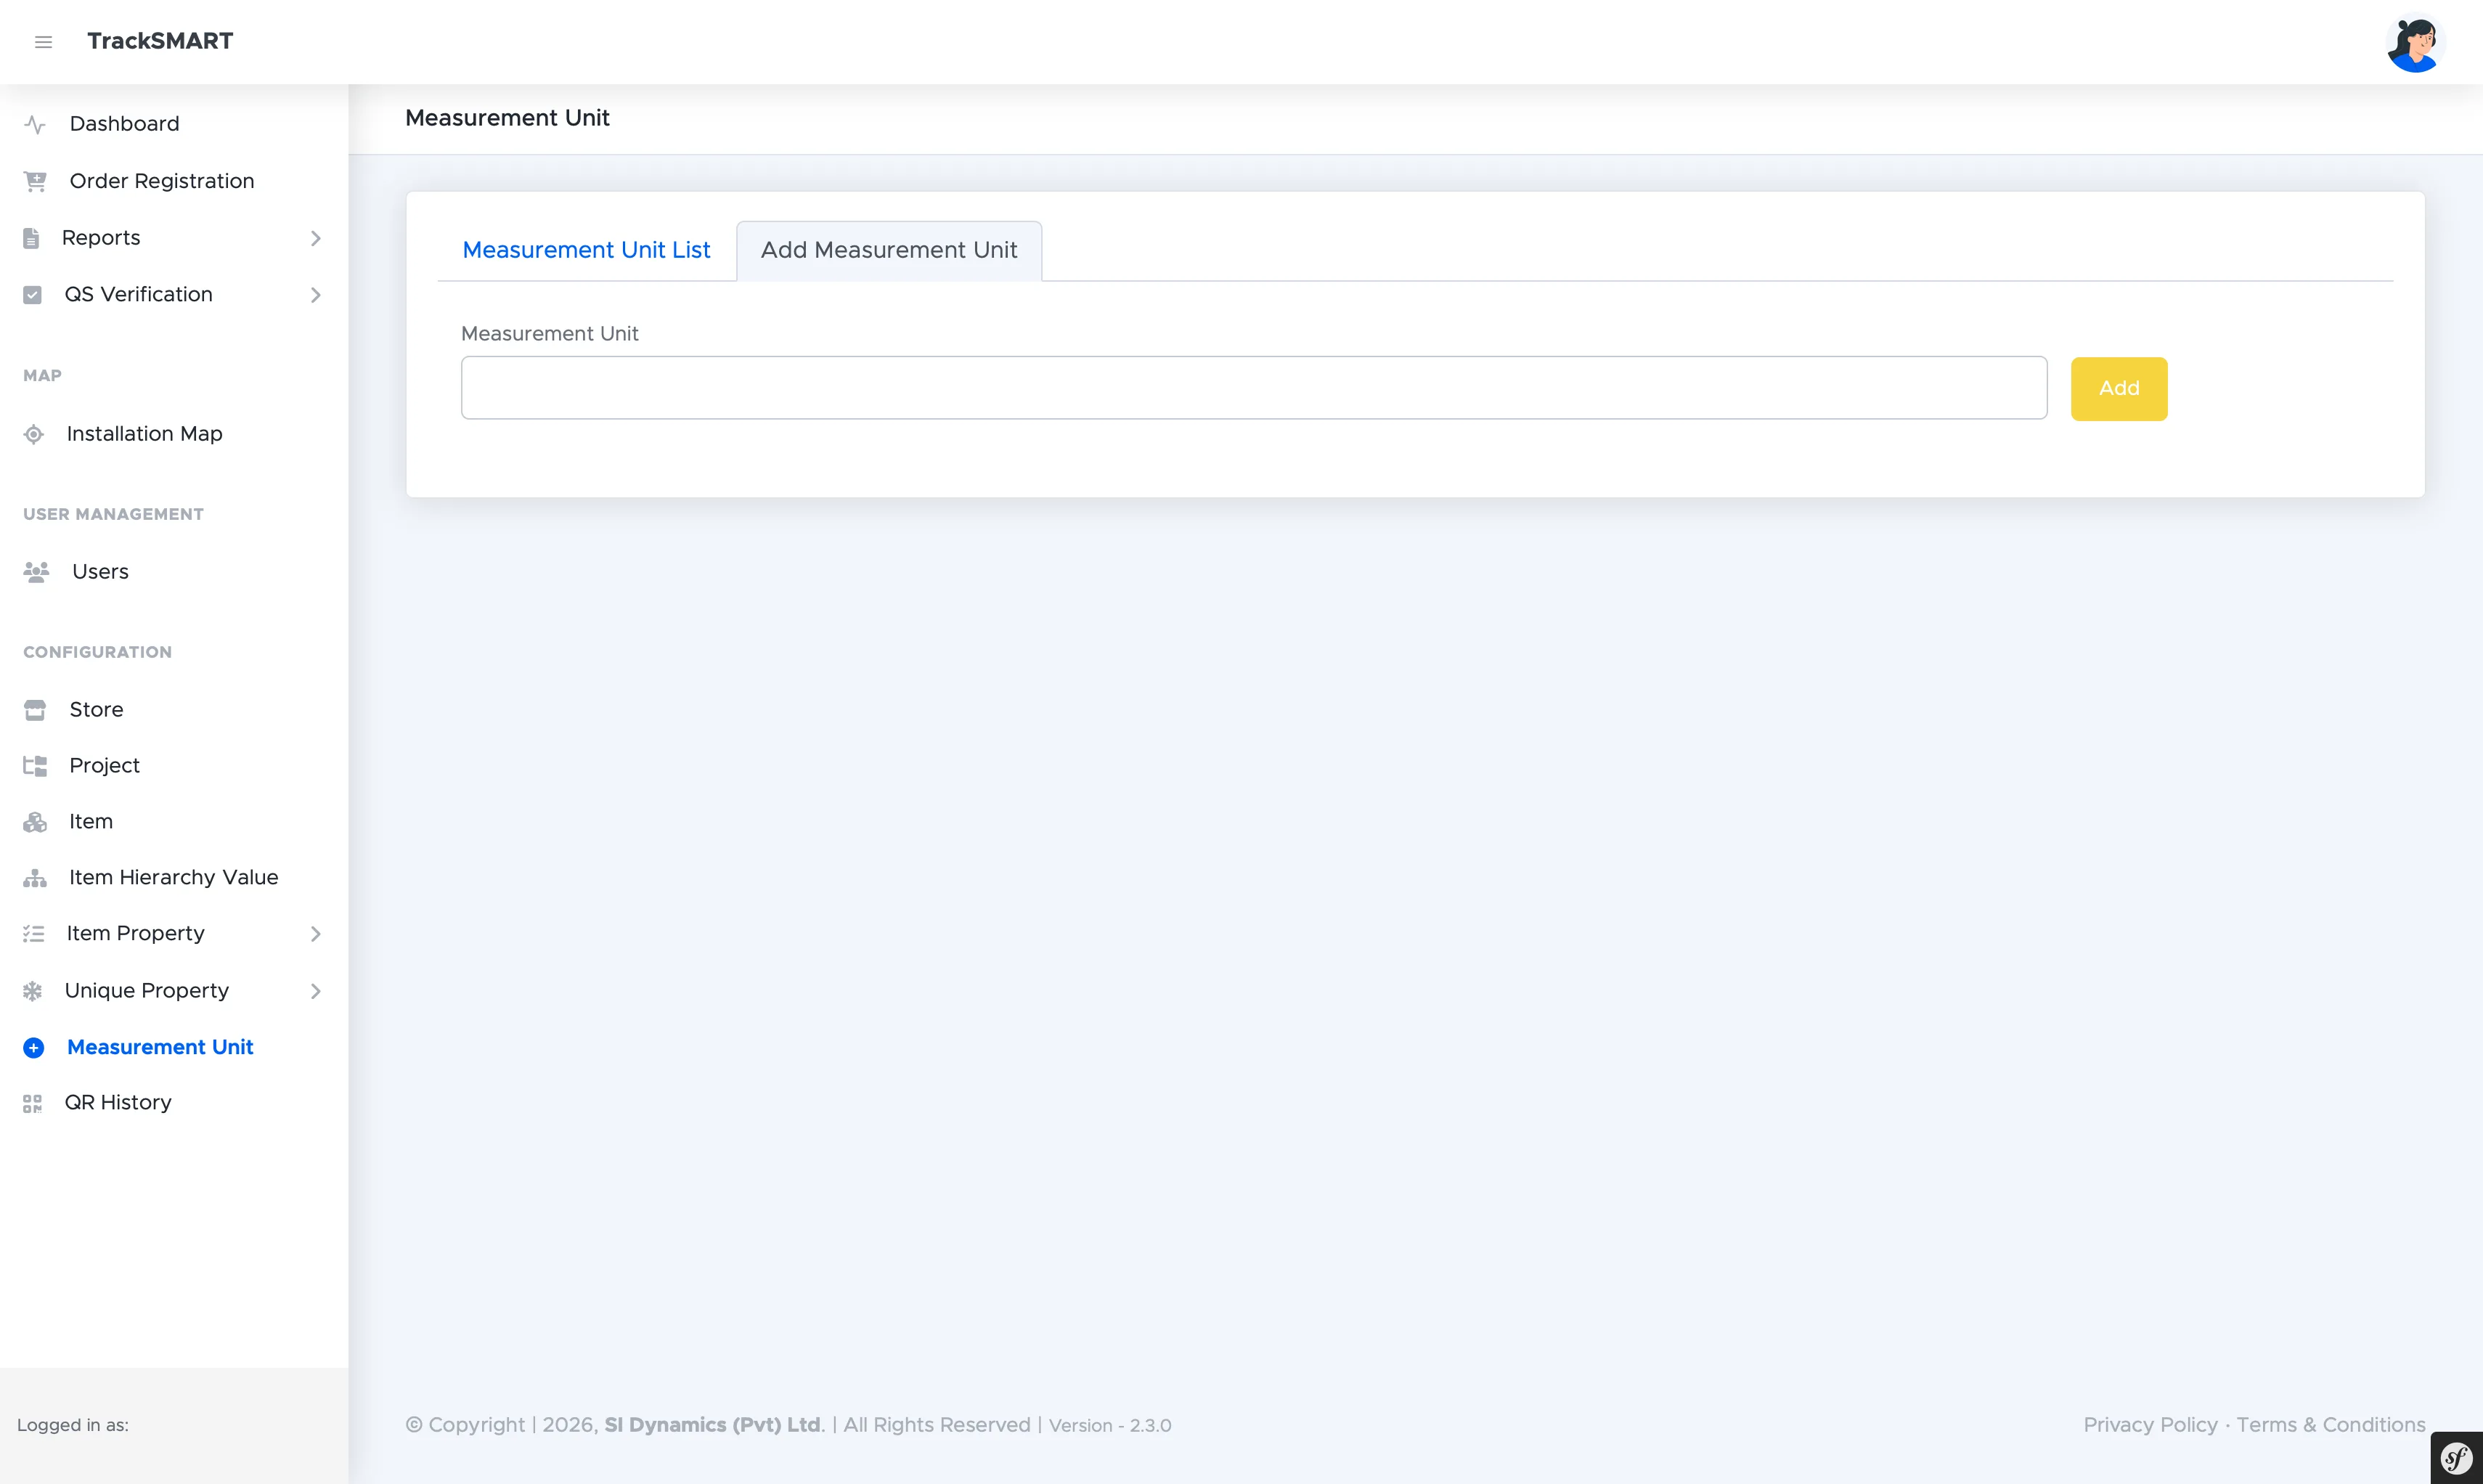
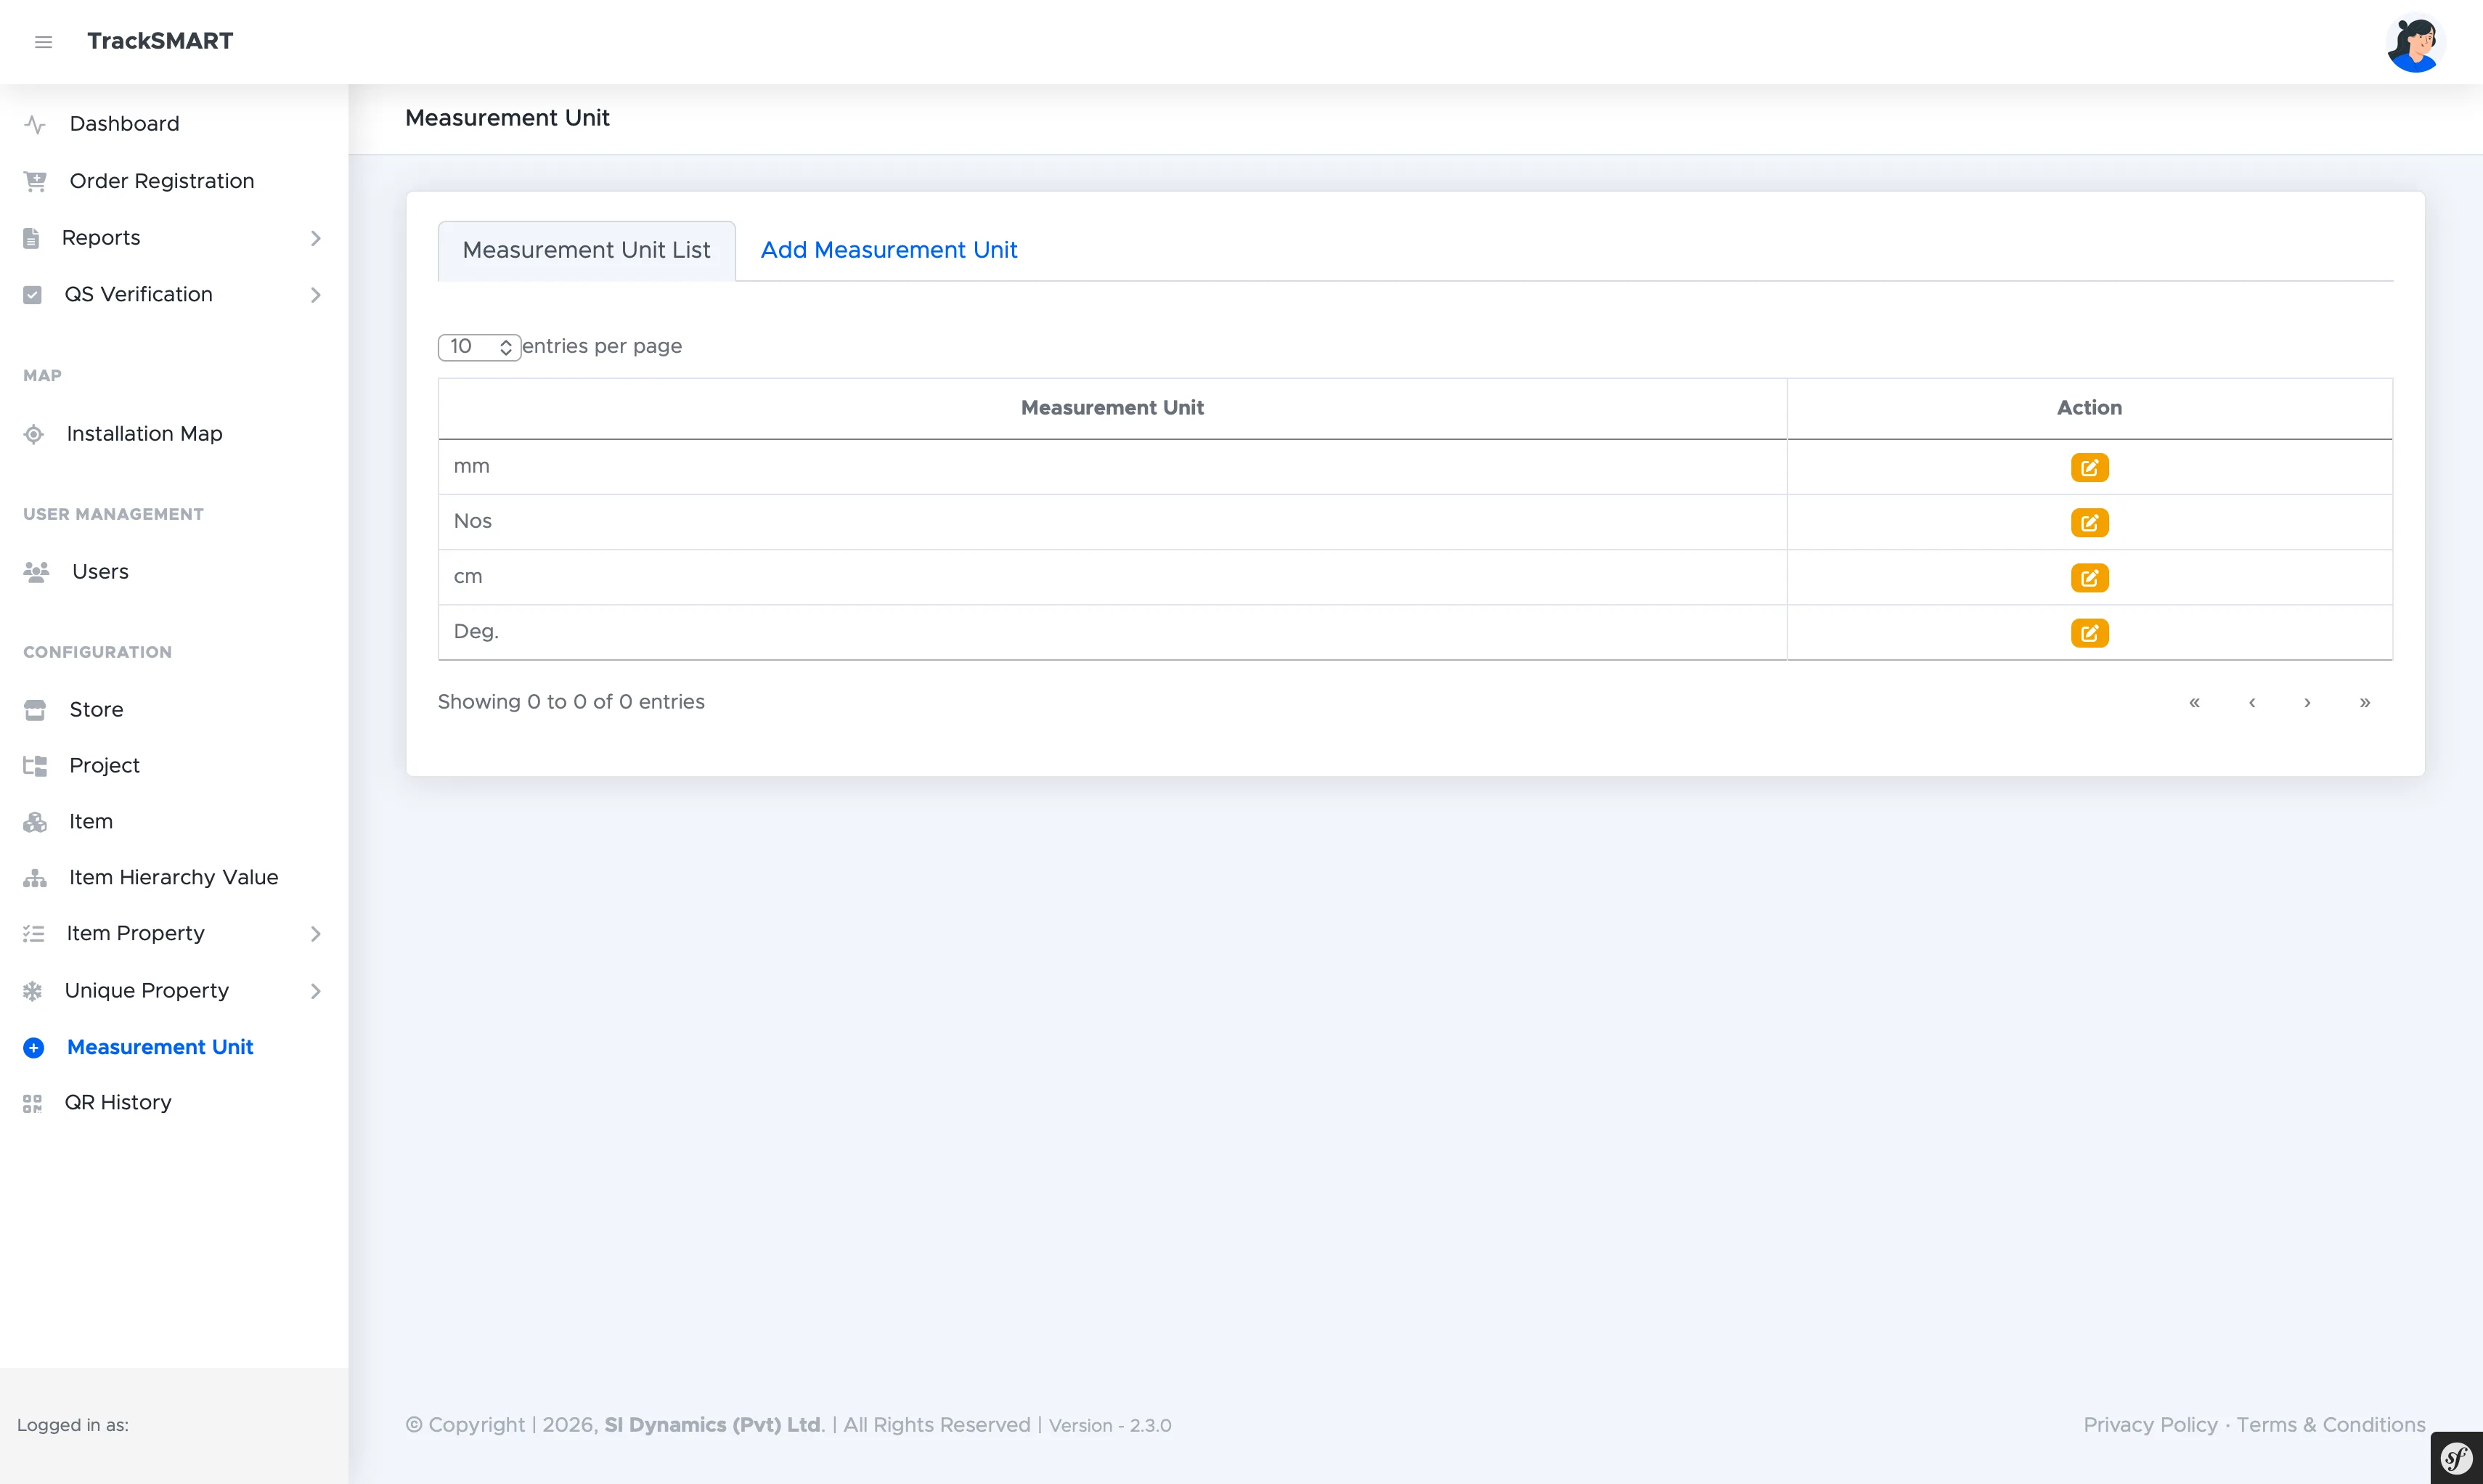
Measurement Units (CONFIGURATION > Measurement Unit) power quantities on items, properties, and reports. Define each unit once — mm, Nos, cm, Deg. — then reference it everywhere.
app.tracksmart.lk
Add Measurement Unit: a single text field plus Add.
app.tracksmart.lk
Units in use: mm, Nos, cm, and Deg., each editable.
TrackSmart Mobile Operations ManualModule 4 of 15
Module 05 : Web AdministrationTS-REF #105
Users & Access Management
Creating field and office accounts, assigning roles, and scoping users to the stores and projects they work in.
Creating Users
Every mobile login is provisioned here.
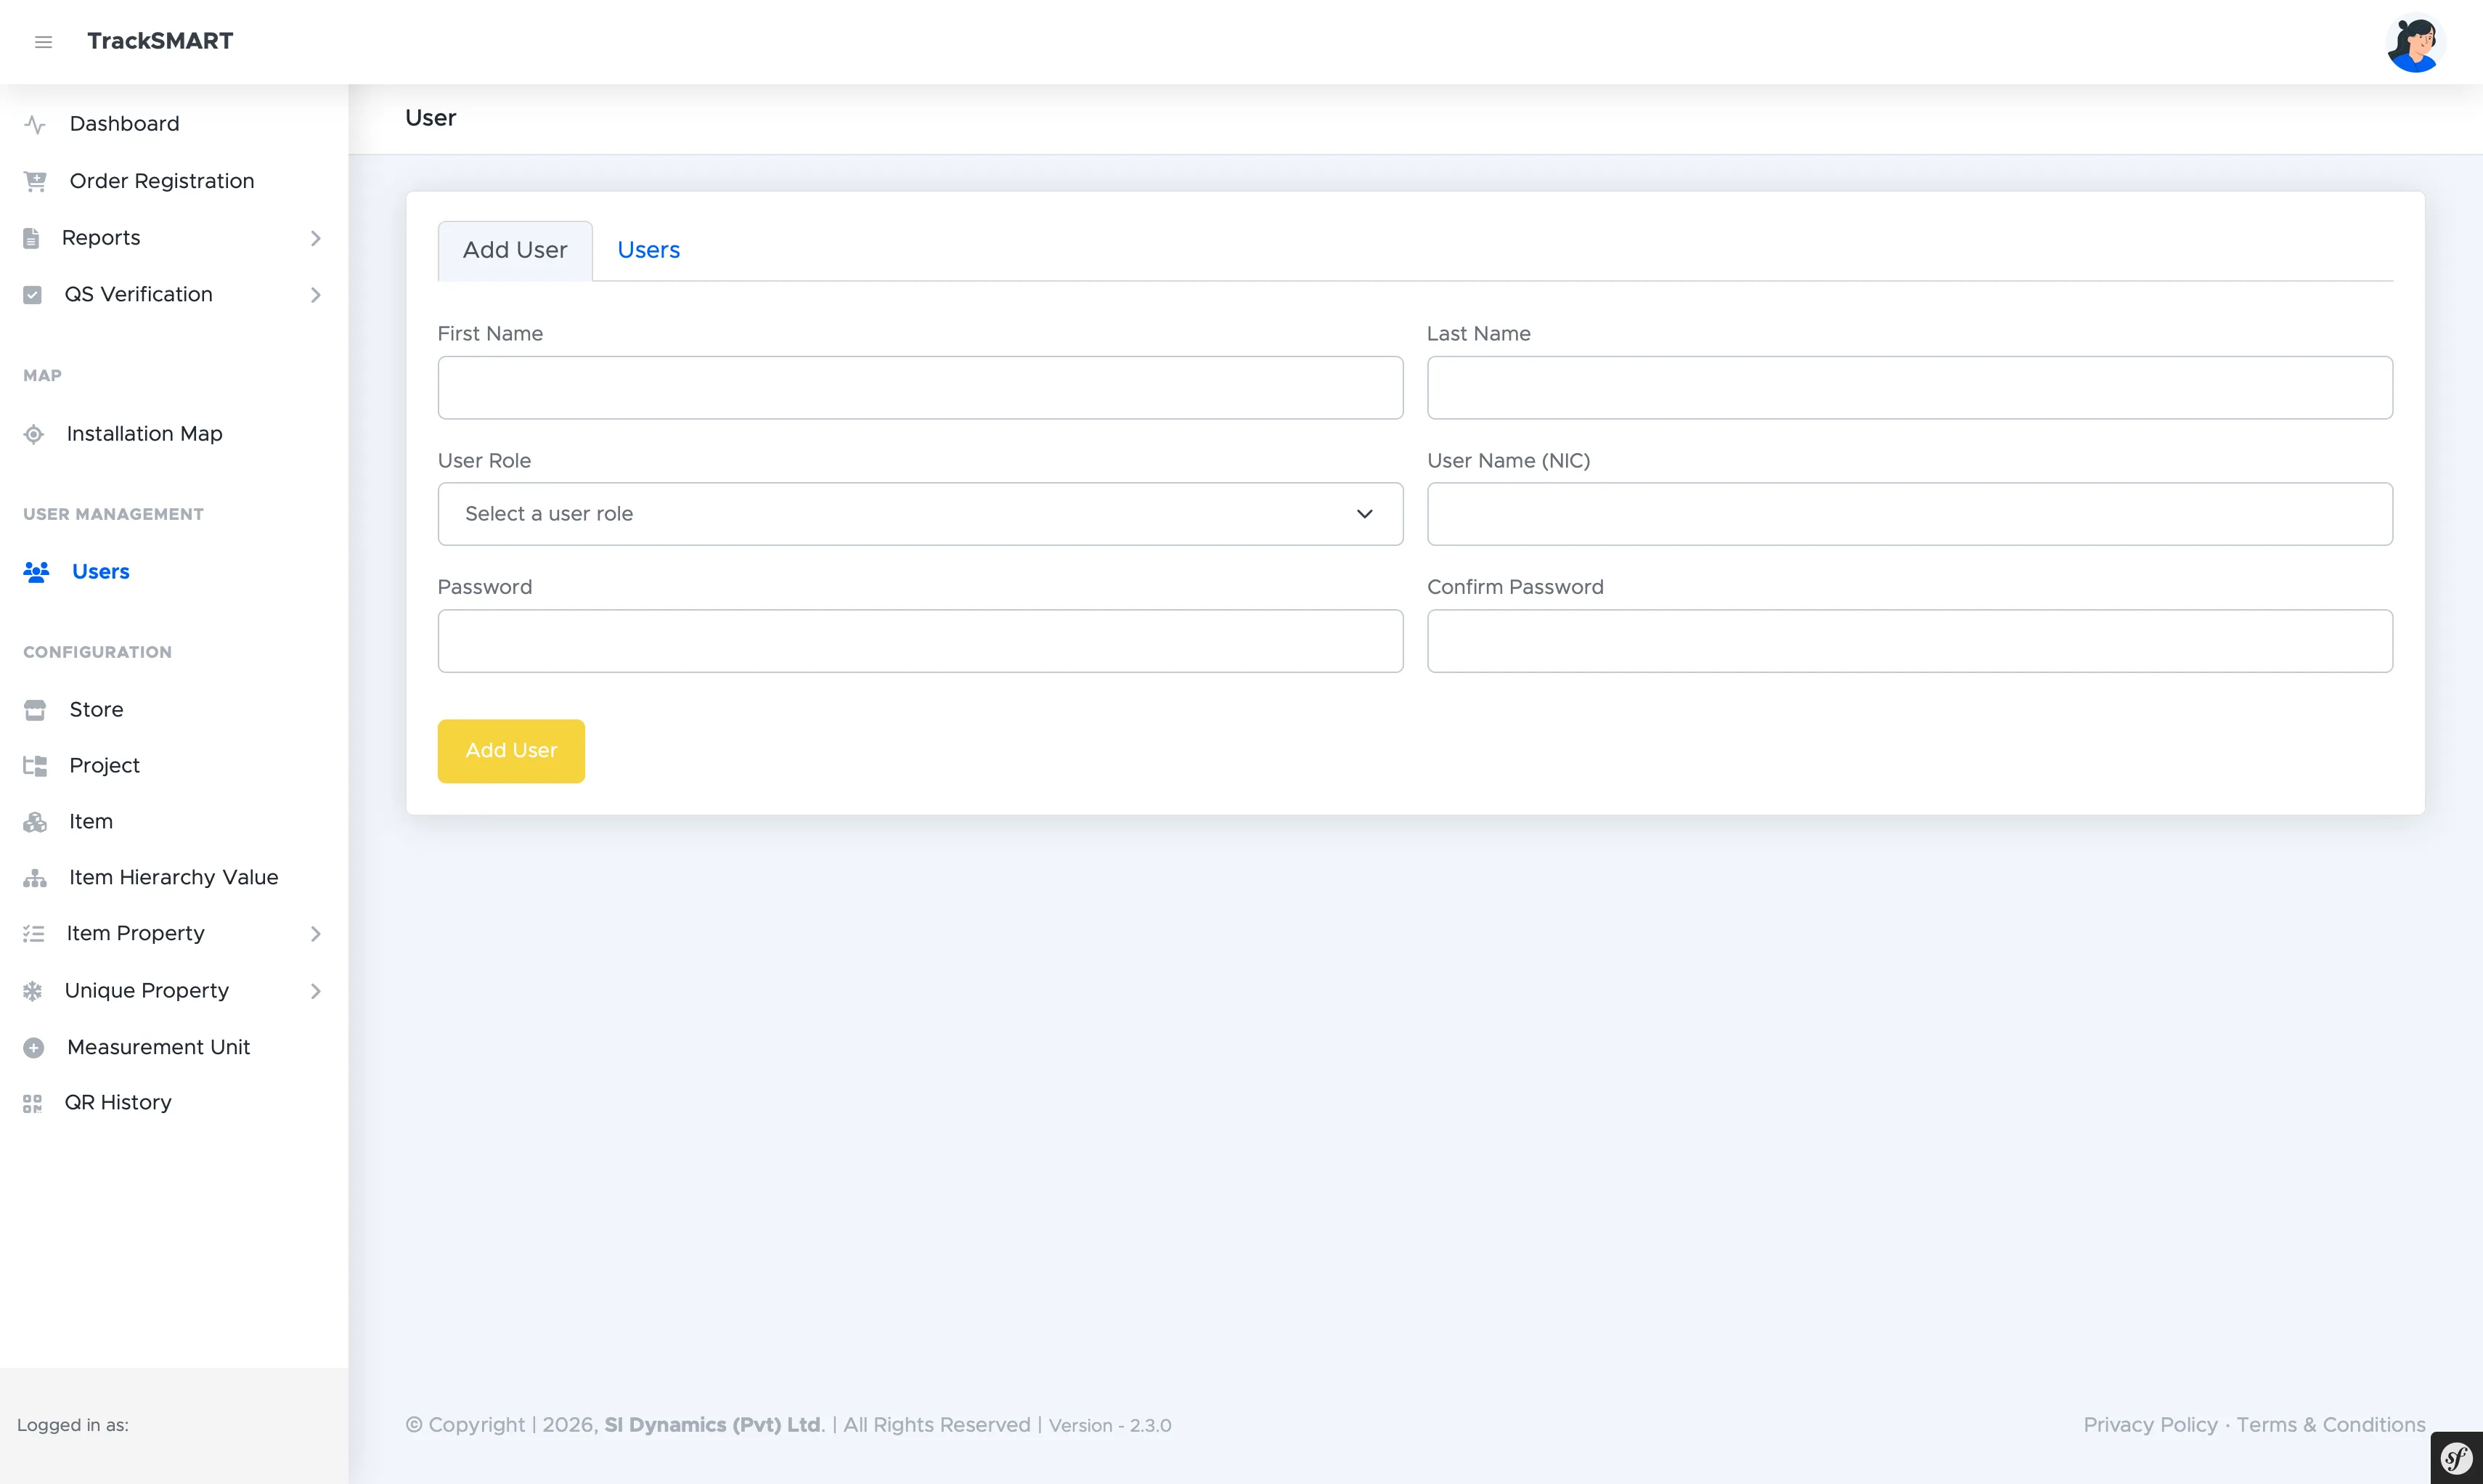
Field personnel cannot self-register. A Web Administrator creates each account under USER MANAGEMENT > Users on the Add User tab. The username doubles as the mobile login identity: an organization email address or a National Identity Card (NIC) number, paired with a password.
app.tracksmart.lk
Add User: name, role, NIC or email username, and password.
1Open USER MANAGEMENT > Users and stay on the Add User tab.
2Enter the First Name and Last Name.
3Select the User Role: Admin, Supervisor, Store keeper, Quantity surveyor, or Report User.
4Enter the User Name — the NIC number or organization email used for mobile login.
5Set the Password and Confirm Password, then click Add User.
Managing the User Register
Filtering, editing, and scoping 30+ site accounts.
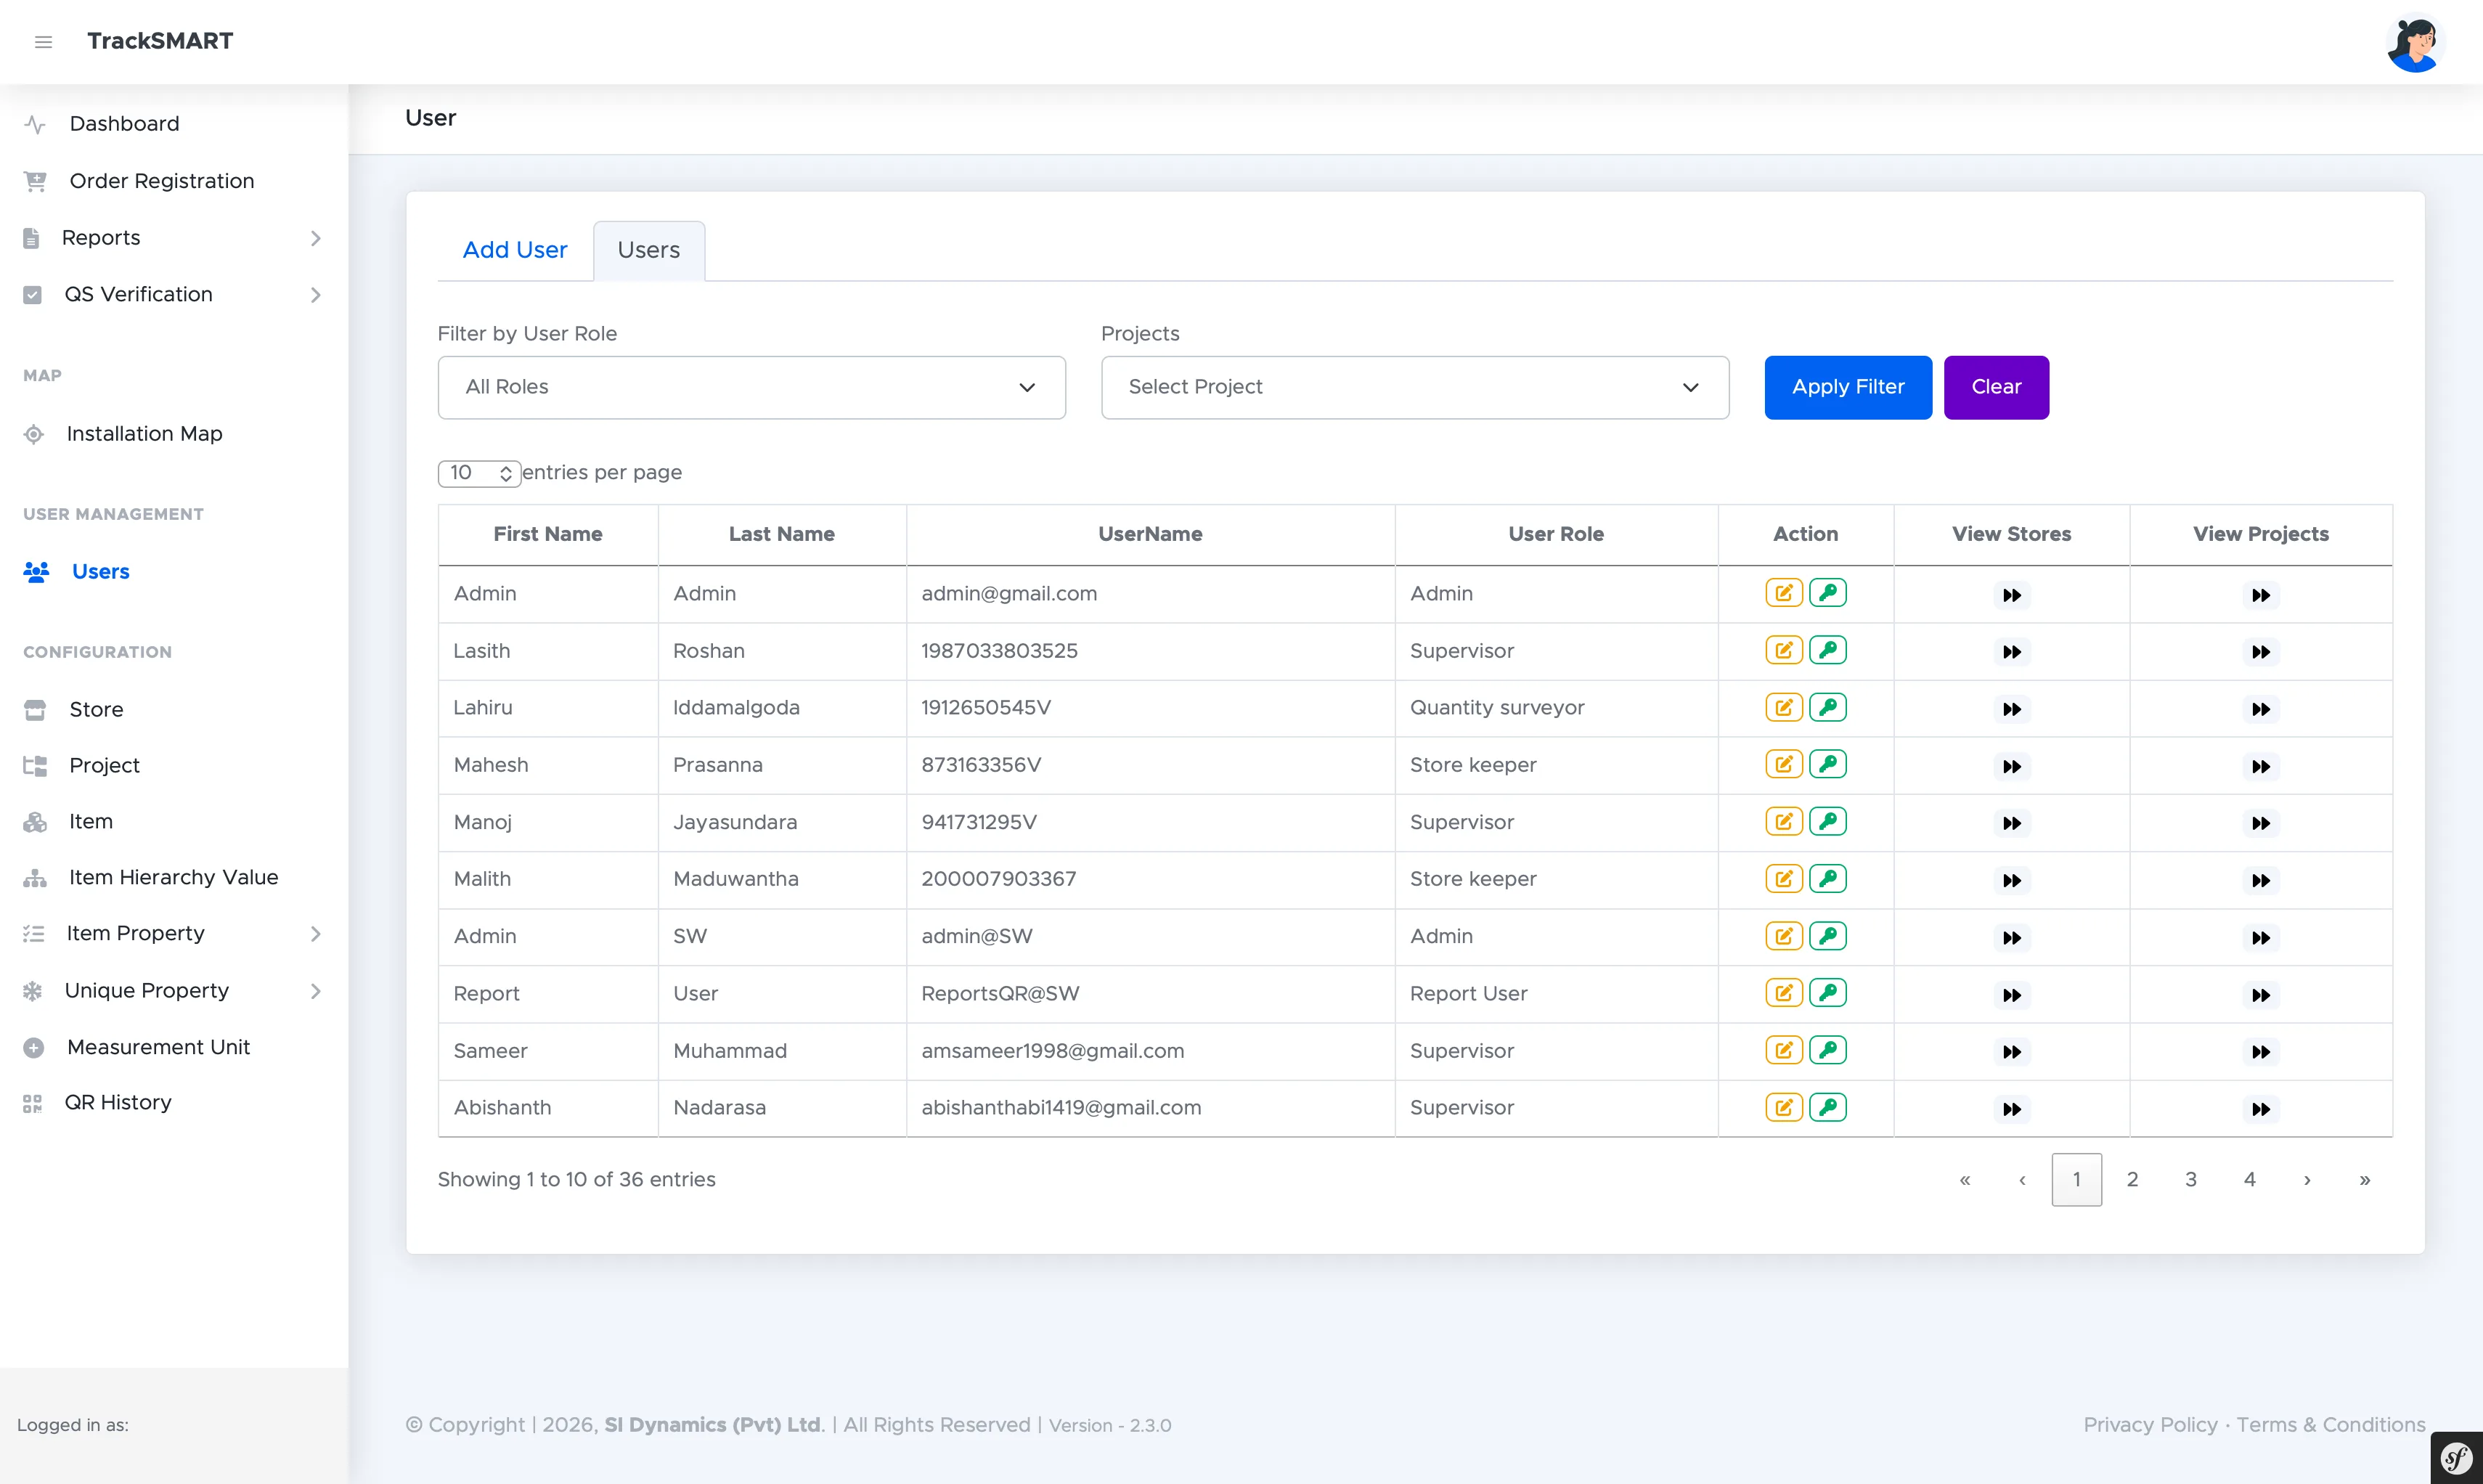
The Users tab lists every account with its role. Filters narrow the register by User Role and Project before applying. Each row carries edit and password-reset actions, plus drill-ins that reveal exactly which stores and projects that user can operate in — the same scope the mobile app enforces at login.
app.tracksmart.lk
Users: role and project filters, per-row edit and password actions, View Stores and View Projects drill-ins.
Supervisors and Store keepers get mobile access scoped to their assigned stores and projects.
Quantity surveyors work the QS Verification queue for progress sign-off.
Report Users receive read-only reporting visibility without operational rights.
Use View Stores and View Projects to audit a user's scope before they head to site.
Mobile login: how these accounts sign in→
TrackSmart Mobile Operations ManualModule 5 of 15
Module 06 : Web AdministrationTS-REF #106
Order Registration & Dispatch
Placing purchase and dispatch orders against a project — the trigger that makes stock appear in the storekeeper's mobile Receive Order queue.
Placing an Order
Two-step wizard: order details first, line items second.
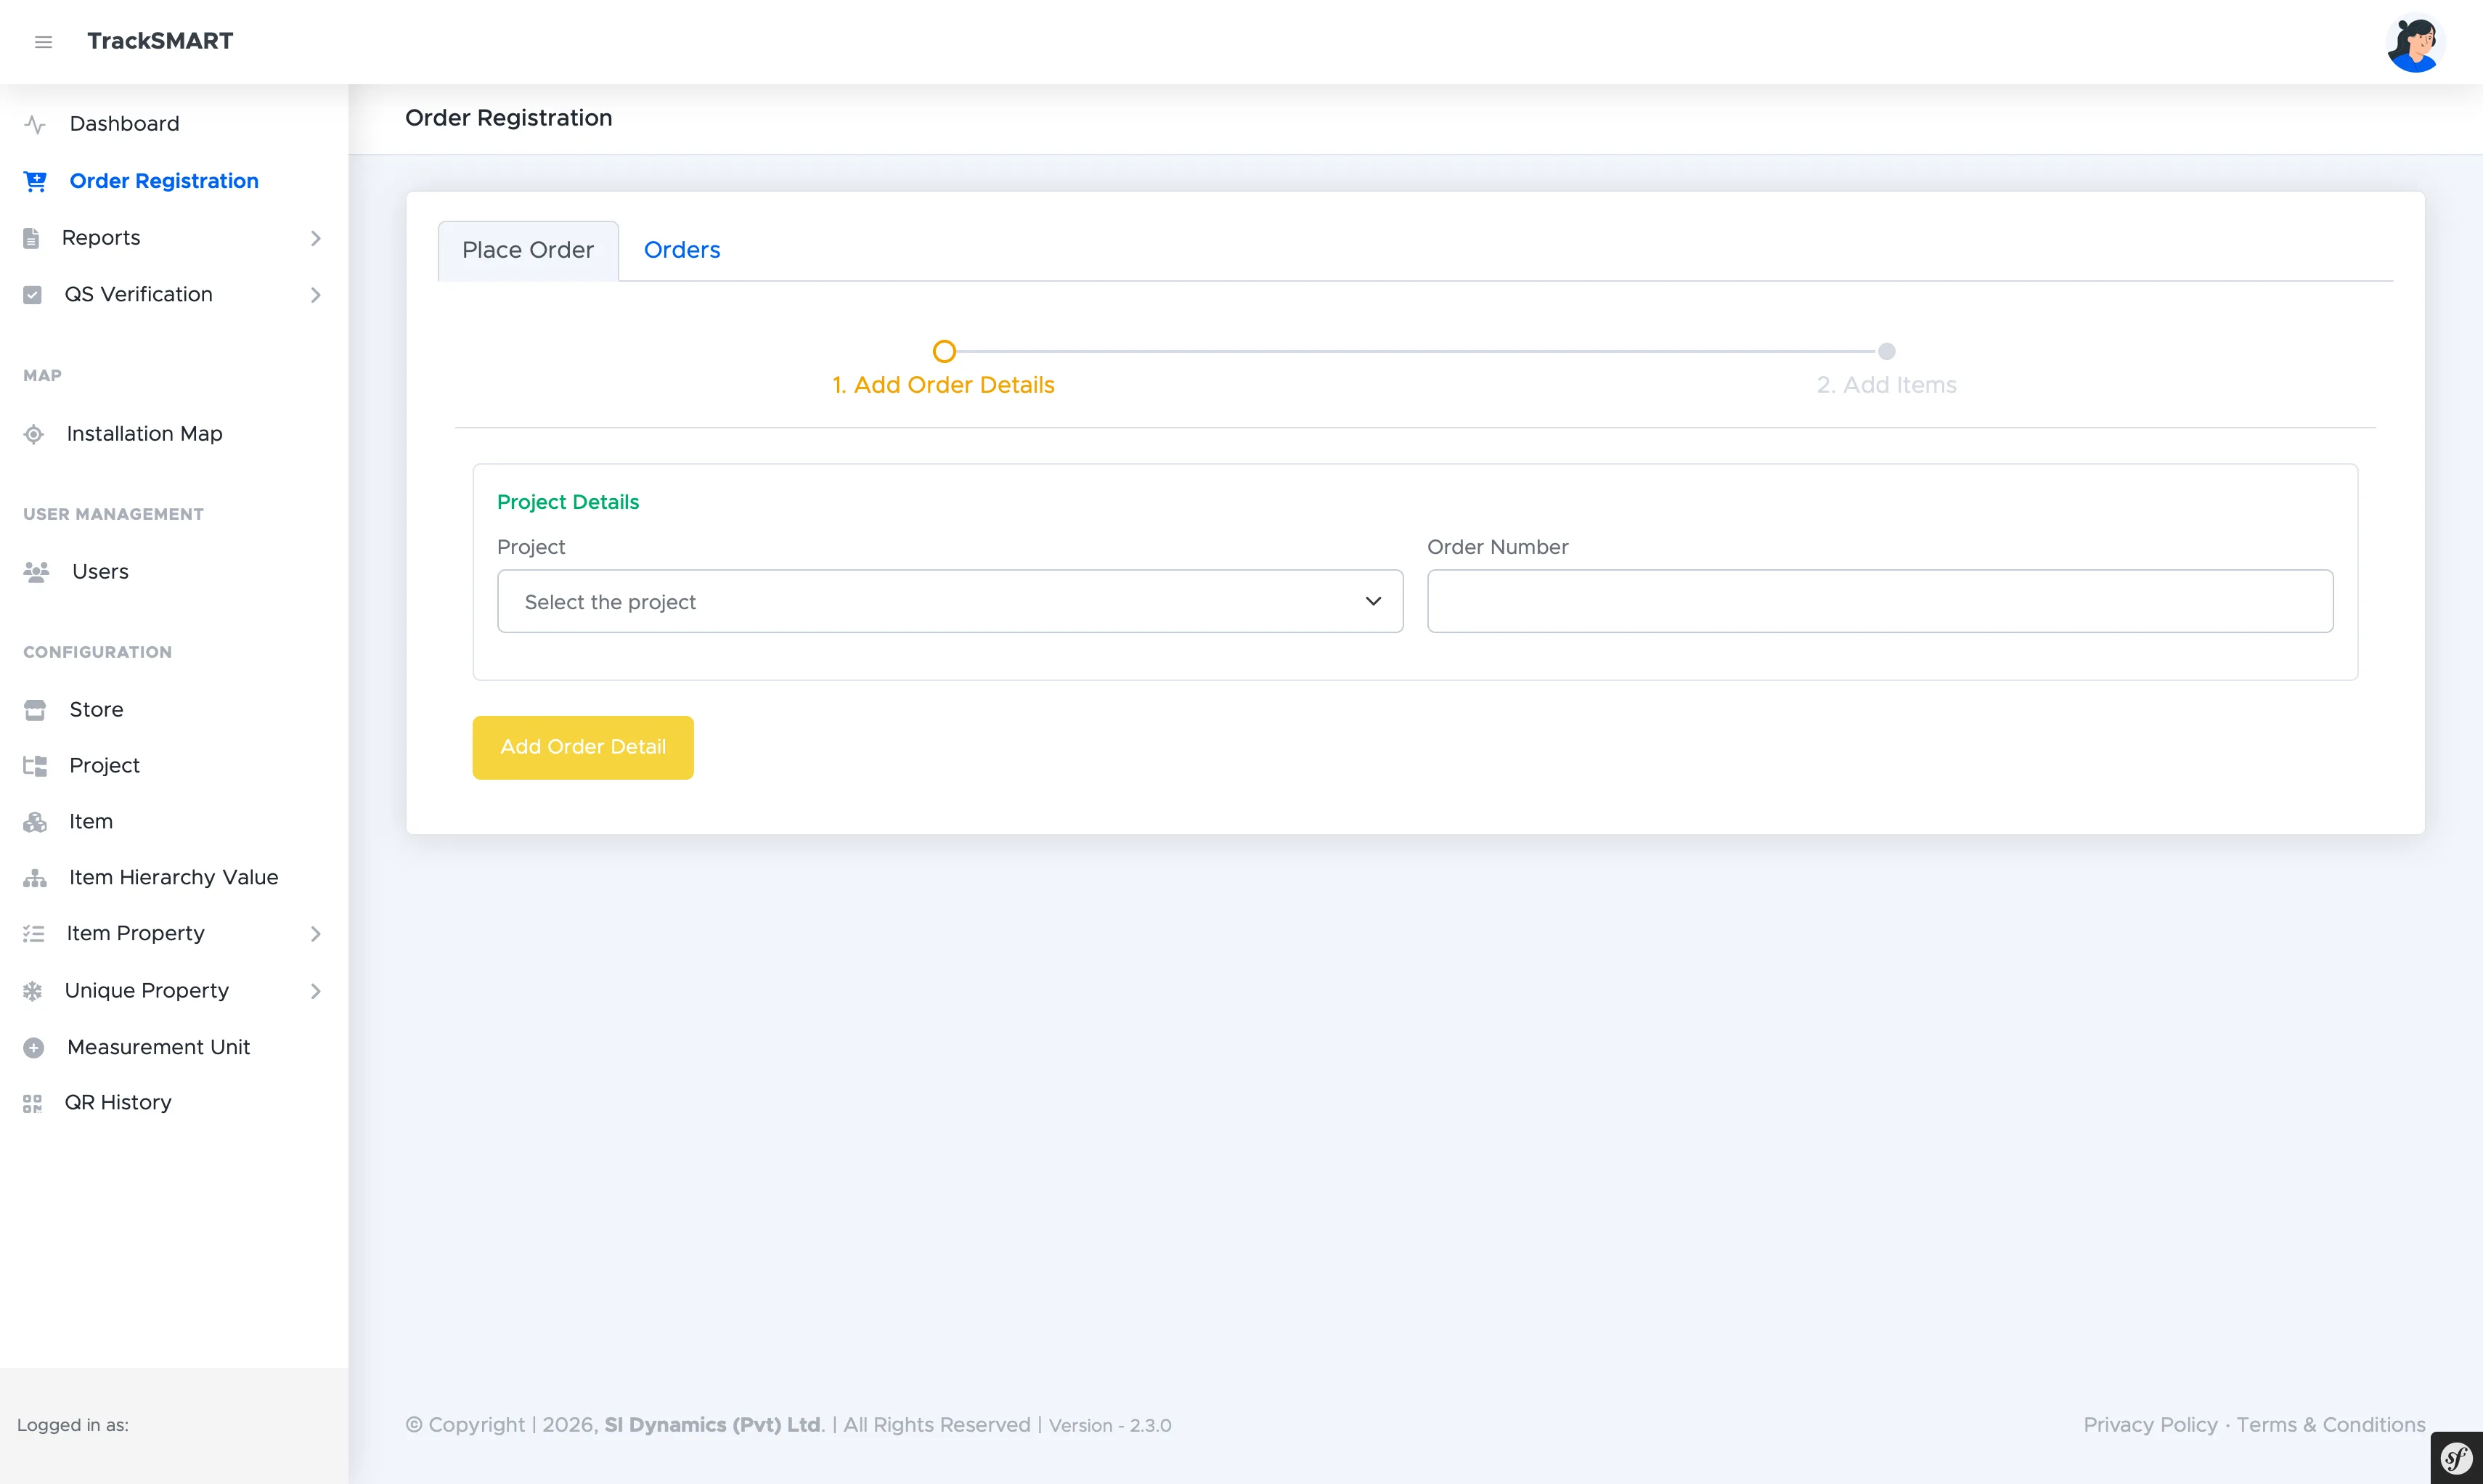
Order Registration starts the physical chain of custody. An administrator selects the destination project, assigns an order number, then adds the line items being dispatched to site. The moment the order is saved, it becomes receivable on the storekeeper's mobile app.
app.tracksmart.lk
Place Order, step 1 Add Order Details: project selection and order number.
1Open Order Registration and stay on the Place Order tab.
2Step 1 Add Order Details: select the Project and enter the Order Number.
3Click Add Order Detail to create the order header.
4Step 2 Add Items: add each catalog item and quantity travelling under this order.
5Save the order. It is now visible to the storekeeper under mobile Receive Order.
Reviewing Dispatched Orders
The Orders tab is the dispatch audit trail.
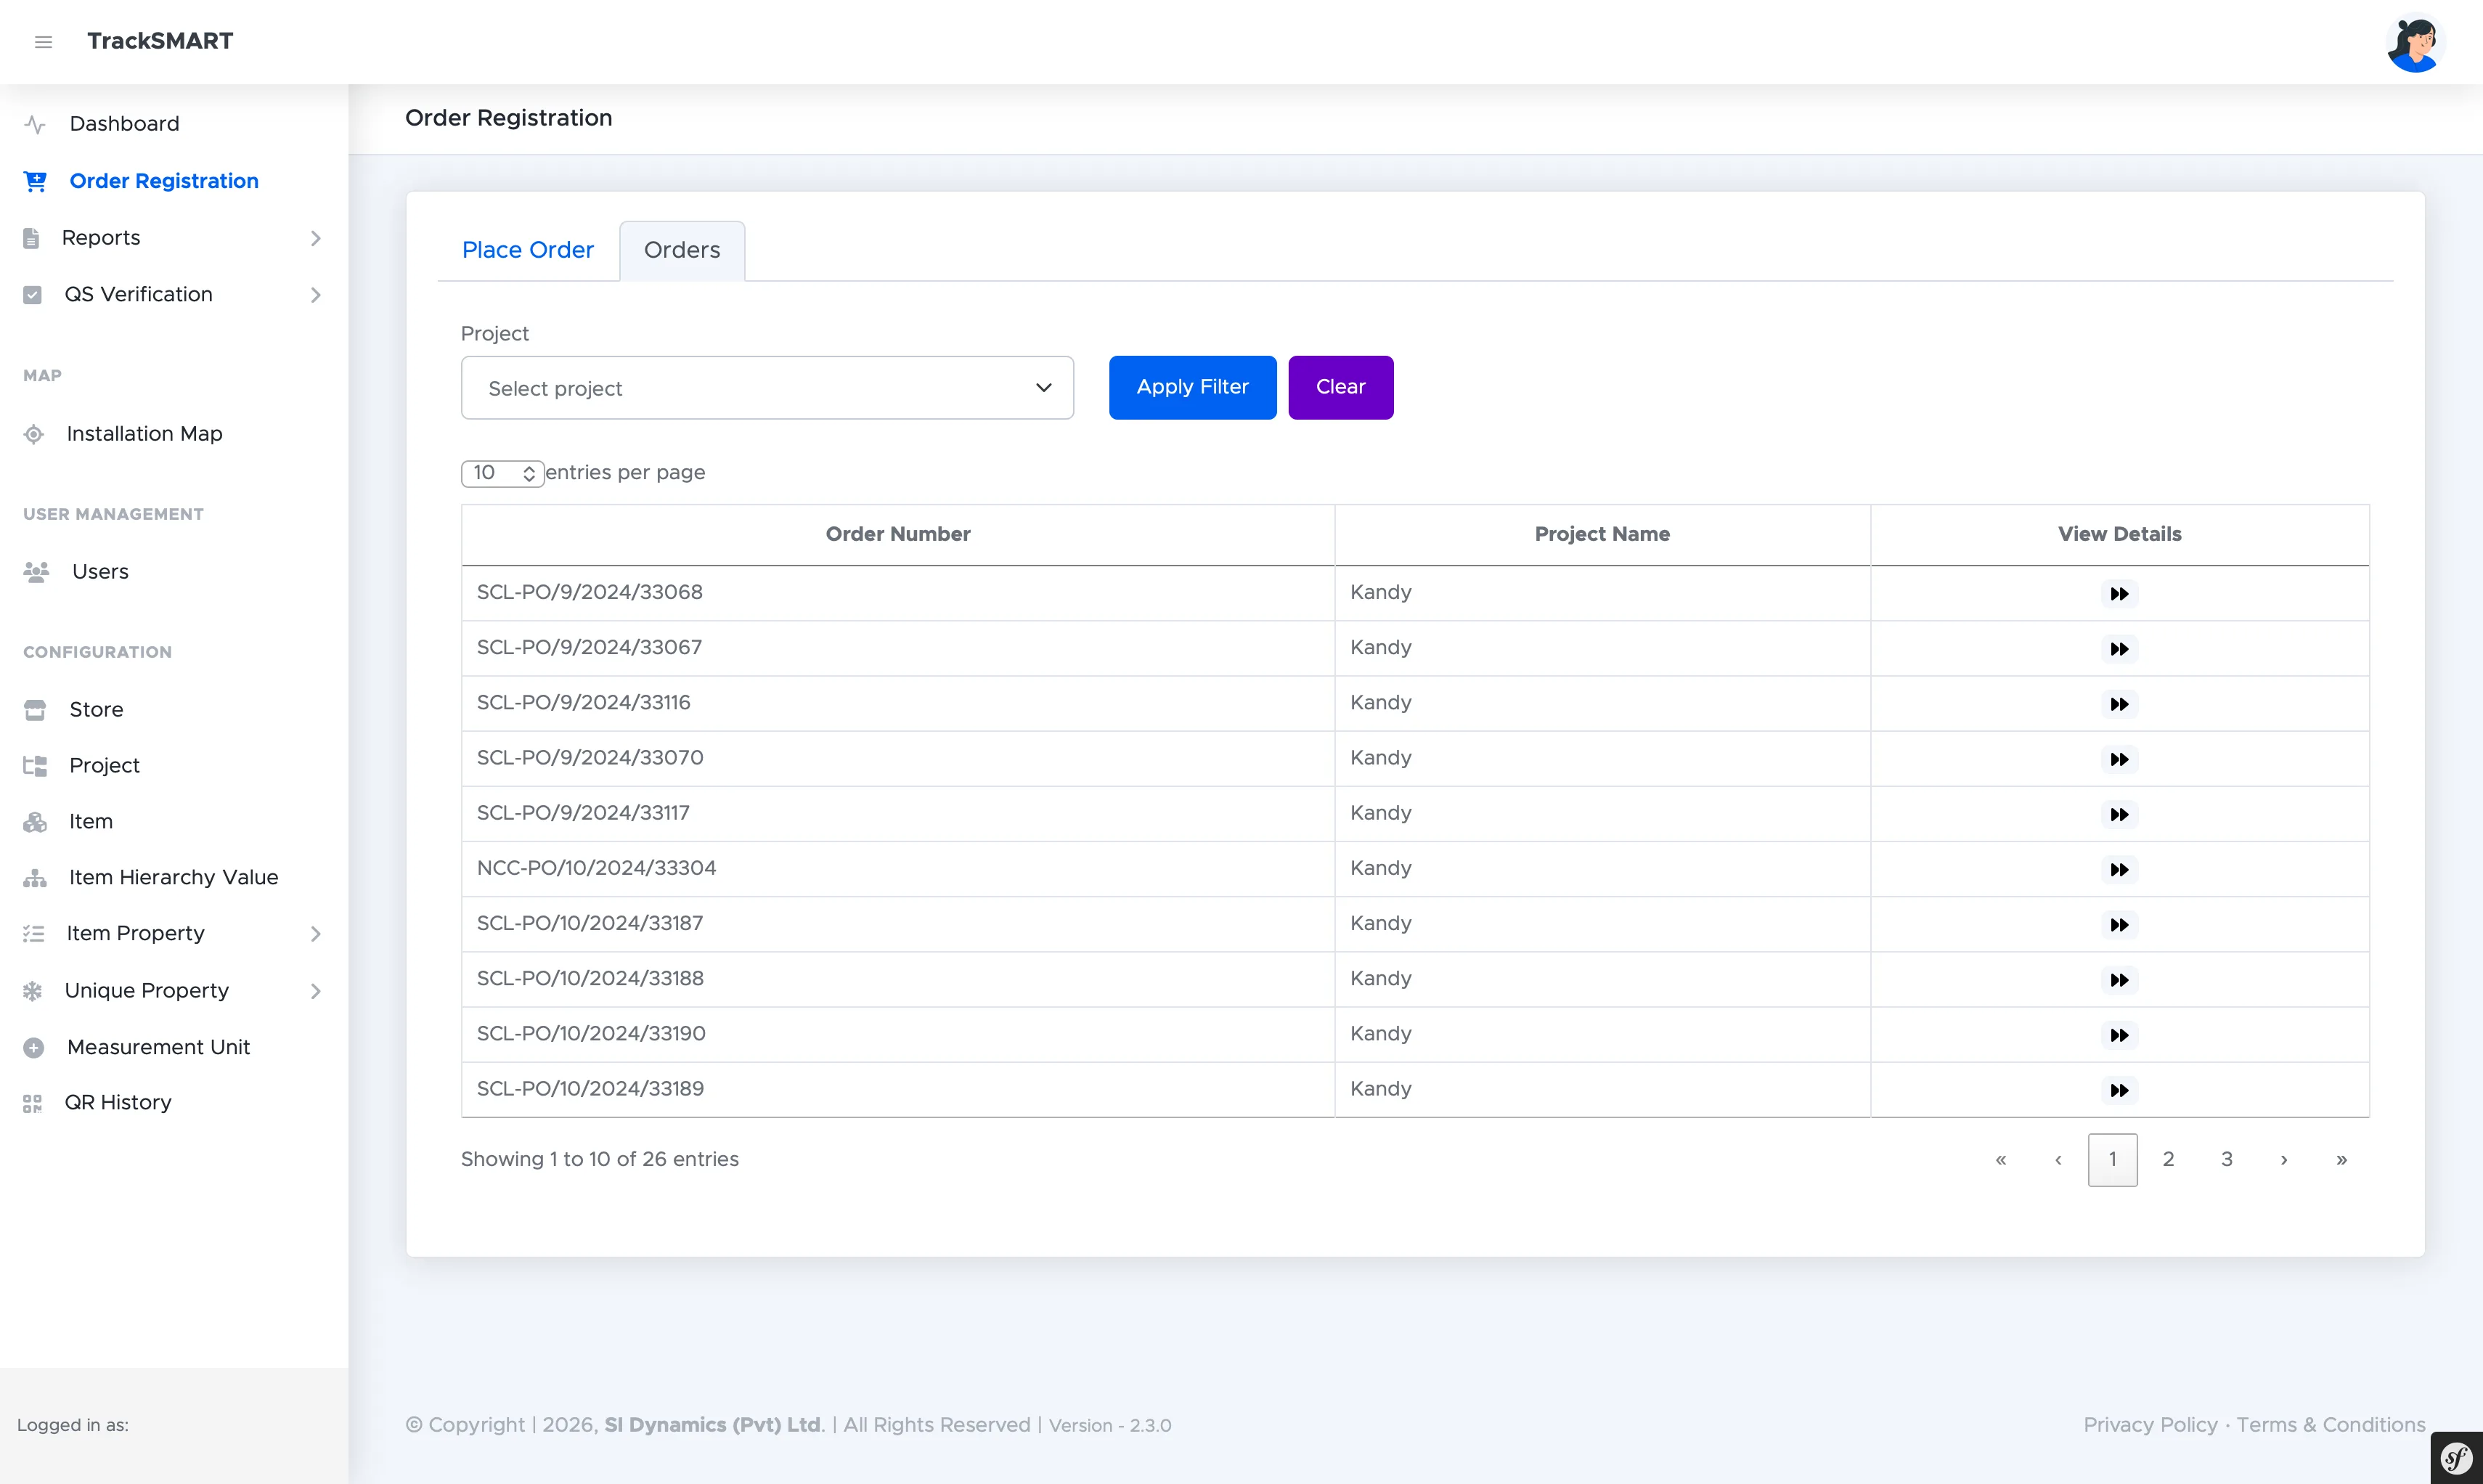
The Orders tab lists every dispatch with its order number and project (e.g. SCL-PO/9/2024/33068 for Kandy). Filter by project, page through the register, and open View Details on any row to inspect its line items.
app.tracksmart.lk
Orders: project filter plus order numbers, project names, and detail drill-ins.
Mobile handover: receiving shipments→
TrackSmart Mobile Operations ManualModule 6 of 15
Module 07 : Web AdministrationTS-REF #107
Tracking, Map & Reports
Live oversight from the office: project-wise installation map, per-QR chain-of-custody history, and filtered stock and progress reports.
Project-Wise Installation Map
Every geo-tagged installation plotted on a live map.
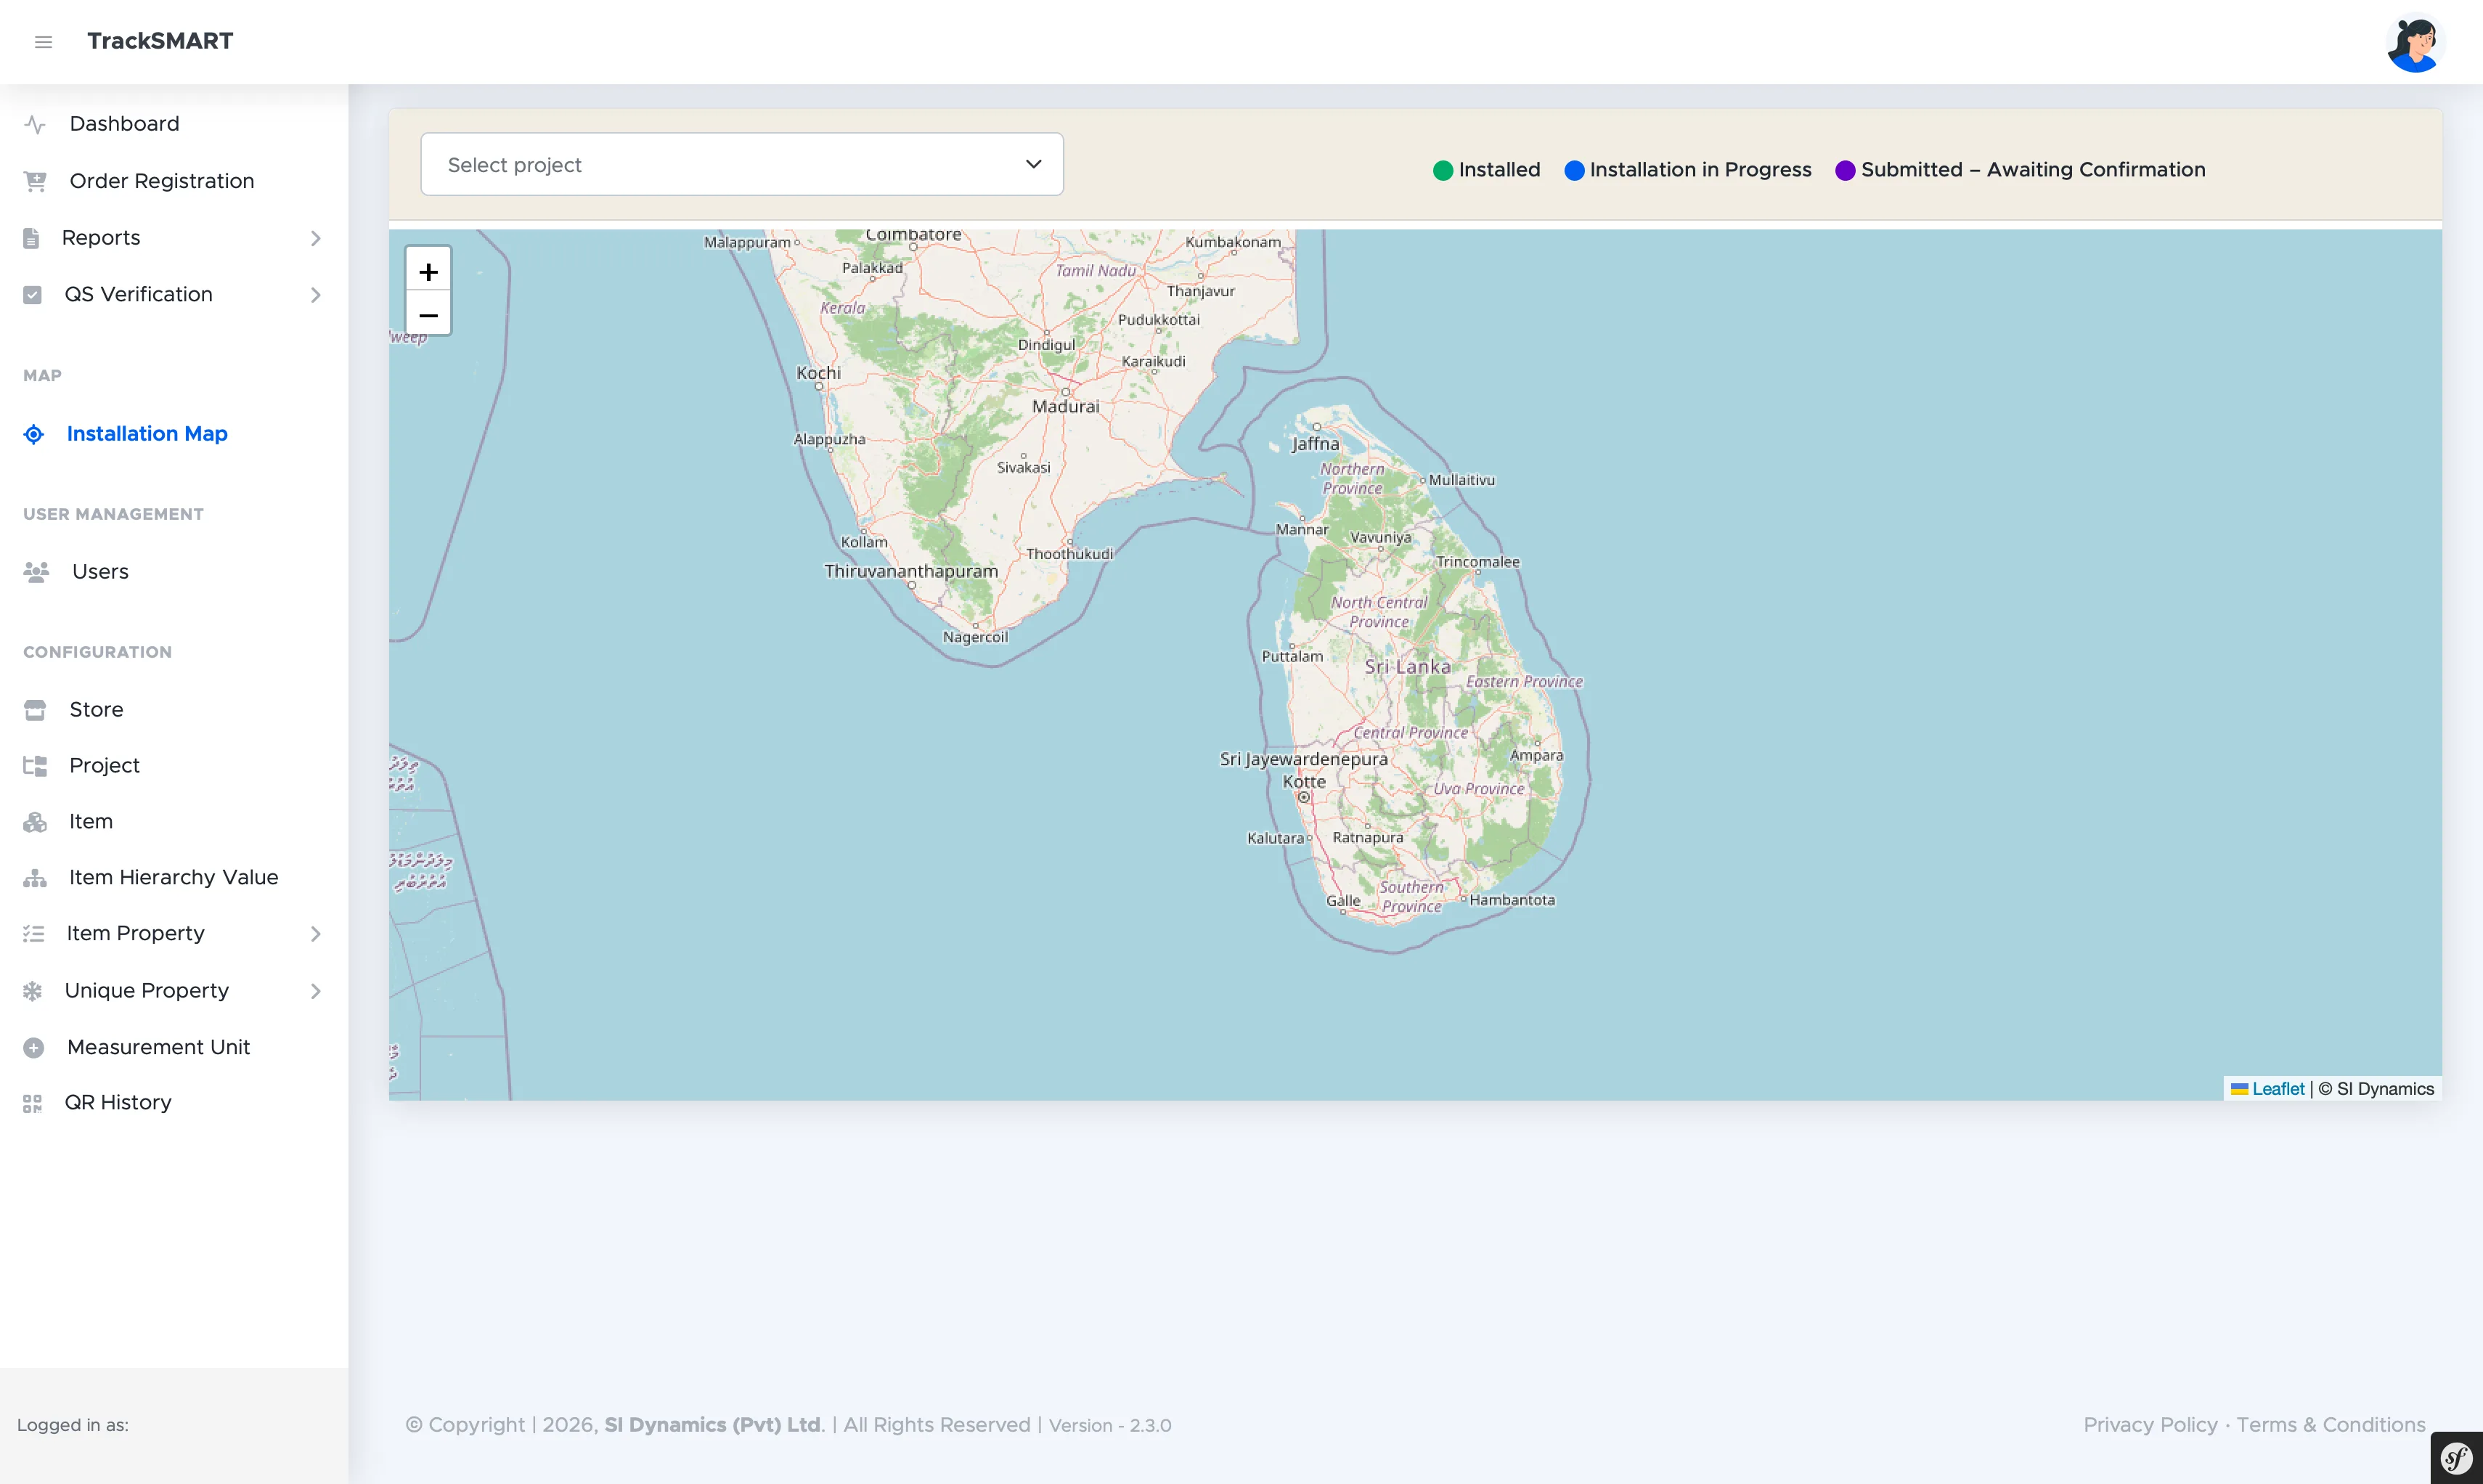
Installation Map (MAP section) renders all supervisor-recorded GPS positions on a Leaflet map. Pick a project from the selector and read status straight off the legend: Installed, Installation in Progress, or Submitted – Awaiting Confirmation.
app.tracksmart.lk
Installation Map: project selector plus Installed / In Progress / Awaiting Confirmation legend.
QR History & Chain of Custody
The full journey of any serialized asset.
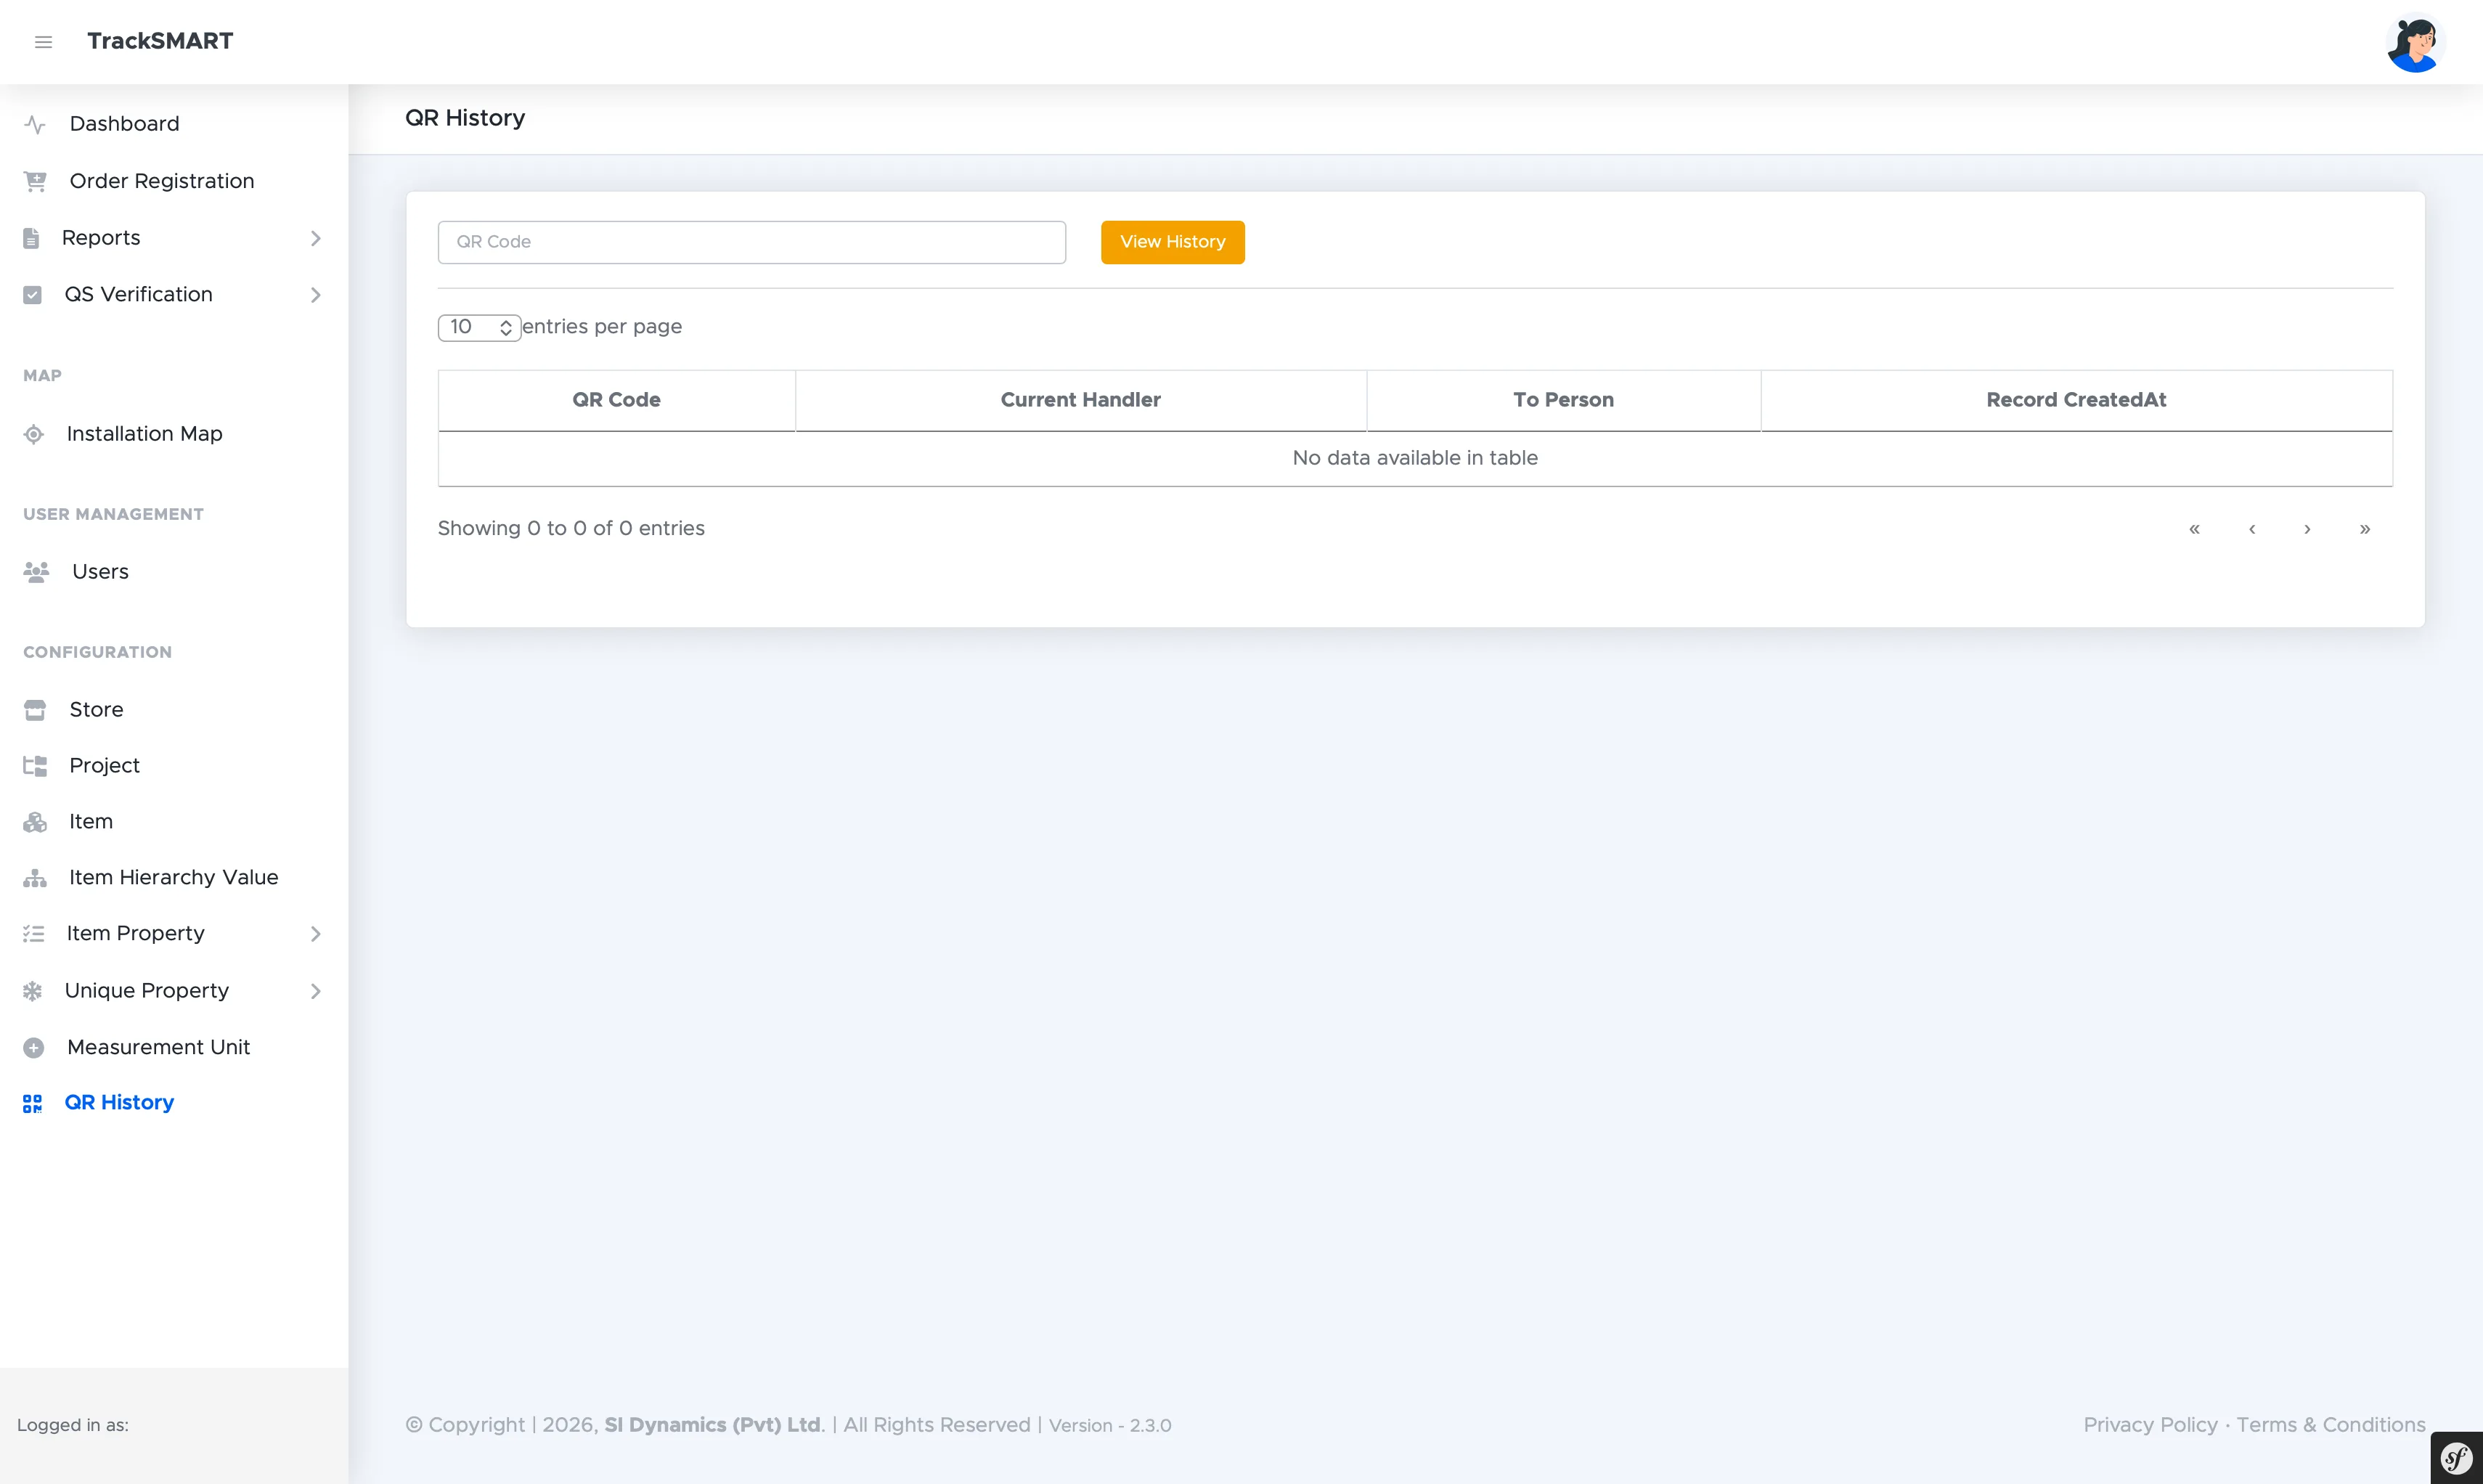
QR History (CONFIGURATION > QR History) answers who had an asset and when. Enter a QR code, click View History, and the table reconstructs every handover: the QR code, the Current Handler, the person it moved To, and the Record CreatedAt timestamp for each hop.
app.tracksmart.lk
QR History: look up a code to replay its handler-to-handler journey.
Viewing Reports
Filtered stock and progress reporting with download.
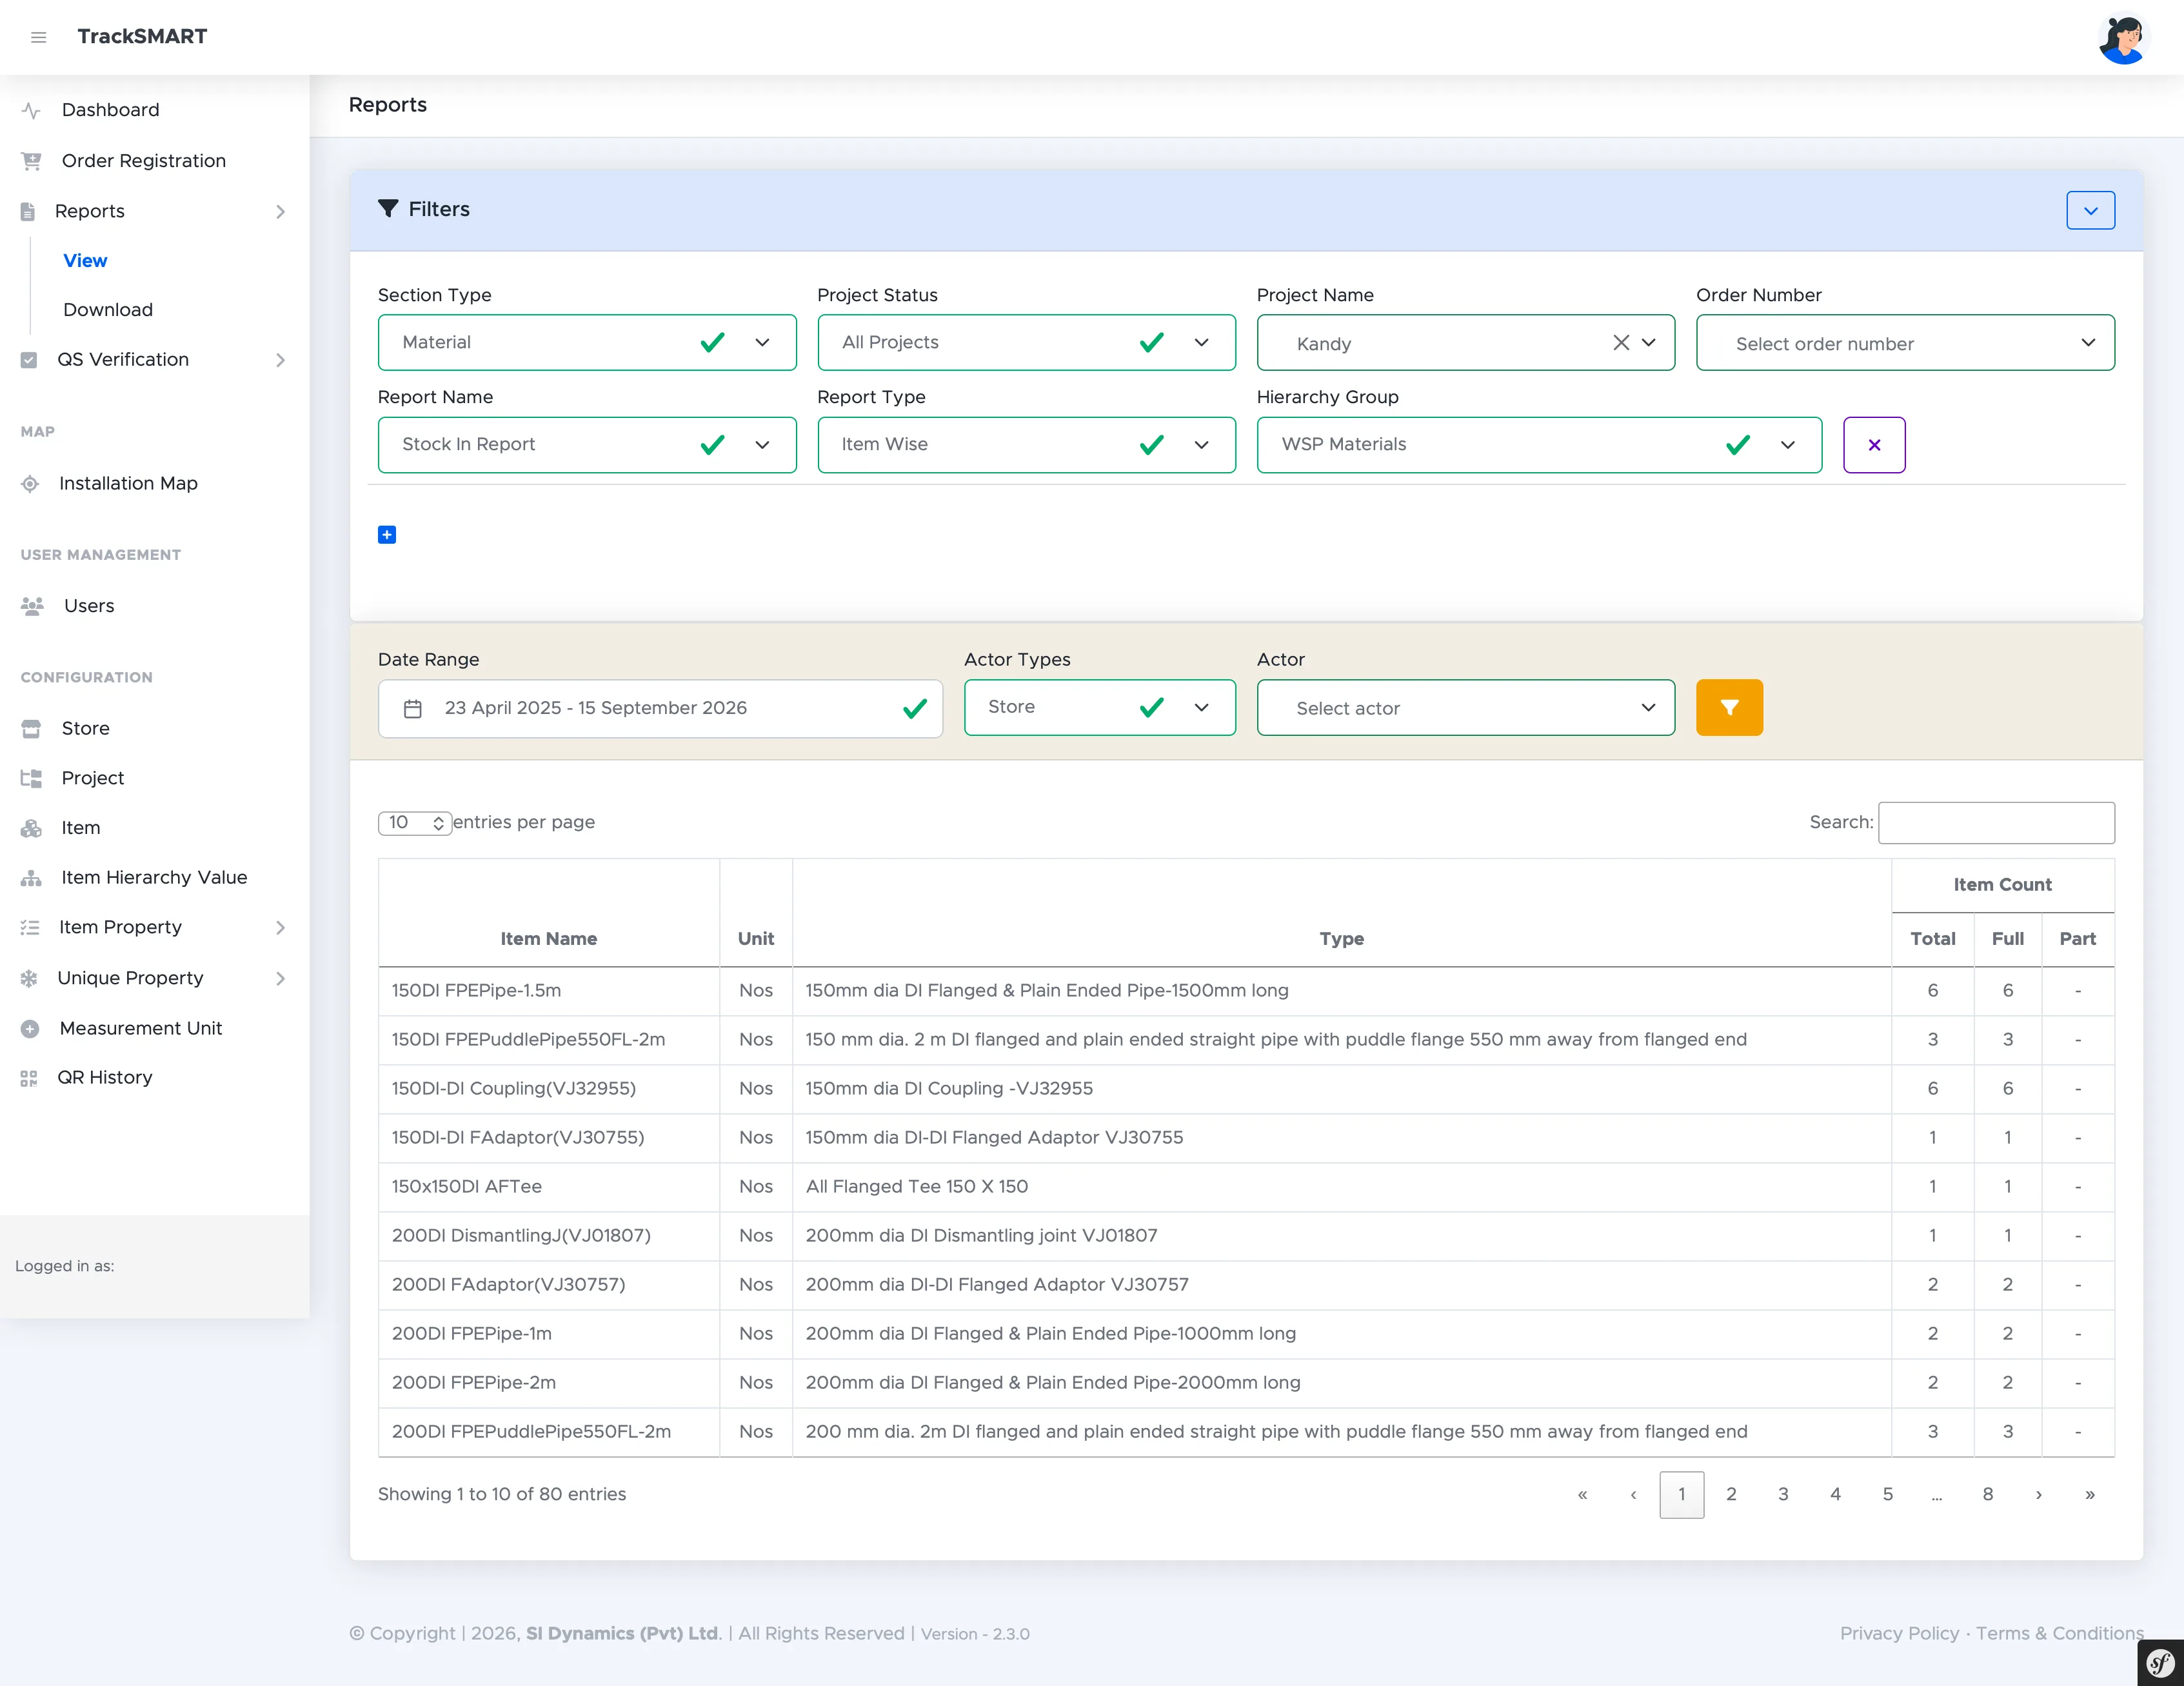
Reports > View is the analytical core: two filter bands narrow any question. The top band fixes scope (Section Type, Project Status, Project Name, Order Number, Report Name such as Stock In Report, Report Type such as Item Wise, Hierarchy Group). The second band fixes time and actor (Date Range, Actor Types such as Store, and Actor). Results tabulate Item Name, Unit, Type, and Item Count split into Total, Full, and Part columns.
app.tracksmart.lk
View Reports: scope and actor filters above an item-wise stock table.
TrackSmart Mobile Operations ManualModule 7 of 15
Module 08 : Web AdministrationTS-REF #108
QS Verification
Quantity Surveyor sign-off: reviewing submitted field installations, verifying accurate work for billing, and rejecting defective submissions back to the field.
Pending Verifications
The QS work queue for submitted installations.
Every supervisor installation synced from mobile lands here under QS Verification > Pending Verifications. Filter the queue by Installation Code, Supervisor, or Date Range, then open any Installation Code card — showing date, time, supervisor, and project — with Verify Now to inspect measurements, photos, and GPS evidence before deciding.
app.tracksmart.lk
Pending List for Verification: filterable installation cards with Verify Now actions.
Rejected Installations
Defective work sent back with reasons.
Installations that fail inspection move to Rejected Installations. Each card pairs the original Installation Code with its Rejected Code, supervisor, and timestamp. Opening a card via View reveals the QS rejection reason so the field crew knows exactly what to rectify and resubmit.
app.tracksmart.lk
Rejected Installations: installation and rejection codes with View for reasons.
Verified Installations
Certified work ready for progress billing.
Approved work lands in Verified Installations, pairing each Installation Code with its Verified Code. These records are the certified source of truth for Quantity Surveyor sign-off, measurement, and progress payment claims.
app.tracksmart.lk
Verified Installations: installation and verified codes forming the billing source of truth.
Field side: how installations get submitted→
Field side: Stock Out issuing that precedes installation→
TrackSmart Mobile Operations ManualModule 8 of 15
Module 09 : Storekeeper OperationsTS-REF #109
Stock In: Deliveries & Returns
Comprehensive procedures for the Storekeeper Stock In module: scanning arriving shipments, checking in supervisor returns, and reviewing inbound transaction records.
Stock In Overview
Navigating the storekeeper Stock In sub-menus.
The Stock In module is the entry portal for all physical assets into the project store. Whether receiving a high-capacity delivery from an external supplier or receiving a returned drill from a field supervisor, every item must be scanned into store inventory.
Stock In Options: Receive Order, Receive Returned, and Stock In Records.
Receiving Project Shipments (Receive Order)
Accepting materials dispatched from the central web platform onto the construction site.
When an administrator assigns a purchase order or material batch to a project on the web app, it appears in the mobile app under 'Receive Order'.
Reviewing delivery orders and scanning items into project store inventory.
1From the Stock In menu, tap Receive Order.
2Select the active delivery consignment or manifest assigned by the web administrator.
3Aim the device camera at each arriving material's QR code. The app validates the QR against the order manifest.
4Confirm quantity and physical condition. If any items are broken or incorrect, select 'Reject / Return to Supplier'.
5Tap Complete Receipt to finalize. All scanned items are instantly added to the physical store's active inventory.
Receiving Returns from Supervisors
Checking in reusable tools or unused materials returned from the jobsite.
When supervisors finish using temporary equipment (such as rotary hammer drills, grinders, or extension cables) or bring back surplus materials, the Storekeeper processes them under 'Receive Returned'.
Scanning returned supervisor assets back into the store.
1Tap Receive Returned from the Stock In menu.
2Scan the QR code on the item presented by the returning supervisor.
3Verify the supervisor's identity on screen. The system displays who checked out the item and when.
4Inspect the tool or material for damage. If functional, confirm the return.
5The item is deducted from the supervisor's Virtual Store and returned to the physical store inventory.
Stock In Transaction Audit Records
Reviewing historical inbound transactions.
The Stock In Records screen provides an immutable audit log of every receipt transaction executed by the storekeeper.
Filterable audit log of all received orders and supervisor returns.
Filter records by date range, delivery order number, or returning supervisor.
Tap any transaction to inspect individual QR serial codes, item descriptions, and timestamps.
Export or sync data directly with central jobsite reporting.
TrackSmart Mobile Operations ManualModule 9 of 15
Module 10 : Storekeeper OperationsTS-REF #110
Stock Out: Issuing Assets
Procedures for issuing consumable construction materials and reusable tools to field supervisors with strict personal accountability.
Stock Out Overview
Understanding the material issuance workflow.
Stock Out represents the discharge of materials or tools from the physical store to the field. Under TrackSmart protocol, items are never released to an anonymous crew; they must always be issued directly to an authorized Supervisor.
Stock Out Menu: Issue Materials and Stock Out Records.
Issuing Materials & Equipment
Step-by-step workflow for scanning and checking out assets.
Storekeepers can issue two categories of physical assets:
Consumable Materials: Pipes, fittings, cable trays, and building components intended for permanent field installation.
Reusable Tools & Plant: Power tools, testing instruments, and safety apparatus that are expected to be returned after work completion.
Selecting recipient supervisor and scanning asset QR codes.
1From the Stock Out menu, tap Issue Materials.
2Select or scan the badge of the receiving Supervisor.
3Scan the QR code on each item being released from the store.
4Review the checkout list with the supervisor to confirm item descriptions and quantities.
5Tap Confirm Issue. The items are removed from warehouse inventory and queued for acknowledgment in the supervisor's Virtual Store.
Stock Out Audit Records
Auditing issued materials and active field custody.
The Stock Out Records screen maintains a complete timeline of all issued assets, identifying who authorized the release and which supervisor holds current custody.
Audit trail detailing item issuances, recipient supervisors, and timestamps.
TrackSmart Mobile Operations ManualModule 10 of 15
Module 11 : Storekeeper OperationsTS-REF #111
Damaged Stock Management
Identifying, recording, and quarantining damaged materials and broken tools to prevent deployment and trigger warranty or replacement workflows.
Damaged Stock Protocol
Why rapid damage logging is essential on construction sites.
Damaged materials and faulty equipment pose safety risks and cause expensive delays. TrackSmart provides a dedicated 'Mark as Damaged' workflow that immediately flags the item across the entire platform and removes it from active circulating inventory.
Accessing the Mark as Damaged module from the Storekeeper home screen.
Logging Damaged Assets
Scanning QR codes and recording damage descriptions.
Storekeepers can flag items returned from the field in poor condition, or items damaged during transit and warehouse handling.
Scanning QR code, selecting failure category, and recording condition notes.
1Tap Mark as Damaged from the main navigation.
2Scan the QR code of the damaged tool or material.
4Enter detailed remarks regarding the cause of damage and physical condition.
5Tap Submit Damaged Record. The asset status switches to 'Damaged / Quarantined' and cannot be issued to supervisors.
TrackSmart Mobile Operations ManualModule 11 of 15
Module 12 : Supervisor OperationsTS-REF #112
Virtual Store & Dashboard
Understanding the Virtual Store concept: personal asset balances, custody accountability, and navigating the supervisor field interface.
The Virtual Store Concept
How individual supervisor custody works in TrackSmart.
In traditional construction sites, materials frequently go missing because items enter a shared 'black hole' once they leave the warehouse. TrackSmart eliminates this through the Virtual Store.
Every Field Supervisor has a personal digital 'Virtual Store'. When a supervisor checks out pipe joints, cabling, or power drills from the Storekeeper, those assets are credited directly into that supervisor's Virtual Store. The supervisor remains legally and operationally responsible for those items until they are marked as installed on site, transferred to another supervisor, or returned to the warehouse.
Supervisor Dashboard: Real-time overview of Virtual Store balances and primary operations.
Supervisor Dashboard Modules
Overview of the primary field modules available to supervisors.
Stock In: Scan and accept items issued from the central store into your Virtual Store.
Stock Out (Transfer & Return): Transfer tools/materials directly to peer supervisors or return surplus items back to the Storekeeper.
Installation: Scan installed items, record precise GPS coordinates, and submit them for QS verification.
Records & History: Instant access to all inbound, outbound, and installation receipts.
TrackSmart Mobile Operations ManualModule 12 of 15
Module 13 : Supervisor OperationsTS-REF #113
Stock In: Receiving Assets
Acknowledging and receiving materials and tools issued by the Storekeeper into your personal Virtual Store.
Receiving Issued Stock
Taking official custody of materials from the storekeeper.
When a Storekeeper executes a Stock Out issuance to you, those items are pending your physical acknowledgment. Tapping 'Stock In' opens the module to verify and accept custody.
Supervisor Stock In: Receive and Stock In Records.
Scanning & Acknowledging Assets
Verifying physical items against the checkout list.
To accept items into your Virtual Store, scan each QR code to confirm that what is in your hands matches what was issued in the system.
Scanning item QR codes to confirm physical handover.
1From the Supervisor Stock In menu, tap Receive.
2Scan the QR codes on the materials or tools being received.
3The app confirms matching serial numbers and displays item specifications.
4Tap Acknowledge Receipt. The items are added to your Virtual Store balance.
Stock In Receipt History
Tracking what you have checked out over time.
Review past receipts, issuance dates, and Storekeeper details under Stock In Records.
Audit log of all materials received by the supervisor.
TrackSmart Mobile Operations ManualModule 13 of 15
Module 14 : Supervisor OperationsTS-REF #114
Stock Out: Returns & Transfers
Discharging assets from your Virtual Store: returning completed equipment to the Storekeeper or transferring custody peer-to-peer to other field supervisors.
Stock Out Options: Transfer vs Return
Choosing the correct discharge path for materials and tools.
When a supervisor no longer needs an item in their Virtual Store, there are two distinct discharge workflows available under Stock Out:
Supervisor Stock Out: Transfer, Return, and Records.
Transfer: Transfer custody directly to another supervisor working on the site without walking all the way back to the main warehouse.
Return: Return tools or surplus materials back to the physical warehouse Storekeeper.
Peer-to-Peer Supervisor Transfer
Sharing equipment and materials dynamically on the jobsite.
Example: Supervisor A is finished using a rotary hammer drill in Sector 1, and Supervisor B urgently requires it in Sector 4. Instead of walking the drill back to the warehouse for re-issuance, Supervisor A transfers it directly to Supervisor B.
Selecting target supervisor and scanning QR codes to transfer custody.
1Tap Transfer from the Supervisor Stock Out menu.
2Select the destination Supervisor from the active site personnel directory.
3Scan the QR code on the item being transferred.
4Confirm the transfer. Custody shifts immediately from your Virtual Store to the recipient supervisor's Virtual Store.
Returning Assets to the Storekeeper
Initiating warehouse returns for tools and surplus materials.
When work is finished and tools or uninstalled consumables are returned to the central store:
Supervisor initiating return of checked-out items.Full audit log of returns and peer transfers.
1Tap Return from the Supervisor Stock Out menu.
2Scan the items to be handed back to the Storekeeper.
3Present the items to the Storekeeper, who scans them via their 'Receive Returned' screen to finalize the discharge from your Virtual Store.
TrackSmart Mobile Operations ManualModule 14 of 15
Module 15 : Supervisor OperationsTS-REF #115
Field Installation & Sync
Recording on-site material installations: scanning QR codes, capturing GPS coordinates, offline local caching, and cloud syncing for QS verification.
Field Installation Workflow
Marking consumable materials as officially installed in the building structure.
When a supervisor installs a material (e.g. pipe joint, electrical panel, duct section) into the building, the installation must be recorded in TrackSmart. This action permanently discharges the item from the supervisor's Virtual Store and places it into the Quantity Surveyor (QS) verification pipeline.
Installation Module: New Installation and Ongoing Installations (Local & Synced).
GPS Geo-Tagging & New Installation
Recording location-verified installation events.
Accurate physical positioning is critical for as-built validation. Upon initiating an installation, TrackSmart requests high-precision device location access.
Select 'While using the app' with precise location enabled for accurate BIM mapping.Scanning installed material QR and entering location / drawing reference.
1From the Installation menu, tap New Installation.
2Ensure precise GPS location is permitted when prompted.
3Scan the QR code affixed to the installed material.
4Select the project zone, floor level, and drawing grid reference.
5Tap Complete Installation. The item is marked as installed and stamped with timestamp and GPS coordinates.
Offline-First Caching: Local vs Synced
Ensuring zero data loss in basements and signal dead zones.
Construction projects regularly involve deep basements, subterranean service tunnels, and remote zones with zero cellular connectivity. TrackSmart is built with an offline-first architecture to handle these conditions effortlessly.
Local tab: Installations saved securely in device storage while offline.Synced tab: Completed installations uploaded to the central server and ready for QS verification.
Local Queue: When offline, all installation scans, notes, and GPS coordinates are written to encrypted local storage. Supervisors can continue working without interruption.
Automatic Cloud Sync: Once the device re-enters cellular or Wi-Fi range, the background sync engine pushes pending records to the central cloud.
QS Verification Handover: Once synced, records appear on the Web Dashboard for Quantity Surveyors to inspect, measure, and certify progress payments.
TrackSmart Mobile Operations ManualModule 15 of 15